
Song Surgeon Version 4
User Guide for Windows
Click here to download the (Song Surgeon User Guide PDF)
The User Guide which follows covers all of the functions found in both the Standard and Pro models. It does not however, clearly delineate the differences between these two, because it is User Guide, not a features comparison document. We encourage you to review the Std. vs. Pro comparison page on our website to understand the differences between these two models. That page can be found here: http://songsurgeon.com/page/svsp.html
Mac OSx 11.X – 26.X

 Win 10 – Win 11
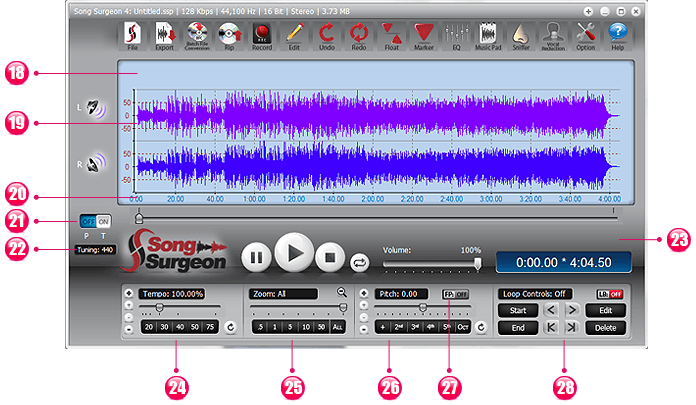
The user interface for Song Surgeon 4 looks largely to similar to Version 3. If you are a first time customer or a user of an older version of Song Surgeon (1 or 2) this user interface will be new. This User Guide (UG) is designed to walk you through all of the buttons and real estate on this user interface (UI) and explain what they are and what they do. This UG is designed to be used in conjunction with the Training Videos, which when used together will teach you how to use the software.

The UI is the same for both the Standard and the Pro version. Some of the buttons and functions we discuss herein will not be functional, and therefore are not applicable to you if you own the Standard version.
1. The details of the file that is currently opened in SS are displayed at the very top, left-hand side of the UI. This is an information display only.
2. The File button contains a number of options within it. They include the following:
2.1 Open File - This opens a windows dialog that enables you to select a file or browser to a location on your machine where audio files are stored.
2.2 Close File - This option closes the current audio file and returns SS to a "blank" condition.
2.3 Recently Opened Files - This option displays and allows you to select from the list of the last 10 files you had opened. Alternatively you can RIGHT CLICK the file button and this list of recently opened files will be displayed.
2.4 Open New Window - This option allows you to open additional SS windows at the same time. This is often used when you would like to cut/copy/paste data between or among multiple files.
2.5 Exit Program - This option closes SS and any associated windows.
2.6 Save Button - This option allows you to save the work currently open in SS in a SS Project file (.ssp). SSP files save all of the settings applied to the currently open file and then reapplies them when the ssp file is opened again.
2.7 Save Project As - Same as the Save Button, except this allows you to save the .ssp file with a different name.
3. Export Button - This button is used when you want to create a new audio file with your changes embedded in them. Here are the options displayed.
Entire Song - The selection of this option EXPORTS the entire contents found on the screen and applies all of the changes you have made to all parts of the audio file opened.
Current Loop - This selection exports only the currently selected loop (the loop with the progress indicator within it). All of the settings applied to this loop will be exported.
All Loops - Similar to the above, but it will export ALL loops and place them back to back, omitting any data that is between the loops.
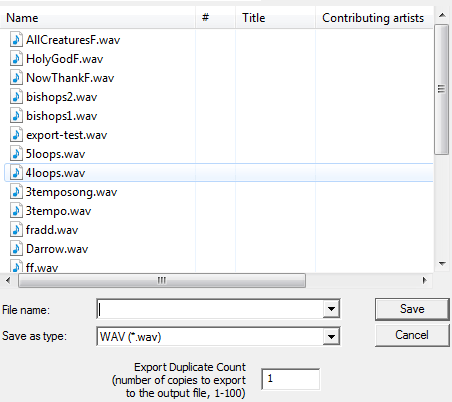
After selecting any of the above three options, you will be prompted to further select the file format, such as mp3, .wav, aac, m4a, etc. Depending upon the format, you may also be prompted to select quality settings.
In this same dialog shown at the right, you will see the Export Duplicate Count. This feature is set by default to one. However, if you change this to some other number, 3 for example, it will export whatever you have selected, make 3 copies of it, and place these back to back, all within the same audio file. This option provides a way to mimic the repetition achieved when a file is played in a loop within SS.
Portable Project File - This option is new in Version 4. It creates a Song Surgeon Project file that is portable (.psj file). This file can be moved to another machine, and when opened it will open the audio file associated with this project and apply all of the project settings to it. This is a large file because it contains a .wav audio data file within it.

4. Batch File Conversion - This is a new feature found in Version 4. It is a Pro only feature. What BFC allows you to do is to select any number of files, 1, 5, 50, or 5000.. and then select an audio file type as an output format, and it will begin processing and converting all of the files selected.
There are three main areas in this dialog. At the top you will select the file or files that you would like to convert. Once these files have been selected they will appear in the upper part of this window.
The second step is to choose the file type or format and bit rate setting (as applicable).
The last step is to choose the output directory or location. In other words, as the files are converted they will be stored in the location you select at the bottom of this screen.
Once you have made you selections, click the Convert button and the BFC will begin to convert the files you have selected. This is a tremendous time saver if you have a large library of files that you need to convert to a different audio file type.
5. The CD rip feature allows you to rip one, several, or all files from a CD. It also allows you to designate the output file type. Built into this function is a Look Up feature which, if selected, will automatically attempt to identify the tracks on the CD and if it finds a match will display the actual names of the songs, rather than use generic designations, such as Track 1, Track 2, etc.
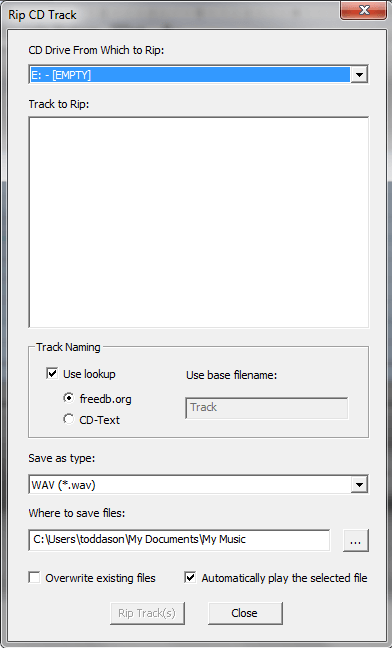
If you are using a commercially produced music CD we suggest you start by using the "Use Lookup" box checked in the Track Naming section of this window.
If this selection does not show you any information in the "Track to Rip" area, then uncheck this box and you should see the window populate with generic track designations like Track 01, Track 02, etc.
If the CD is NOT a commercial CD then it is best to deselect the "Use Lookup" box.
In the "Save As Type," you can choose a number of common audio formats.
In "Where to Save Files," a default file location will show you can alter this to meet your preferences. If this path is incorrect or set to a virtual folder you will see an error message that says "Destination Path Cannot be Found." In this situation, please click the button with three dots on the right side of this path and select a different destination folder.
At the bottom of the Rip window there is also an option to auto play the selected file. This is especially helpful if the Lookup feature has been unsuccessful in finding a match and all you have are Track designations appearing in the rip window. This feature allows to click on any track and it will begin to play the audio. This allows you to quickly determine whether the track being played is one of interest or not.
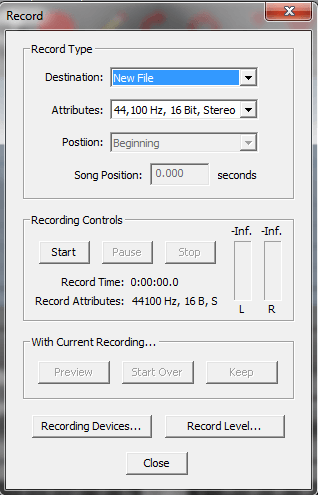
6. The RECORD feature is new to Song Surgeon Version 4. This feature allows you to record audio from a built-in microphone or any other external microphone plugged into your computer. Additionally, the Record feature can work with input device other than microphone. For example, if you have a digital turntable, you can plug it into SS and SS can record the audio input from your old LP's. One other type of recording that SS can do is record the audio from your computer's sound card. What is that? That means that any audio your computer is playing you can record. For example, if you find a video that SS sniffer module cannot detect and download, you could play the video back and record this playback. This will allow you to copy the audio and save it.
At the top of this window the first option is the "Destination." New File is selected by default, which means it will create a new file and load it into a new window of SS. The other option is Current File. If this option is chosen, the recorded audio will be inserted into the currently open Song Surgeon window. When this option is chosen, the Position drop down will be activated and you can choose to have this recorded data inserted at the beginning, end, a specified time, or at the location of the progress indicator.
The Attributes drop down is set by default to 44,100 and 16 bit stereo. This is Standard CD quality audio. We recommend you use this setting unless you specifically know that you need other specification.
You can start, stop and pause recording at any time. Once you Stop a recording you have three options:
1) You can preview it to decide if you want to keep it or not;
2) You can Start Over which means it will delete the data recorded; or
3) You can Keep which will insert the recorded data into Song Surgeon for you to use.
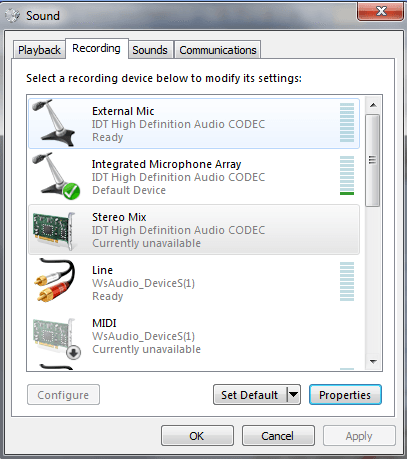
At the bottom of this window are buttons for Recording Devices and Record Level. Both of these buttons will take you to your system audio settings. For the Recording Devices button, you will want to select the recording device you want to use. This may be a microphone, it may be your sound card, or it may be an external device like a digital turntable that you have connected to your computer.
1. When you record in Song Surgeon you MUST choose a device that is found in the Recording
Tab.
2. You must select this device and then you must set it as the default.
3. If you have other active devices you may need to disable them to allow you to record a
good quality recording.
In the picture to the right you can see the stereo mix is highlighted and selected as the default. This means we will be recording the system audio... in other words whatever is heard over you computers speakers will be recorded.
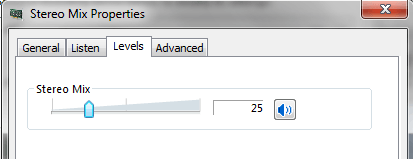
Record Level will open your system audio settings. Once you have selected a recording device, you can then from there select the Device you want to use for recording. You can select its properties and then adjust the recording level. A picture of what en/view/img this looks like on a Win 7 machine is shown to the right. Please note it is very important that you reduce the volume enough, so you don't cause clipping (distortion) in the audio you are recording. The level meters that are found in the recording dialog window will give you an approximate idea; however, we recommend you do a dry run of a few seconds, keep it, and then once it opens in SS you will be able to more easily see the levels and make further adjustments if necessary. Since SS can easily increase the volume of recorded audio, it is best to err on the low side, making sure that whatever you record does not clip. Distortion from clipping cannot be removed in SS; however, low volume recording can be amplified using the change volume settings in the Edit function of Song Surgeon.
Most computers have multiple recording devices installed - and every computer is different. We cannot, in this User Guide, illustrate all possible options, so if you want to use this function, please know that you will need to spend a significant amount of time experimenting until you get the correct settings for YOUR computer. Please see the training video on recording for additional details; this can be accessed through the Help Button on Song Surgeon.
A final note: Some computers may not be able to record system audio because they don't have a sound card that will allow this. This is more common on older computers with older operating systems. There is at least one work around for this and it can be found in the Knowledge Base of the Help Desk for Version 4 by searching for Recording.
7. Edit - Before you can execute any of the Edit functions, you must first select an Edit area. This is done by holding your left mouse button down and dragging your mouse in the Wave Form area. This will begin highlighting that area of the wave form file and continue until you release your mouse button. You can adjust the placement of this highlighted area by grabbing it at the beginning or end of this selected area and moving it. To deselect a selected edit area, tap the Escape key on your keyboard.
Once you have selected an area to edit, click the Edit button and open the Edit menu. The following selections are available. (There are also keyboard shortcuts for these). The use of the editing commands Paste and Insert Silence are done not by selecting an area of the wave form file as described above. Rather, these commands are executed using the progress indicator as the insertion point from which data is pasted or silence is inserted.
You can cut, paste, and copy within the same instance of Song Surgeon, or you can open multiple instances and cut, paste, and copy between them. This new version has a built-in automatic converter that will detect mismatches of frequencies and bit depth when you are attempting to paste, and automatically convert these to match the destination file to allow you to execute this operation.
Cut - This deletes the highlighted section but place a copy of it on your clipboard.
Copy - This copies the highlighted section to your clipboard.
Paste - This copies what is on your clipboard into the wave form file by inserting it at the current position.
Delete - This deletes the highlighted section.
Insert Silence - This inserts silence -- of a length you specify -- into the wave form file at various positions
Silence Highlighted Section - Choosing this option AFTER selecting a portion of the wave form file will silence the selected area.
Change Volume - This allows you to increase or decrease the volume of the selected section of the wave form.
Fade In / Fade Out - By selecting an area of the wav for data and then selecting one of
these two options, the volume of the wav data selected will be gradually increased (Fade in) or
decreased (Fade out) to allow smooth entrances and exits to audio segments.
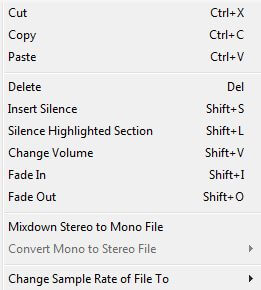
Mix Down Stereo to Mono - This option will take the stereo file open in Song Surgeon and combine it to one, thereby creating a mono file. There are two options. If you select a portion of the data on the screen, SS will mix down ONLY the selected portion. If you do not select any of the wav data, SS will mix down the entire audio file that is opened.
Convert Mono to Stereo - This option allows you to create a stereo track with 2 channels from a mono track that only has one channel. When this option is selected, a submenu opens which allows you to use the mono data in one of three ways. You can place it in the left channel (with the right channel being blank), or the right channel (with the left channel being blank), or you can place it in both channels.
Change Sample Rate - Changing sample rate is the same thing as changing the frequency of a file. SS allows you to convert the file you have open to one of several other frequencies.
Click/Pop Removal - This effect can be used at any time but is primarily used when applied to audio that has been recorded from old vinyl or LP's. This removes the majority of pops or clicks associated with such audio.
8. Undo - This will undo your last action and will continue undoing as many as 10 previous actions. This undo encompasses all function found on SS including zooming as well wav form selection for editing.
9. Redo - The opposite of undo, it will reapply previous actions that you have undone.
10. Float/Fixed - This button toggles between float and fixed states of the progress indicator. In the fixed state, the progress indicator is centered in the wave form area, and the wave form data moves while it stays fixed. In the float state, the progress indicator moves or floats over the wave form data and the wave form data is fixed.
11. Marker - The Marker button, when clicked, inserts a marker at the current position of the progress indicator needle in the marker area above the wave form window. You can also insert a marker by left-clicking with your mouse in the marker area of the wave form window. Markers can be edited by hovering your mouse over the inverted blue triangle and right clicking. A menu will appear that will allow you to delete the Marker or change the name. Markers can be moved by hovering your mouse over them and then left-clicking and dragging the marker to a different position.
12. EQ - EQ settings can be designated for an entire song, or applied to a single loop or to each loops individually. These settings will be applied to any file that is EXPORTED from SS. The Standard version of SS has 9 band EQ. There are a small number of presets in the 9 band EQ and you can create new ones and delete these at any time. The Pro version of SS contains a 31 Band EQ.
With a thirty-one band graphic equalizer, each band covers one third of an octave (you can work this out from the fact that one octave represents a doubling - or, going the other way, halving - of frequency, and there are ten octaves between 20Hz and 20kHz: on a 31-band graphic there are three steps between each doubling of frequency). This EQ configuration provides a great deal of control over frequencies and therefore over the sound you hear. This sophisticated EQ configuration is very useful to musicians or people that transcribe music, as it allows them to diminish unwanted sounds and to enhance others.
In Song Surgeon Pro, this 31 band EQ comes loaded with more than 60 presets that have been custom-built on an instrument basis. The list of instruments is not comprehensive, but we have included the most commonly played instruments in this list of presets. For each instrument, we have a preset designed to enhance that instrument as well as diminish that instrument. These are not perfect, as every song has a different mix of instruments and frequencies and, not only will one size not fit all, EVERY song is likely to require customization of the EQ preset to best work for that song. Nonetheless, these EQ presets are helpful starting points. The Pro EQ allows you to create new custom presets and delete them. Unlike the Standard EQ, the 31 band found in Pro allows you to apply the EQ to either of the two stereo channels or to both.
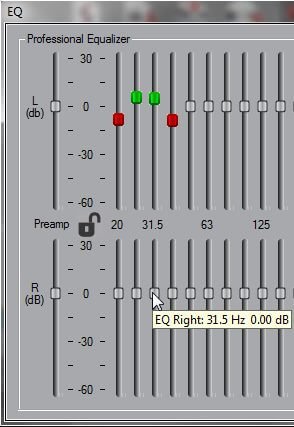
To make this EQ compact, we did not label all of the bands, but by hovering your mouse over any slider you can see what band it is for. Also notice here on the left side that we have a pre-amp that can be used to increase the volume. This is especially useful when you are cutting bands and you need to pump up the volume to hear the remaining frequencies.
Notice that the gain is +30Db and the cut is -60Db. Please note that if you increase the gain substantially it is likely that you will introduce clipping and distortion. Also note that if you cut a band significantly, you will reduce the volume substantially.
Notice the color coding -- when flat, the sliders are gray; when boosting, they are green; when cutting, they are red, and if they are turned OFF, they are BLUE.
There is a lock icon here in the middle. When turned off, you see sliders for both left and right channels, and these sliders can be moved independently. When locked, the bands for the channels move together and whatever you do to one, you do to the other. In the locked state, the EQ goes into a mini mode, and only one set of bands is visible and necessary for the locked channel adjustments.
Bands can be adjusted in several ways. The first way is by grabbing a slider with your mouse (left click) and moving it up or down. A second way is to click or click and hold down the mouse in the groove for that EQ band -- it will move incrementally up or down. If you want to move multiple sliders at once, you can right-click and drag your mouse across a series of bands, and the sliders will move to the location of your mouse drag.
Lastly, for fine tuning, you can select bands by holding down the control key + clicking with your mouse on a band. You can select one or multiple bands. Once you have selected the EQ bands of interest, you can then nudge them up or down (for fine tuning) using your up and down arrow keys.
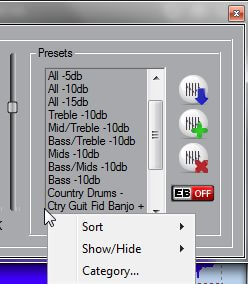
The last area to review regards the presets. System presets cannot be modified or erased. However, you can create new presets based upon the existing ones by selecting a preset, modifying it to meet your needs, and then saving it with a new name. To create a new preset, you click the button with the green + sign, give it a name, and the click okay -- this will create a new preset. If you want to save this new preset permanently so that it stays in the list of presets, you must click the button with the BLUE arrow to save it. The delete button will allow you to delete ANY custom preset, but it will NOT allow you to delete System presets.
If you right click in this preset area you will see some additional selection appear. These selections will enable you to sort the list, or filter the list, so that you can get the group of presets on your screen that you would like to use. To refine your list further, you can also use the hide/view button to hide or remove presets from the visible list. Once you have refined your list of presets, you will need to click the SAVE button (blue arrow) to save this list of presets so it loads the next time you open SS.
Lastly we will discuss the EQ-B button (which is the EQ bypass button). If you have a song open and playing in SS and you have EQ applied to it, selecting the EQ Bypass and toggling it on will ignore the currently applied EQ and the song will continue playback with no EQ applied. Note that when you do this, the buttons become blue and inactive/you can't move them. When you toggle the bypass off, the EQ is again applied to the file and the buttons are re-activated.
EQ is a topic that can be very complicated. There are entire courses in college dedicated to it, so don't expect to master the use of this 31 Band EQ overnight. If you'd like to learn more about EQ, we refer you to this external site which provides an excellent overview: http://www.zytrax.com/tech/audio/equalization.html
13. Music Pad - Music Pad allows you to create and store text note, music tablature and conventional music notation. Whatever you create within Music Pad can be stored when you save an open file as a Song Surgeon Project file (.ssp). All of the contents in Music Pad will then be recalled when you re-open this project file at a later date.
Main Toolbar - There are three toolbars found within Music Pad. The main toolbar which appears below has the following functions.

A. This button toggles your screen back to the main Song Surgeon interface.
B. This button opens the music notation toolbar.
C. This button displays or opens the tablature toolbar.
D. This is a print preview button.
E. This is a print settings button.
F. This is the print button.
G. This is an undo button.
H. This is a redo button.
Music Notation Toolbar - Standard music notation is quite varied and quite complex. Music Pad allows you to create basic music tablature and gives you some flexibility when doing so. Keep in mind that Music Pad is not intended to be a complex Music Score program; rather, it is an auxiliary feature found within Song Surgeon that allows you to create and store basic music notation.
The Music Notation toolbar is shown below.

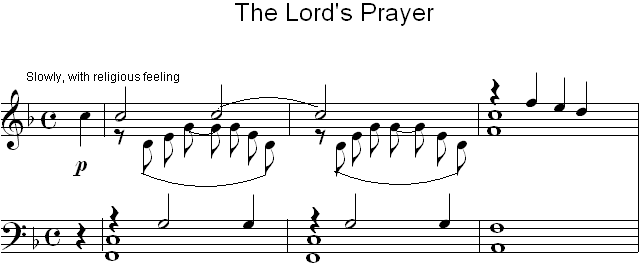
The standard music notation toolbar allows you to create basic standard music notation like that shown below. Note the basic layout. It is like an online sheet of paper. The inner gray line represents the margins or useable area for printing purposes. It is within the gray boundary line that you will create your music.
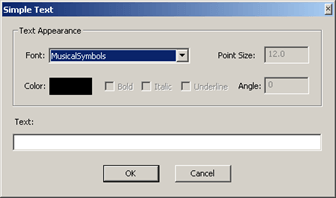
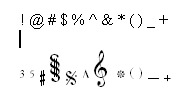
I. This is a text notes button that allows you to enter text onto your music notation via a text box. Within the text box you can control the font size, the orientation, the font color, and the font. en/view/imgThis music symbols font enables you to enter additional, less common symbols that are not available from the notation toolbar. For example, the following symbols can be created by typing the following characters into the text form.
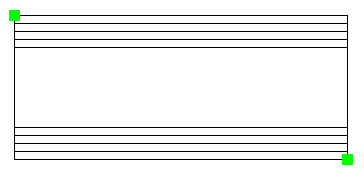
J. This is the staff button. When clicked -- if you move your mouse onto the music pad paper and left click and drag to the right -- you will create a grand staff. If you also pull or slide your mouse downward as you do this, you will create 2 staff lines simultaneously.
PLEASE NOTE: All objects placed on this cyber paper have selection handles on them that appear as a square box in the upper right and lower left corners of the object. These handles, when they appear, tell you an item(s) is selected and allows you to move or reposition the selected item(s). ALSO: Once you have drawn an object and positioned it on the paper, you must left click to place that object onto the paper.
K. This Clef button allows you to select a clef sign from the dropdown box and place it on the staff.
L. The clock is the icon for the tempo. You can select from any of the tempo presented in the drop down list. If you also want to include a numerical designation of tempo, like for example, 120, you can do this by using the text tool mentioned in (LETTER I).
M. This time signature button allows you to select from any of the normal time signatures and place it on the staff.
N. The flat/sharp button allows you to select either one and place this on the staff.
O. and P. These are beginning and ending repeat signs that can be selected and placed on the staff.
Q. This button is a vertical measure line for delineating measures.
R. These are buttons for individual notes beginning with a whole note and decreasing to a 128th note. All of these notes have the tails pointing upwards. However, there are many circumstances in which the tails of notes point downward. To flip these notes by 180 degrees so that the orientation of the tails is downward, select the note from the toolbar with your left mouse button. As you begin to move your mouse with the note attached, right click and hold down and you will see that the note has been inverted. Continue dragging the note to the position on the staff where you would like to insert it. While your right mouse button is being held down and the note is inverted, click the left mouse button and this will place the note, in an inverted position, onto the staff.
IN ADDITION -- these same buttons (S-Y) also double as REST buttons. You can toggle to see the rests by holding the Control key down. When you do this, you will see the corresponding rest notes displayed. While holding the control key down and with the rest being shown, you can select a rest and place it onto the staff.
Z. This is the half dot, which when placed after a note increases the length of the designated note by ½ or 50%.
AA. This is a triplet button, which allows you to create a triplet line that can be placed above a group of three notes to designate them as a triplet.
AB. This button allows you to create a tie of an indeterminate length. It can be stretched to accommodate any number of notes AND it can be rotated so the arc opens upward or downward.
Repetitive Insertion: If you need to insert the same object onto Music Pad, you can do this by using the space bar. For example, let's say you are inserting a measure of quarter notes. Rather than having to go to the toolbar four times, go there only once and select the quarter note. Place it on the staff, and after placing it, tap the space bar. Immediately you will have a second quarter note to also place. After placing this note, tap the space bar again for another quarter note. You can do this an infinite number of times.
Because rests are viewed by using the control key, if you want to repetitively insert a rest, you follow the above procedure with the exception of hitting the Control key down and then tapping the space bar.
Tablature ToolBar - The toolbar below is the Tablature Toolbar. It contains four buttons as described below. Anyone that is familiar with tablature knows that there are many different forms not only between instrument types but even within the same instrument. Accordingly, we have created the tablature part of this program to be flexible to accommodate the specific preferences of users.

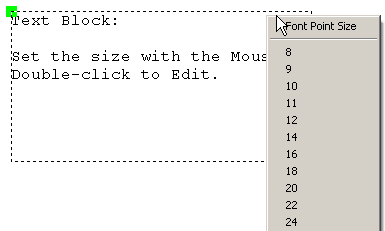
AC. This button is a Text Block Insertion tool that has a variety of uses. It is especially useful when creating tablature. When you click this button and move your mouse to the Work Area of Music Pad, it will display and insert a text box that looks like what is shown below.

As the text says, you can drag and resize with your mouse and double click within the box to edit the text. You can also right click and you will see a menu that will allow you to resize the text by choosing alternative font sizes. This is especially useful when cutting and pasting text from documents or web pages whether tablature, lyrics or something else. The ability to resize allows you to have it fit into the work area so it visible and can be formatted correctly for printing.
AD. This button allows you to create strings similar to the staff button in the Music Notation toolbar. It is different, though, because it enables you to create any number of strings with a minimum of two. After you click the button, you move your mouse to the main work area and left click. As you drag your mouse to the right, you can size the string area horizontally and, if you drag down, you will see the number of strings increase.
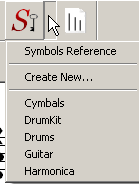
AE. This is the button for the symbols key. When you click the drop down box, you can select from a few preset symbol keys for commonly used instruments like guitar, drums, harmonica and a few others. When you select one of the items in the list, it opens a text editor window with the selected information. You can modify or edit this information at any time. To save these changes, you must click the save button on the text window.
When you click this button you will also see the option to create a new symbols key. This will open a dialog where you can enter the name of the instrument or some other name you will recognize; then you can enter the set or series of symbols for this new key, clicking Save on the dialog box. You have now created a new symbols key.
Symbols keys are for reference and should be altered or modified to customize them for your needs. Also, if desired, you can copy these symbol keys and paste them into the work area of Music Pad using the Text Block button #28. This might be helpful if you are going to print the information in Music Pad to share with someone else.
AF. This button creates a line of indeterminate length. Once placed in the work area, you can grab it and change the length. This line is similar to the measure line found in the Notation toolbar, except this line can be resized. This line should be useful when creating measure markers for tablature, as it will allow you to size it to the tablature you are creating.
Important Keyboard Functions:
Space Bar - Depressing the space bar will insert again onto the Work Area the last selected object.
Caps Lock - When the caps lock is on, the Quick Text Insert Mode is invoked. This allows you to push any alphanumeric key on your keyboard and that letter or number will be inserted at the location of your mouse.
Control Key - Holding the control key down reveals the "rests" toolbar and enables you to select these objects.
Control + Space Bar - Holding the Control key down allows you to select a "rest" and then ones placed on the work area, while continuing to hold the control key down and tapping the Space Bar inserts the same rest note again.
Left, Right, Up, Down Arrows: - When one or more objects are selected, these arrow keys allow you to nudge the object(s) in the direction of the key.
Escape - If you have selected an item from one of the toolbars by mistake and would like to deselect the item without having to place it in your work area, simply hit the Escape key.
Music Pad Page Toolbar - At the bottom of the music page frame, there is a small menu (shown below) that allows you to insert additional pages.

Other Important Features
Selection - An object that is selected will show two small green squares or handles. If an object is selected, this means that it is active and can be manipulated. Multiple objects can be selected by clicking on these objects one at a time within the boundaries of the object. Lastly, if you want to select multiple objects in one operation, simply use your mouse and trace a rectangle around the OUTSIDE of all the objects you want to select, while holding the left mouse button down. Once you release, you will see that all of the objects within this rectangular area are now selected as indicated by their green handles.
Nudging - An object or group of objects that is selected can be nudged by using the four arrow keys on your keyboard.

14. Sniffer - The sniffer button give you two options: the Main Sniffer and the YouTube Sniffer. We recommend that you do NOT use this sniffer for YouTube videos but rather use the YouTube downloader mentioned below. The Main Sniffer has the ability to detect audio or video playing in your browser from thousands of other sites. It automatically detects the link and enables you to download these files, whether audio or video. Audio files are downloaded and stored on your computer directly. The sniffer window will NOT save video; rather, it extracts the audio from the video and saves this as an audio file. This sniffer technology works on approximately 90% of all web sites with A/V files.
As depicted to the right, the links are color coded. The red color indicates a link has been detected. This red turns to orange as a file is being downloaded. Once a link has been downloaded the orange then turns green.
Preview allows you to hear a preview of the file once detected. While this preview works on most sites, it does NOT work on Youtube. The Remove button removes the link from the sniffer window. Download Only saves the file to your computer but does not open them in Song Surgeon. Download and Play saves to a temporary location and then opens the file in Song Surgeon's main window.
The sniffer module works by detecting network traffic. The simple definition of NETWORK in computer lingo is two or more computers connected to each other that can communicate. What that means for the sniffer module is that it will not work (detect) video playing on your computer or video playing from a DVD. It also means that if you have already played a video from the internet on your computer, and then you view the video a second time and ask the sniffer to detect it, it will not. Why? Because in order for the video to be played on your machine, the data must be (and is) downloaded to your machine as it plays. This means that if you go back to a video to play it a second time, even though it appears that you are playing the video from the internet, you computer is really playing it from a temporary location on your computer. If you want the sniffer to detect an audio or video file you have played before in your browser, you will need to clear the browser cache. Toward the bottom of this section on the sniffer module, there is a link to a video which shows you how to do that.
The use of the sniffer is straightforward.
1. Open SS
2. Click the sniffer button to open the sniffer
3. Minimize the main SS user interface, leaving sniffer open
4. Open Browser, go to a site and play audio or video.
5. Within a few seconds of the AV file starting to play, the sniffer should detect and populate the
sniffer
window with a description of the video.
6. Once a link is detected, select the link with your mouse and then select Download or Download and
Play.
We recommend that you manage the files in the sniffer by removing those you don't want and downloading those that you do within a short period of time after you first detect them. We do not recommend that you populate the box with a large number of links and then go back 20 or 30 minutes later and try to download them. Some AV files have associated cookies that may expire and cause problems with downloading if you wait for too long.
The sniffer works best with high speed internet connections. If you have a slow internet connection, the sniffer module will likely not work well.
Main Sniffer Troubleshooting
Because the sniffer module is working with outside websites on which we have no control, and with your internet connection through a browser which is subject to browser security settings, computer firewalls, and your antivirus program, Sniffer is the function within Song Surgeon for which we most often receive Help Desk tickets. For that reason we are including this troubleshooting section in this User guide.
There are two main problems that are encountered. They are:
1. The sniffer module does not detect the video playing - nothing appears in the sniffer window.
2. The sniffer window detects links and you see them in the window, but when you select one and attempt to
download it, it fails.
We estimate on about 85% of machines that the sniffer module will work correctly the first time it used. However, on some machines a combination of browser, firewall, and antivirus settings blocks the sniffer from working correctly and your computer may need to be correctly configured to allow the sniffer module to work. There are hundreds of different antivirus programs in use and each of them is different, so we cannot provide specific guidance for all of these. Please start by doing a search on the internet of your antivirus program and how to set up a program exception. If you have tried to get the Main sniffer to work and have failed, please complete a support ticket on our Help Desk.
Alternative (YouTube) Sniffer – With the launch of version 4, we have built and implemented an alternative sniffer module specifically for YouTube, which we call the YouTube Sniffer. This sniffer also has a built-in update mechanism to help keep the YT Sniffer up-to-date and working.
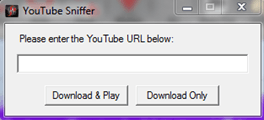
To use the YT Sniffer, click the Sniffer Button at the top of the SS user interface and select the YouTube Sniffer. Next, go to YouTube and find a video that you would like to download. Once you locate such a video, copy the YouTube URL of the video playing in your browser. Paste this URL into the YouTube Sniffer and then select either Download or Download and Play. Song Surgeon will then proceed to download the video file and strip the audio from it.
If you have selected Download, Song Surgeon will simply download this video and store it on your computer in the sniffer folder (see Options button for this file path). Alternatively, if you select Download and Play, Song Surgeon will immediately download the video and then strip the audio from the video and open it in Song Surgeon for you to use.
15. Vocal Reduction - This button opens a slider that allows you to apply an algorithm to the audio file, which in some cases can be fairly effective in reducing the vocals in an audio track. Its effectiveness is song dependent. Generally speaking, it works better on older songs, where fewer tracks were employed and less sophisticated effects and mastering methods were applied. There is no prescribed best setting. We recommend trying the center section, around 128, as a starting place and then adjust up or down from there to see if better vocal reduction is obtained. VR settings are recalled as part of a Song Surgeon Project file; they are also applied to the audio file when the EXPORT button is used.
16. Options - This button contains a number of settings for Song Surgeon. These are primarily default file locations for various functions.
17. Help- This button contains a link to the Quick Start Guide, the Help Desk, and the Training Videos.
NOTE: The Wave Form Window shown below consists of a Marker Area at the top, a Wave Form area in the middle, and a Timeline area at the bottom. Each of these areas is described in more detail below.
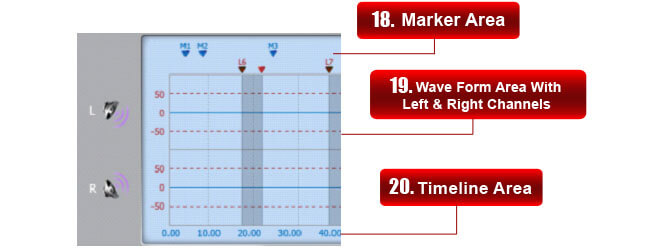
18. Marker Area - The area at the top of the wave form window is called the Marker Area. Two types of Markers appear in this area. Blue, sequentially numbered triangles are Information Markers. These can be inserted by clicking in the Marker area or by clicking the Marker button from the top menu. These blue Information Markers can be deleted by right clicking on one with your mouse, or they can be edited. Editing allows you to enter a limited number of characters to custom label the Markers. You can also delete the markers and change the default font size from this right click menu. These Information Markers are always found at the top of this section.
The markers found below the blue Information Markers will be either green, red, or yellow. These markers are referred to as Loop Points, because they define an area of a song that will loop repeatedly. They are also numbered sequentially. When you set the first loop point it will be orange to indicate it is not complete and is only one of a pair. As soon as you set the second Loop Point, you will see the first one turn green, signifying that it is the beginning Loop Point, and the second one turn red, signifying that it is the ending Loop Point. Loop Points are set by clicking in the Wave Form area with your mouse. A left click marks the beginning Loop Point and a Right Click marks the end. Right clicking over top the Loop Points allows you to either delete or edit the Loop Points. See the Loop Control (section #23) for more details on the Loop Point controls, as well as setting beginning and ending Loop Points from this control area.
19. Wave Form Area - The wave form area is where the left and right wave form data is plotted in the GUI. This area of the wave form window is where you can select sections to edit and set loop points by right or left clicking in this area. A selection is made by left clicking and holding down the left mouse button, then dragging the mouse across the wave for area. As you do this, you will see the selected area turn a blue color to indicate it has been selected.

Version 4 enables you to selected data from one channel or both channels for editing purposes. If you want to select both channels, click, hold, and drag your mouse near the bottom of the center of the wave form data. If you want to select only data from one channel, drag your mouse near the bottom or top of the wave form screen and the left or right channel will be selected independently of the other channel.
The wave form data in this area also can be zoomed in to enlarge the details and to make the selection or setting of markers, loops, and edit areas easier and more accurate. To the far left of this area are small speaker icons that can be clicked to select the left or right or both channels. When in the Float mode, you can grab the wave form display with your middle mouse button (rollerball) by clicking and holding it down; then you can drag the wave form display to the left or right. If you have a notebook that doesn't have a middle mouse button, you can accomplish the same thing by holding down the Ctrl key and dragging with the left mouse button.
20. Timeline - The timeline area at the bottom of the wave form screen (bottom of above image) shows the chronology of the wave form data. If you click with your mouse in this area (which is below the bottom black line frame and within the numbers which designate the time position of the audio file), you will automatically move the current position of the audio to that place on the timeline that you selected by clicking.
21. P/T Toggle - This button toggles between Performance (P) and Transcribe (T) algorithms.
The graphic on the left shows this button from the user interface. en/view/imgPlease note that the white
color
 shows the algorithm that has been selected or turned on. Starting with version 3.0, Song Surgeon has used a
completely new sound engine for changing pitch and tempo that virtually eliminates ALL distortion -- this
has only become more improved with 4.0. As part of this change, we have implemented two different
algorithms. If you are using Song Surgeon to practice something and are making significant changes in Pitch
and/or Tempo, you should use the "T" or transcribe setting. This setting gives you the BEST quality sound
reproduction for extreme changes (for example, slowing the tempo of a song to 25% of the original).
shows the algorithm that has been selected or turned on. Starting with version 3.0, Song Surgeon has used a
completely new sound engine for changing pitch and tempo that virtually eliminates ALL distortion -- this
has only become more improved with 4.0. As part of this change, we have implemented two different
algorithms. If you are using Song Surgeon to practice something and are making significant changes in Pitch
and/or Tempo, you should use the "T" or transcribe setting. This setting gives you the BEST quality sound
reproduction for extreme changes (for example, slowing the tempo of a song to 25% of the original).
If, however, you are going to use Song Surgeon to make a small adjustment, +/- 15% of the original (say a 1 or 2 step change in pitch) and then you want to export the file to make these changes permanently for a theoretical performance setting, then you should use the "P," or Performance setting.
If you have an older computer or one with a smaller amount of RAM memory (or both), you may experience a stuttering of sound stopping and starting on playback. If this occurs, you should right click over the P/T button and select a lower quality setting. This may improve playback performance.
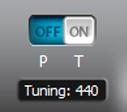
22. Tuning - Just below the P/T toggle switch is a tuning section. In 1936, the American Standards Association recommended that the A above middle C be tuned to 440 Hz. This standard was taken up by the International Organization for Standardization in 1955. Although not universally accepted, since then it has served as the audio frequency reference for the calibration of acoustic equipment and the tuning of pianos, violins, and other musical instruments. There are, however, several alternative tunings still in use or of interest to people. V4 features the following alternative tunings which can be selected: 442, 432 (Verdi tuning) and 444.
If you'd like to use a different tuning, just click on the text of this tuning display area and it will cycle thru each of the available different tunings. Remember that whatever is selected is what will be used by Song Surgeon for the song or audio open in SS.
23. Playback Controls - The bottom area of the GUI is the playback control area. The top portion of this area contains the normal or typical playback controls.

The first three playback controls are pause, play and stop. The fourth smaller button is a repeat button. When the repeat button is selected, whatever is opened in Song Surgeon will play from start to finish and then jump to the beginning and play the file again repeatedly.
This slider controls the volume. You may also have additional control over the volume by adjusting your system volume controls in your computer or on your computer speakers
The blue shaded area to the right of the volume is the numerical time display of the song. The first number shows the current position and the second number shows the total amount of time in the entire song or audio file currently open.
24. Tempo - The tempo control section controls the tempo or speed of the playback. The range
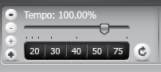 is 10% to 400%. en/view/img The plus and minus buttons on the left incrementally change the tempo. The
larger
(thicker) + and - buttons change tempo by 1% at a time. The smaller + and - change by .01% at a time. The
black buttons at the bottom are presets that will move the tempo to the designated speed shown. You can also
grab the slider with your mouse and adjust the tempo. The small white button with the circular arrow is a
default button which returns the tempo back to 100%, or the default setting.
is 10% to 400%. en/view/img The plus and minus buttons on the left incrementally change the tempo. The
larger
(thicker) + and - buttons change tempo by 1% at a time. The smaller + and - change by .01% at a time. The
black buttons at the bottom are presets that will move the tempo to the designated speed shown. You can also
grab the slider with your mouse and adjust the tempo. The small white button with the circular arrow is a
default button which returns the tempo back to 100%, or the default setting.
Version 4 enables you to customize the preset buttons with your own tempo values. To do this, go the the options button and click it. At the bottom of the options screen, you will see the Tempo section and the currently used values. You can change these values to your own custom values. They will go into effect once you close and then re-open the program. Values from 0-99 can be selected.
25. Zooming - The controls for zooming the wave form file are similar to the ones described
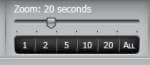 above for Tempo. en/view/img You can grab the slider and move it as a means of zooming, or you can use the
black pre-set buttons. These presets use seconds as the unit, NOT percentage. This means that if you select
10, the zoom will adjust to display 10 seconds of data in the wave form area -- 2 will show 2 seconds. ALL
is the default setting and shows the entire song or file.
above for Tempo. en/view/img You can grab the slider and move it as a means of zooming, or you can use the
black pre-set buttons. These presets use seconds as the unit, NOT percentage. This means that if you select
10, the zoom will adjust to display 10 seconds of data in the wave form area -- 2 will show 2 seconds. ALL
is the default setting and shows the entire song or file.
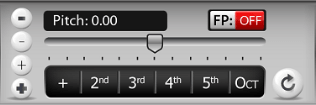
26. Pitch - Controls for the pitch are similar to the controls for the tempo. The white button on the left side adjusts either by 1/100 of a half-step (a cent) or by a ½ step at a time. The black buttons are presets except for the first one marked +/- . This is a toggle for the black preset buttons. In other words, if this button is toggled to +, the presets change the pitch or key by raising it. If this button is toggled to '-', the preset lowers the key or pitch. The presets are expressed as musical intervals and are as follows:
2nd = Major 2nd = 2 - ½ steps
3rd = Major 3rd = 4 - ½ steps
4th = Perfect 4th = 5 - ½ steps
5th = Perfect 5th = 7 - ½ steps
OCT = Octave = 12 - ½ steps
The white text that indicates the current pitch setting is expressed in Steps and Cents. For example, a reading of 2.25 would mean 2 half steps and 25 cents.
27. Format Preservation - You will notice in the Pitch or Key area a White/Red toggle (above) that says FP: OFF. You can see this button to the right. FC stands for "Formant Preservation." Format Preservation eliminates what is known as the munchkin effect. Version 4 will allow users to apply this preservation to files when changing keys, thus stopping the chipmunk or munchkin effect that occurs when key changes are applied to vocals. The default setting for this feature is off, and it should not be used unless previewing how vocals will sound when key or pitch is changed and when exporting. Format preservation requires many more system resources and CPU power.
28. Looping Controls - The loop controls found in Song Surgeon are as follows: Start and End
when clicked en/view/img set the starting and ending loop points. If you prefer to set loop points based
upon
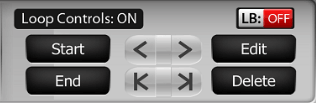 listening to the audio playing, these two buttons allow you to do that. You can also set loop points by left
clicking in the wave form area (starting loop) and right clicking (ending loop). Once a loop point is set in
the wave form area, it can be physically adjusted or moved by approaching it with your mouse and grabbing it
and dragging it. Loop points are entered in pairs and numbered sequentially beginning with L1, L2, etc.
Green lines designate a beginning loop point, red lines are the ending loop points, and orange lines mean
that only 1 of 2 loop points that comprise a pair has been set.
listening to the audio playing, these two buttons allow you to do that. You can also set loop points by left
clicking in the wave form area (starting loop) and right clicking (ending loop). Once a loop point is set in
the wave form area, it can be physically adjusted or moved by approaching it with your mouse and grabbing it
and dragging it. Loop points are entered in pairs and numbered sequentially beginning with L1, L2, etc.
Green lines designate a beginning loop point, red lines are the ending loop points, and orange lines mean
that only 1 of 2 loop points that comprise a pair has been set.

The Delete button deletes a pair of loop points. This deletion only occurs if the progress indicator is placed BETWEEN a pair of loop points (start and end). When the progress indicator is not located between a pair of loop points, clicking the Delete button will do nothing. A second way to delete is to hover your mouse over the triangle that designates a loop point in the marker area, right click, and then select delete.
The Edit button opens a separate menu window for a pair of loop points. To view the settings for a loop, that loop must be selected by placing the progress indicator line BETWEEN two loop points. When so positioned, the Edit button opens another window as shown to the right.
The Label section at the top is created chronologically as mentioned earlier, but if you want to edit this designation you are free to do so. The start and end points are the current precise locations of the beginning and ending points of the selected loop. If you would like to edit these to adjust the location, you may do so here.
The Pitch and Tempo settings are the presently designated pitch and tempo for this loop. Again, these can be changed by editing these values. The loop count refers to the number of loops on playback. The default value is negative -1, which mean infinite. You can change this to any number you like. Song Surgeon will loop the designated number of times and then move beyond the ending loop point and continue playing the remainder of the file.
Below this section you will note a Speed Trainer section. This is new to version 4. The Speed Trainer allows you to select a beginning and ending tempo as well as a % change. For example, 50 and 100 and 5%. With these selections typed into the Speed Trainer, this loop will play at 50%, then 55%, then 60, then 65%, etc. until it reaches 100%. Once you have inserted settings, you can have SS ignore or bypass these settings by simply checking the box. Speed Trainer can also work in reverse. You might set the beginning speed to 100% and the ending speed to 50. In this situation, SS would gradually slow down rather than increase in speed.
The delay refers to the number of seconds of delay at the end of each loop. A "0" means a continuously looping play back with no delay. A 5 would insert a five-second delay at the end of the loop before it jumps back to the beginning and plays the loop again.

The white arrow buttons are "jump to" buttons. If you click the arrows at the top while in a loop area, you will advance to the end of the loop, or rewind to the beginning of the same loop. The arrow buttons at the bottom, with a line after them, will cause the progress indicator to jump to the next beginning loop point in either a forward or backward direction. Lastly, you will notice the White/Red toggle that say LB: Off. This button stands for loop bypass and it allows you to turn the looping controls off or on. When you toggle the loop bypass to off, Song Surgeon will ignore any loops you may have created and, of course, all of the loop settings. When the bypass is ON (loops turned off) you will see the shading between the loop points will disappear.
29. Global Settings - If you set NO loop points, but change tempo or pitch, you apply the changes to the entire song. These are referred to as global settings. If you apply such a global change to a file, and then create a set of loop points, you will see that the area defined by these newly created loop points will have the same global setting. Once you change the settings of this specific loop area, it will retain those settings, overriding the global settings. However, once a loop area is designated, you can no longer apply global settings, so if you'd like to make Global changes, you must make these first before creating smaller loop areas within the audio file.
30. Keyboard Shortcuts - The following keyboard shortcuts can be used with Song Surgeon Version 3.0.
| Open | Ctrl-O | Add Start Loop at Position Needle | B |
| Save | Ctrl-S | Add End Loop At Position Needle | N |
| Save As | Ctrl-Shift-S | Add Marker At Position Needle | M |
| Cut | Ctrl-X | Jump To Start of Loop | , (comma) |
| Copy | Ctrl-C | Jump To End of Loop | . (period) |
| Paste | Ctrl-V | Jump To Previous Loop | L |
| Undo | Ctrl-Z | Jump To Next Loop | ; (semi-colon) |
| Redo | Ctrl-Y | Zoom in 2X | Arrow Up |
| Delete | Del | Zoom Out 2X | Arrow Down |
| Insert Silence | Shift-S | Scrub Back 0.1 secs | Arrow Left |
| Change Volume | Shift-V | Scrub Forward 0.1 secs | Arrow Right |
| Silence Highlighted Section | Shift-L | Nudge Marker or Loop Left 0.1 Secs | C |
| Delete All Loops | Ctrl-Delete | Delete Current Loop | Shift-Delete |
| Play/Pause | Space Bar | Nudge Marker or Loop Right 0.1 Secs | V |
| Move Position Needle to Start | H | Scroll | Control-Left-Mouse |
31. Foot Pedal Support - Song Surgeon provides a foot pedal interface for hands-free operation for several of the key playback functionalities. Currently Song Surgeon utilizes the Infinity, IN-USB-2 foot pedal, via a USB connection. A picture of the foot pedal is shown below. The Foot pedal interface is only supported in the Professional model of Version 4.

The Infinity Pedal has three switches or pedals. The center pedal can be used to Start and Stop the playback of the currently open audio file. The left pedal has two functions. When depressed once ( a single click ) it rewinds the playback to the BEGINNING point of the current loop. If double clicked, it causes the current position to jump BACKWARD to the BEGINNING point of the next previous loop. Subsequent double clicks will again cause the progress indicator to jump out of the current loop and BACKWARDS to the previous loop until there are no more previous loops.
Similarly, the right button of the pedal when depressed ADVANCES the playback position to the next BEGINNING loop point, and with subsequent clicks of the pedal continues to ADVANCE to the next BEGINNING loop points until there are no more.
Go To Help Desk – Our Help Desk Contains a series of FAQ's, a knowledge base, downloads for all version of Song Surgeon, and a ticket system for tracking and responding to individual user issues.
Go To Training Videos – Our training videos cover all of the major functions found in Song Surgeon. These video are STRONGLY recommended for all users, as they will quickly get you up to speed. They enable you to see all of the Song Surgeon functions demonstrated on a computer screen in the same way you would use the program.