
Song Surgeon Version 6
User Guide (Mac OSx and Windows)
Version 6 of Song Surgeon is available for both Mac OSx 11.X – 26.X and Win 10 – Win 11. Each purchase of Song Surgeon comes with license to activate on two machines at one time. These machines must be the same person or an immediate family member. Three models of Song Surgeon 6 (SS6) are available. These are: Basic, Standard, and Pro. Go here to see what modules are available in each model https://songsurgeon.com/features.html.
Click here to download the (Song Surgeon V.6 User Guide PDF)In addition to this User Guide, we strongly suggest that you view the Training Videos for version 6. These two resources, used together, will answer most of your questions and enable you to come up the learning curve quickly
Mac OSx 11.X – 26.X

 Win 10 – Win 11
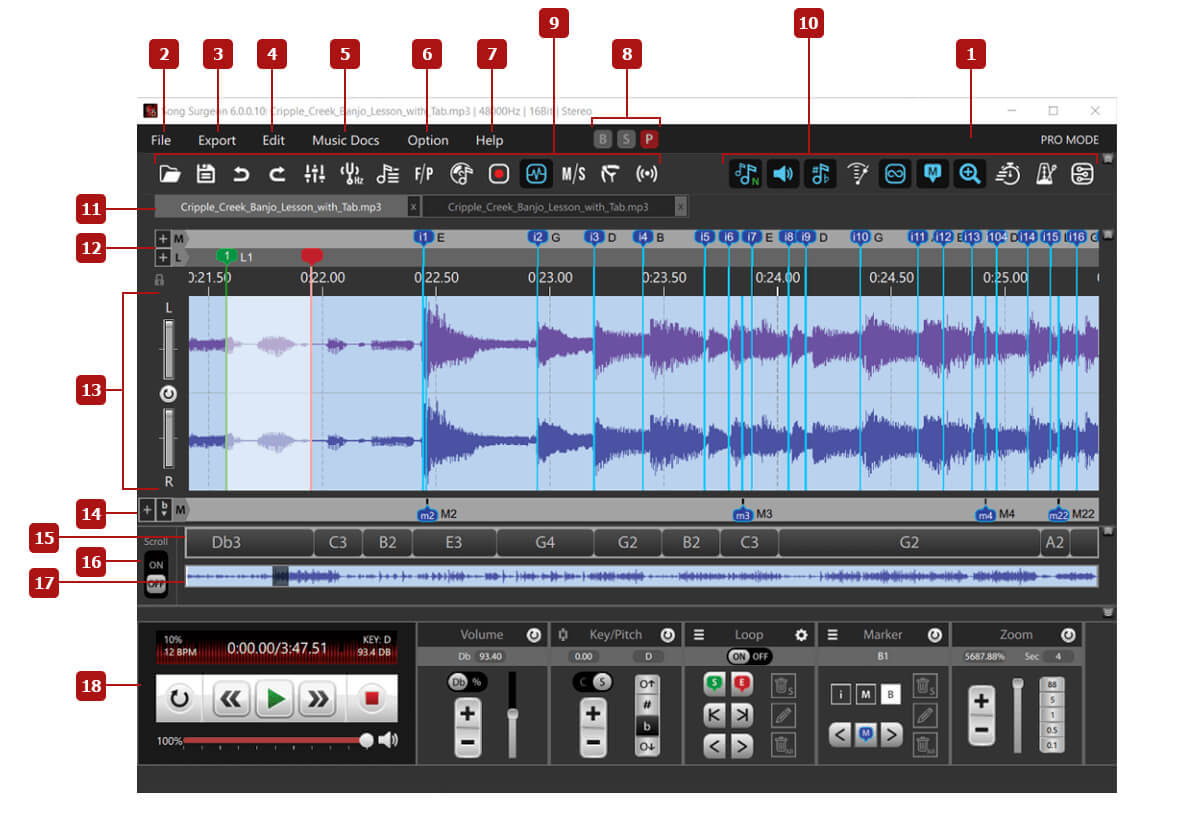
1
In the very top frame of SS6, once a file is opened you will see something like this. This information is: Version of SS6, the file name that is open/active, the frequency, the bit depth, and mono/or/stereo

Text Menu: Immediately below this frame, the following text menu can be found. Let’s look at each of these menu items in detail.

2
The File menu open the following options
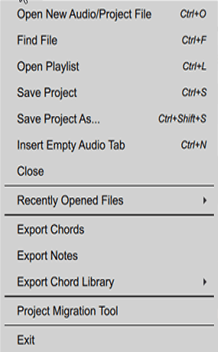
Open New Audio/Project File: This option opens a dialog box from which your computer
can be browsed and
a file selected to open. This dialog shows a list of the file types that SS6 can open. These include
audio files, video files and project files. Note that only the audio stream from a video file is opened,
when a video is selected. File formats that can be opened include: aac, aif, aiff, m4a, mp1, mp3, mp4,
ogg, wav, wma, cda, mid, flac, avi, flv, m4v, mov, mp4, mpg, rm, vob, webm, wmv, sspr, ssp and psj file
formats. The folder icon found immediately below this text menu also has the same functionality. 
Find File: This option opens a dialog box or window which allow a search to be conducted by file name and/or file format.
Open Playlist: Selecting this option opens a dialog window for the default directory where SS6 playlists are stored. Also, please note that in addition to SS playlist formats files (.spl), SS6 can also open Window Media Player (.wml) and iTunes (.xml) playlist files.
Save Project: This option saves the current work which is open in SS6 to a project file. If a project file does not exist (has not been created) then a dialog window will appear allowing a name to be assigned to the project. If a project for this work already exists this selection will simply save the current work using this existing name. The disc icon or graphic in the menu below this text menu has the same functionality.
Save Project As: This option creates a project file for the SS6 work that is currently open, allowing users to assign a name. This can be used for the first time saving of a project or, if you want to save an existing project with a different name, this also allows that to be done.
Insert Empty Audio: This selection opens a new audio tab in the main graphing window. Though empty, it allows data from other open files to be pasted into it.
Close: This selection closes the currently open and active tab in SS6.
Recently Opened Files: This selection opens the list of recently opened files. From this list you can click and drag any item in the list to reorder it. You can also delete a file or files from this list. Another way to view this same list is to RIGHT-Click over top the folder icon in the upper graphic menu. When using this right click method, users can delete entries and grab them (left-click and hold) with their mouse and reorder items in the list.
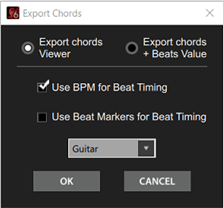
Export Chords: This selection opens a small dialog from which a number of options can be chosen. Exporting Chord View prints a copy of the notes as the appear in the Chord Viewer Module in SS6. This print out can be formatted in musical diagrams specific to instruments including guitar, mandolin, Ukulele and piano.
An additional option is to print the chord values and beats in columns and rows and not in a musical notation format.
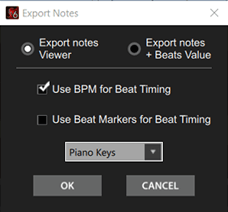
Export Notes: This selection opens a small dialog from which a number of options can be chosen. Exporting Notes Viewer prints a copy of the notes as the appear in the Notes Viewer Module in SS6. This print out can be formatted in either musical notation (staff) or on piano keys. An additional option is to print the note values and beats in columns and rows and not in a musical notation format.
Export Chord Library: This option opens a dialog window from which a specific instrument can selected. Once selected SS6 will print the entire chord dictionary it contains for the specified instrument.

Project Migration Tool: The Project Migration Tool is a utility that assist with the transfer of your Song Surgeon project files and folders from on computer to another. This tool requires that SS6 is installed on BOTH the computer you are transferring FROM and the computer you are transferring TO.
When you select this option the following dialog window will open. It will automatically insert the default location for your SS6 project files. If you changed your default location for these files you will need to change this path to the correct path where these files are found on your computer. Once this is done, click the Pack button and SS6 will find, pack, and zip all of these files for transfer to your new computer. Follow the on-screen prompts to complete this process.
3
The Export Menu: When clicked, the Export Button opens the following dialog with these options. A brief review of each of these selections follow. When the Export command is used, you can specify the audio format to be created. These audio files that are created are standard audio files like .wav, mp3, m4a, etc that will play on any standard player or device.
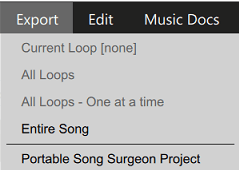
3.1 Current Loop: When you have created one or more loops in a work window and that loop is selected by the placement of the progress indicator being within its boundaries, selecting this option will EXPORT the data within this loop and apply any/all of the settings you have applied to it, in the new file that is created on Export
3.2 All Loops: When you have created two or more loops within a work window, and select this option, SS6 will export all of these loops, beginning with the one farthest left and proceeding to the right, and create a single audio file with all of the loops contained in this file. Any changes applied to these loops will also be found permanently applied and found in the exported file.
3.3 All Loops – One at a time: When you have created two or more loops within a work window, and select this option, SS6 each loop, one at opens time, and save the data from each loop as a unique audio file. Any changes applied to these loops will also be found permanently applied and found in the exported file.
3.4 Entire Song: This selection will export the entire song or audio file and create a single new one apply any/all changes, such as EQ, Editing, key, tempo, volume etc. to the new file.
3.5 Portable Song Surgeon Project: This option, when select will create a file, containing both the contents of a project files (meaning all of the settings that have been applied within SS6) and the underlying audio being to which these settings are being applied and zip them up to create a file that can be easily transported and opened on another machine on which SS6 is installed.
4
Edit Menu
Before executing the Edit functions, an area of the audio file must first be selected. Left-click and drag in the main waveform window to select an area. By moving the position of your mouse to the bottom or top of this graphing area you can select either the L channel, or R channel or both channels of data. Click at either edge of the selected area and drag it to adjust the placement of the selection. For finer tuning place your mouse over one of the edges of the selection area and use the arrow keys to change the position by 0.1 seconds. To clear a selection, use the Escape key.
Song Surgeon supports cut, paste and copy operations not only within a single opened file, but also between files open in multiple instances of Song Surgeon. One of the features of Song Surgeon is automatic frequency and bit depth conversion when moving audio data between two files. Song Surgeon will automatically detect these values and convert the selection to match the frequency and bit depth of the destination file. The operations in the Edit menu are:
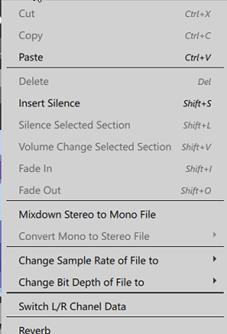
4.1 Cut (Ctrl-X)
This deletes the highlighted section, and places a copy of it on the clipboard.
4.2 Copy (Ctrl-C)
This copies the highlighted section to the clipboard.
4.3 Paste (Ctrl-V)
The Paste Function pastes the audio data on the clipboard into the currently opened file. When you click
the paste button it opens a small dialog window from which you can select several options. One is to
select the channel, meaning Left, Right, or both. The second is to designate a position which will
either be at the beginning, end or at the current position of the progress indicator.
4.4 Delete (Del)
This deletes the highlighted section.
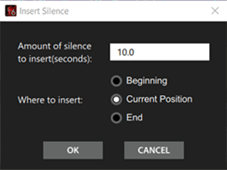
4.5 Insert Silence (Shift-S)
This option opens a menu for inserting a period of silence into an audio file. Choose the length of
silence in seconds, and whether to insert it at the beginning of the file, at the end, or beginning from
the current position in the file (default).
4.6 Silence Highlighted Section (Shift-L)
With a portion of the audio file selected, select this option to silence the selection.
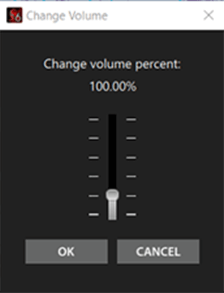
4.7 Change Volume (Shift-V)
Opens a menu to increase or decrease the volume of the selection. Use the slider to make a selection
between 0% and 500%, and select OK. A notification will be added when a much higher volume may distort
audio quality.
4.8 Fade In (Shift-I) / Fade Out (Shift-O)
With an area of the audio file selected, use these two options to gradually increase volume at the
beginning or decrease volume at the end of the selection, for smoother transitions.
4.9 Mix Down Stereo to Mono
If a file is open in Song Surgeon with a left and a right (stereo) channel, this option will mix the two
down to a mono (one-channel) file. If an Edit selection is made, this option will only mix down the
selected area, and will discard the remaining portion of the file. If no selection is active, this
option will mix down the whole file to mono.
4.10 Convert Mono to Stereo
This option creates a stereo track from a mono audio file. Hovering over the option opens a submenu:
choose to place the mono audio data in the left audio channel only, in the right channel only, or to
place a copy of the mono data in both the left and right channels. If you choose either L or R channel
only the mono data will be placed in that channel and the other remaining channel will be blank or
empty.
4.11 Change Sample Rate of File to
The sample rate of a file is the same as its frequency. Hovering over this option opens a submenu with a
list of sample rates which Song Surgeon can convert the open file to.
4.12 Change Bit Depth of File to
The bit depth of a file is a measure of quality. Most standard digital audio files are 16-bit files, but
some types of uses may require alternative bit depths. Song Surgeon can convert to 8, 16, 24, and 32 bit
depths.
4.13 Switch L/R Channel Data
Exchanges the audio data for the left and the right channels of a stereo file, so that left channel
audio data is played in the right channel and vice versa.
4.14 Reverb
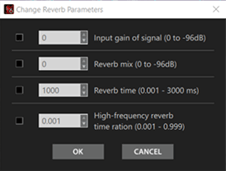
The Reverb dialog can be seen to the right, this option opens a dialog with four parameters which can be selected and set. Please note that to enable or apply a parameter the checkbox next to it, must be selected or checked. Also, note that two of these parameters have default settings. When these parameters are selected you can use these defaults or override and change them.
If an Edit selection is made, this option will apply the reverb only to the selected area. If no selection is active, this option will apply reverb to the entire file.
We’d suggest as a starting point that you use the default values supplied. Applying reverb adds substantial volume. To offset this volume you will need to reduce the sound in these first two parameters:input gain and reverb mix. We suggest you start with values of -2 dB and then adjust from there as necessary.
5
Music Docs
5.1 Muse Score: Muse Score is a highly sophisticated scoring program which rivals many of the high quality, paid, scoring programs such as Maestro, Finale, and Sibelius. You can download it and run it as a separate program, or you can install it and run it from within Song Surgeon. If you install it from Song Surgeon you can also select this MuseScore option from the Music Docs menu to open it.
The complete documentation for Muse Score, including training videos, is located on its website: https://musescore.org/handbook.
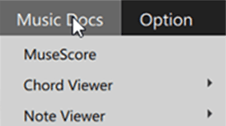
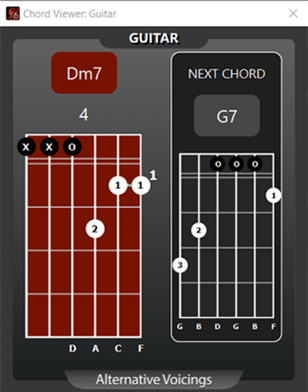
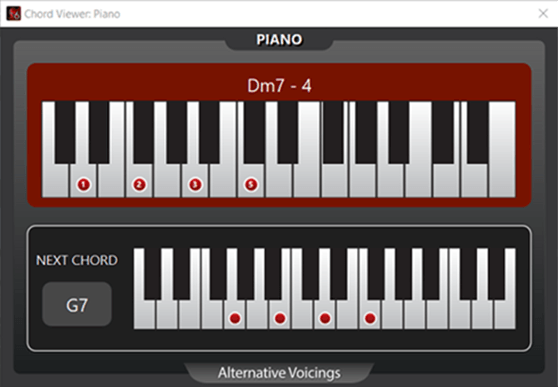
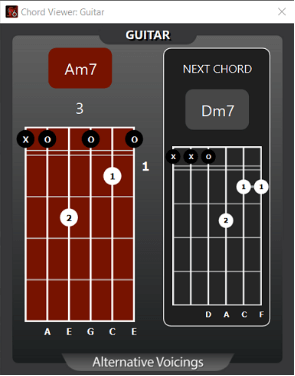
5.2 Chord Viewer: is an option that options a window that shows real times chords as they are detected and played within Song Surgeon. When you select Chord Viewer you will have the option to choose one of four instruments: Piano, Guitar, Ukulele or Mandolin.
Depending upon the instrument that is select, SS6 will display the detected chords on a piano keyboard or on the strings of the fretted instrument you selected. Examples for Piano and Guitar are shown below. Also, please note the button at the bottom which says “Alternative Voicings”. When clicked this button opens a window with alternative fingers for this same chord that can be used instead of the default one.
5.3 Note Viewer: This is similar to chord viewer except that it displays the detected notes in real time as a song is played in SS6. There are two display options in Note Viewer: Piano Keys and on a Musical Staff.
5.4 Music Pad: In older version there was a selection entitled Music Pad. This was a very basic program that allowed for the creation and saving of music documentation. This has been removed from Version 6 and we suggest that you use MuseScore as its functionality is far superior to what was found in Music Pad.
6
Options Button: The Options Button opens a dialog which contains 5 tabs as shown below. Each of these is described in detail in this section.

6.1 Default Paths: Song Surgeon 6 installs a user folder in the Documents folder of your computer. Within this folder there are nine subfolder that are created and used by the program. We recommend that you use the default locations that are created upon install. However, if you decide to change them you can do so through this “Default Paths” window. Shown below is the default path for the Open button on SS6. This can be changed by click the square button on the right with the 3 dots on it and then browsing and selecting an alternative location. Likewise, all of the other paths or locations can also be changed.

6.2 Program Settings 1: This tab contains a series of settings that allow you to customize your use on SS6. Starting from the top and working downward, we’ll review these.

A. Audio Algorithm Settings: By default, this setting is on P which gives excellent quality when making modest changes to key and tempo. If you are making larger changes, then you should try the T. Lastly, if you are only using files with a single instrument or a human voice (not multi-instrument tracks) then the V setting may be of interest.
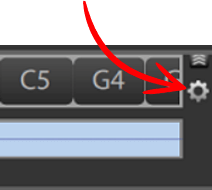
B. Tempo Presets: The next section allows you to select either BPM or % as the default preset for tempo display in the main user interface. In addition, you can insert values for the tempo presets that appear on the front end. For example, in this window you can see that the values designated and which appear on the front-end buttons are 30, 40, 50 and 75… and the units selected is percentage.
C. Zoom Presets: The zooming function for SS6 also has 5 preset buttons on the front end. These values can be changed here. As noted, the units used are seconds.
D. Formant Preservation: This is turn on by default but that settings can be changed here. Formant preservation is for use with files that contain vocals. This feature helps reduce the chipmunk or munchkin sound that occurs when key is changed in a file containing vocals.
E. Note/Chord Viewer Settings: When SS6’s Chord or Note Viewer is being used, it shows the current chord/note being played and the number of beats until a new value will appear. This setting allows you to select the “Detected BPM” or, if you have created/inserted beat markers those can be selected and also used.
6.3 Program Settings 2: This tab contains a series of settings that allow you to customize your use on SS6. Starting from the top left and working downward, we’ll review each of these.
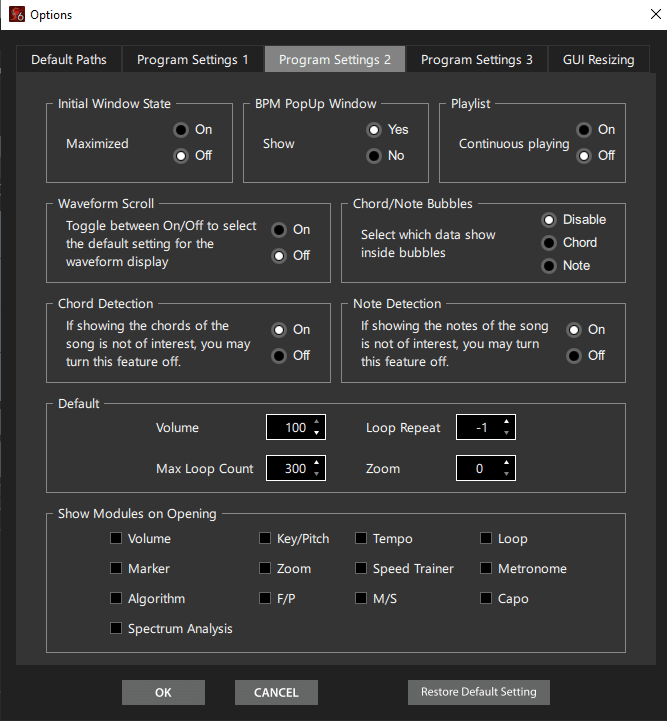
A. Initial Window State: This is set to OFF by default. If toggled On, SS6 will open in a maximized view.
B. BPM PopUp Window: By default, this is set to On. When a file is loaded and the high BPM is detected a window will show that asks you if you’d like to use this high BPM or an amount that is half of that. The halved BPM may be the correct BPM and this window allows you to choose this. The reason dichotomy exists is because SS does not the song timing, i.e. 4/4 7/8 etc. and this timing will result in a different BPM.
C. Playlist: Continuous playing is by default set to Off. When changed to On, SS will automatically play the next song on the playlist after it finishes playing the current song.
D. Waveform Scroll: This setting is OFF by default. When OFF the plotted audio data is fixed and the progress indicator moves. When turned on the progress indicator stays in a fixed position on the screen and the plotted audio data moves. In the on-state the Progress Indicator is relocated to the middle of the screen, however the PI can be grabbed with your mouse and relocated to a different fixed position.
E. Chord/Note Bubbles: This setting allows you to select whether Chords or Note appear in the bubbles by Default. Remember this is a toggle on the main UI that allows you to toggle between chords and notes and any time but, by default, Song Surgeon displays chords.
F. Chord and Note Detection: These two setting are self-explanatory. SS6 runs chord and note detection automatically, on opening a file. This takes a few extra seconds. If these are not of interest you can toggle them off here.
G. Default: This next section allows you to customize four values on the front end. Volume sets the volume slider at a customized level. By default, it is 100% but you may wish it by default to be set at an alternative value.
H. Loop Repeat: By default, this is set to a -1 which means that a loop will play or loop continuously and never stop. If any other value is substituted, say 5 for example, SS will play the looping area 5 times and then at the end of the 5th it will ignore the ending loop point and continue moving forward and playing the audio.
I. Max Loop Count: This is set to 300 by default but can be increased to 999. This controls the number of looping areas that can be created in a song.
J. Zoom: By default, this value is set to zero (0). This means that regardless of the length of the song… 3 minutes or 30 minutes, the ENTIRE song will be plotted in the main graphing area with no zoom. If you change this to any other value, it will show the specified value – in seconds – on the screen.
K. Show Modules on Opening: This bottom section shows a listing of all of the modules available within SS6. When you open SS6, there are NO modules open by default. Selecting one or more of these, in this area will open these modules automatically, each time you open SS. Your selections will only be applied after closing the program and then re-opening it again.r value, it will show the specified value – in seconds – on the screen.
6.4 Program Settings 3: This is yet one more dialog window of settings that can be customized
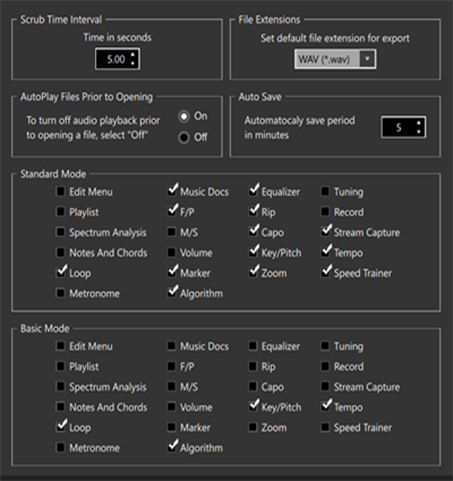
A. Scrub Time Interval: To the left and right of the play button there are forward and backward scrub buttons. The interval that they move (scrub) on clicking can be set her.
B. File Format: By default, the .wav file format is set or selected on when you use the export command. You can change this default to mp3 or another file format here.
C. AutoPlay Prior to Opening: Whenever you are opening a file from a dialog window and you select the file with your mouse in the dialog – the file will autoplay by default. This audio allows you to hear and confirm the file you have selected is the one you want. This setting allows you to toggle it off.
D. Auto Save: By default, this setting is set to 5 minutes. You can shorten or lengthen this time here. The Auto-save feature automatically backs up your work so that if the program crashes or you close the program accidently, back up of your work is available for you to use. When re-opening the program after a crash SS6 will automatically re open and prompt you to open this last used file. Standard and Basic Modes – SS6 is available in 3 different models, Basic, Standard and Pro. The feature associated with each model can be found here: https://songsurgeon.com/features.html However, regardless of the model you buy, you may want to customize the interface and only show buttons for features you are going to use. These settings allow you to do this.
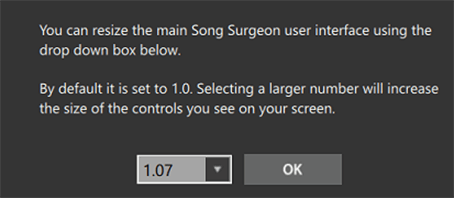
6.5 GUI Resizing: This tab opens a screen which a dropdown list of values. By default, it is set to 1. By selecting a value larger than 1 you can increase the size. A value smaller than 1 will decrease the size.
7
Help Button: The Help Button contains a number of items which are briefly reviewed below

7.1 My Account: this option will open the My Account page on the Song Surgeon website. This My Account page contains your user information including name and address, order history, download links, and a list of our licensed machines.
7.2 Help Desk: Clicking this selection will take you to our Help Desk
7.3 User Guide: Clicking this selection will open the User Guide, which is the document you are reading now
7.4 Deactivate Machine: This option deactivates the machine you are on, removes it from our database, and puts the program into a Trial Mode. By doing this you are freeing up a slot for the program to be activated on a different machine.
7.5 Offline Activation: This is for use only with the assistance of someone Help Desk. If it is appropriate and necessary you will be given instructions on how to use it. Do not attempt to use this by yourself.
7.6 Check For Program Updates: SS 6 has a built-in auto updater but you can also manually check for updates aby clicking this option at any time.
7.7 Logging: Off – this is the default setting. When you select or check the box, logging will be activated. We don’t recommend that you turn this on except with the Help of one of our tech support people.
7.8 Show Logs: This option will open the folder to the location of the log files that are generated. This allows you to easily find and send these to tech support or the Help Desk
7.9 Other TMJ Products: This opens the TMJ Software website where there is a brief overview of the products we carry.
7.10. About Song Surgeon: This selection opens a dialog window containing information about your machine and also will show the model of the software and the full build number, i.e. 6.0.0.58. This build number is required when you submit a support ticket.
8
Model: To the right of the top text menu, in the middle of the UI are three buttons that allow users to switch between different models of SS 6 in accordance with the license and model that they own.
9
Icon Menu: Below the top text menu is a menu of graphics on both the left and the right side. We will briefly describe each of these buttons and what they do.


9.1 Open: The folder button is an icon that when clicked opens a dialog window allowing you to browse and choose a file to open in SS. In addition to opening a file by browsing, you can also drag and drop an audio file onto the interface. Lastly, if you right click over top this icon you will open a list of previous opened files from which one can be selected and opened. By default, when you select an audio file with your mouse, it will play the file to give you a preview of the contents of the song/file. This can be turn off in Options >> Settings 3.

9.2 Save: The save button saves the currently open work in SS as a project file. The first time this button is clicked in opens a dialog window allowing a customized name to be assigned. The second time and thereafter once a name is assigned it does not open a dialog, it simple save the work by updating the currently open project. Please note that if more than one audio file is open in SS, this Save function saves all files and all features, settings applied to each file.
 9.3 Undo/Redo: These two buttons undo or redo the previous changes or settings applied
to a file
9.3 Undo/Redo: These two buttons undo or redo the previous changes or settings applied
to a file

9.4. EQ: This button opens SS 31 band EQ as a separate window. This feature is available in Standard and Pro only.
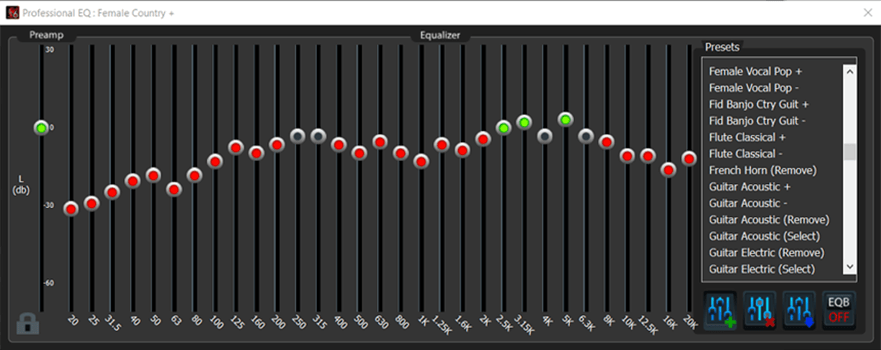
The preamp band is at the far left by itself. Use this to adjust the preamp volume. Below the preamp band, at the bottom left of the Equalizer window, there is a lock icon; click the lock to separate the equalizers for the left and right channels. By default, the two channels are locked together. Any adjustments made while locked will be made to both channels of data simultaneously. Please note that this lock/unlock feature applies only to the EQ bands, it does not apply to the pre-amp sliders.
The EQ bands can be adjusted in any of four ways:
- Click and drag on a slider to move it up or down.
- Left-click in the track, above or below a slider, and the slider will snap to the cursor position.
- Right-click in the gray area between any two slider grooves and release. Then move your mouse left and right or up and down, and you will see the EQ bands follow the movement of your mouse. This is an easy way to adjust multiple bands very quickly. Right click again, in the gray area between the slider grooves, and this functionality will be deactivated and the EQ bands will remain where you placed them.
- On Windows: Hold the control key down, and left click on a band or a several bands; then use the up/down arrow keys to adjust the group.
- On a Mac: Hold the Shift key down + left click on a band or several EQ bands, and then to move them as a group using your up/down arrow keys.
For ease of use, the EQ bands are color-coded; the default position is gray. When a band is set above zero (0) the adjustment slider turns green, and when any band is set below default the slider turns red. At the right of the EQ window is a preset menu, which can be used to select from a range of preset EQ options. Click on any of the options to use it.
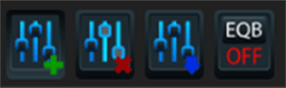
The three buttons at the bottom, right edge of the EQ window are used to modify EQ settings. When a desired setting is reached, use the top, green checkmark button to save a preset. Use the middle button, with a red X, to delete a preset; use the bottom button to modify an existing preset. Default presets cannot be deleted or modified.
It is important to note that EQ can be applied either to the entire audio file or to a particular loop. The EQ for a loop can be accessed in the Loop Edit menu; only presets are available. If you have a custom EQ configuration that you want to apply to a loop, you will need to create and save as a EQ Preset to be able to do that. EQ settings are saved with Song Surgeon project files, and applied to any audio files that are exported from Song Surgeon.
With a thirty-one band graphic equalizer, each band covers one third of an octave (you can work this out from the fact that one octave represents a doubling - or, going the other way, halving - of frequency, and there are ten octaves between 20Hz and 20kHz: on a 31-band graphic there are three steps between each doubling of frequency). This EQ configuration provides a great deal of control over frequencies and therefore over the sound you hear. This sophisticated EQ configuration is very useful to musicians or people that transcribe music, as it allows them to diminish unwanted sounds and to enhance others.
In Song Surgeon 6, this 31 band EQ comes loaded with more than 100 presets that have been custom-built on an instrument basis. The list of instruments is not comprehensive, but we have included the most commonly played instruments in this list of presets. For each instrument, we have a preset designed to enhance that instrument as well as diminish that instrument. These are not perfect, as every song has a different mix of instruments and frequencies and, not only will one size not fit all, EVERY song is likely to require customization of the EQ preset to best work for that song. Nonetheless, these EQ presets are helpful starting points. The Pro EQ allows you to create new custom presets and delete them. EQ settings can be applied to either of the two stereo channels or to both.
To make this EQ compact, we did not label all of the bands, but by hovering your mouse over any slider you can see what band it is for. Also notice here on the left side that we have a pre-amp that can be used to increase the volume. This is especially useful when you are cutting bands and you need to pump up the volume to hear the remaining frequencies.
Notice that the gain is +30Db and the cut is -60Db. Please note that if you increase the gain substantially it is likely that you will introduce clipping and distortion. Also note that if you cut a band significantly, you will reduce the volume substantially. Notice the color coding -- when flat, the sliders are gray; when boosting, they are green; when cutting, they are red, and if they are turned OFF, they are BLUE.
There is a lock icon here in the middle. When turned off, you see sliders for both left and right channels, and these sliders can be moved independently. When locked, the bands for the channels move together and whatever you do to one, you do to the other. In the locked state, the EQ goes into a mini mode, and only one set of bands is visible and necessary for the locked channel adjustments.
Bands can be adjusted in several ways. The first way is by grabbing a slider with your mouse (left click) and moving it up or down. A second way is to click or click and hold down the mouse in the groove for that EQ band -- it will move incrementally up or down. If you want to move multiple sliders at once, you can right-click and drag your mouse across a series of bands, and the sliders will move to the location of your mouse drag.
Lastly, for fine tuning, you can select bands by On Windows: Hold the control key down, and left click on a band or a several bands; then use the up/down arrow keys to nudge the group. On a Mac: Hold the Shift key down + left click on a band or several EQ bands, and then to move them as a group by using your up/down arrow keys.
The last area to review regards the presets. System presets cannot be modified or erased. However, you can create new presets based upon the existing ones by selecting a preset, modifying it to meet your needs, and then saving it with a new name. To create a new preset, you click the button with the green + sign, give it a name, and the click okay -- this will create a new preset. If you want to save this new preset permanently so that it stays in the list of presets, you must click the button with the BLUE arrow to save it. The delete button will allow you to delete ANY custom preset, but it will NOT allow you to delete System presets.
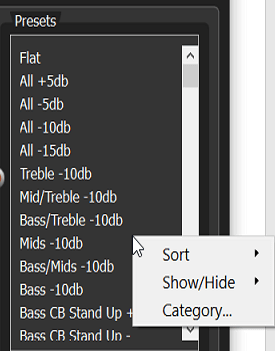
If you right click in this preset area, you will see some additional selection appear. These selections will enable you to sort the list, or filter the list, so that you can get the group of presets on your screen that you would like to use. To refine your list further, you can also use the hide/view button to hide or remove presets from the visible list. Once you have refined your list of presets, you will need to click the SAVE button (blue arrow) to save this list of presets so it loads the next time you open SS.
In addition to using your mouse to select a specific preset and using the scroll bar on the right to navigate the list, you can also use your arrow keys. Here are commands. On Mac: Click in the preset area, then holding your Shift key down, use your up/down arrows keys to scroll. On a Windows machine you can do the same by clicking in the preset area and then while holding your Control key down using your up/down arrows.
Lastly, we will discuss the EQ-B button (which is the EQ bypass button). If you have a song open and playing in SS and you have EQ applied to it, selecting the EQ Bypass and toggling it on will ignore the currently applied EQ and the song will continue playback with no EQ applied. Note that when you do this, the buttons become blue and inactive/you can't move them. When you toggle the bypass off, the EQ is again applied to the file and the buttons are re-activated.
EQ is a topic that can be very complicated. There are entire courses in college dedicated to it, so
don't expect to master the use of this 31 Band EQ overnight. If you'd like to learn more about EQ, we
refer you to this external site which provides an excellent overview:
http://www.zytrax.com/tech/audio/equalization.html

9.5 Tuning: This button opens a tuning module. This module enables the creation of alternative tunings. The standard tuning worldwide is A440, however there are various alternative tunings used, often for period instruments. For example, Verdi Tuning is 432 rather than 440. Version 5 had 4 presets for tuning. In Version 6 you can create ANY tuning frequency.
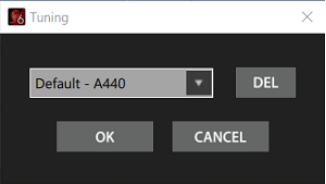

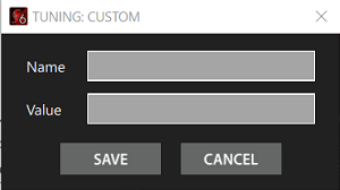
When you click the tuning icon button on the top menu, it opens the Tuning dialog window shown above. By default the tuning is set to A440. If you click the dropdown button to the right of the A440 selection it will show you all of the Tunings that are currently defined. In addition, if you select the “Add New” option a further dialog window will open (shown above) where you can create a new preset by giving it a custom Name and then in the “Value” field inserting a value in Hertz. This value field should only contain numbers. Once you have entered this data and clicked the Save button this preset with its defined value will be included in the preset dropdown list.
Whatever preset is selected in the Tunings window is the tuning that will be applied to the files opened in Song Surgeon 6 until or unless it is changed.
9.6 Playlist: SS 6’s playlist feature allows you to create, save, and open Song Surgeon playlists. It also allows you to open iTunes xml playlists and .wml playlists created in Windows Media Player. When you click the Playlist button this dialog window will open. Any files/songs in the playlist will be shown in the main playlist screen.
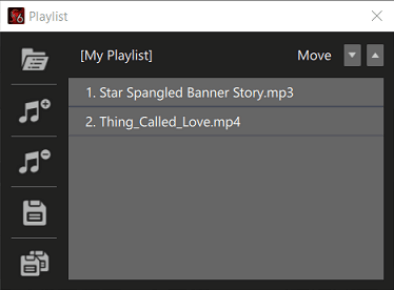
- Use the browse button at the upper left to browse and select a playlist to open.
- Use the + button to add files/songs
- Use the – button to remove files
- Use the Disc button to save changes
- Use the bottom two disc button to Save an assign a new or different name
The Move arrows at the upper right allow you to select songs within the open playlist window and change the order of them

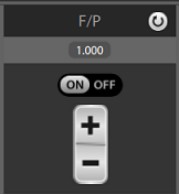
9.7 Formant Preservation: The module is almost identical to its version 5 iteration. It is used and valuable only when you are changing key on a song that contains vocals. The use of FP reduces the chipmunk or munchkin effect heard in vocals with key change. When you click this button this module opens at the bottom of SS6 in the Module Track area. This feature is turned off by default. When turned on, the value shown, is automatically changed as the key of the song – in half steps – is changed. These values are hard coded for each half step increment and have been optimized to give you the best quality possible. Although there are + and – buttons that can be used to manually change this value, we don’t recommend it because these values are optimized.

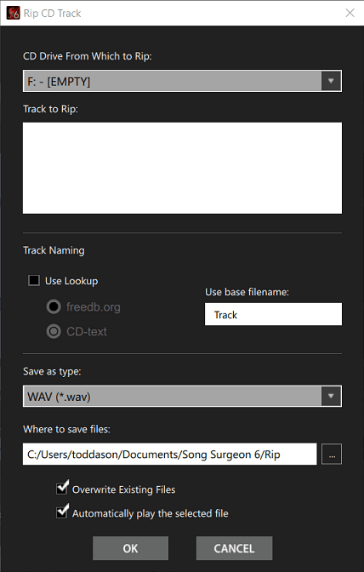
9.8 Rip: SS’s ripping function will rip and save to your computer, one file or all files on a CD. Clicking tis button opens a file dialog for ripping tracks from CDs. Select the drive where the disc is located using the top drop-down menu. Once the CD loads all the tracks will be displayed in the box; select one or more to rip.
Track Naming: Song Surgeon will either look up the track names or use a default name. If “Use lookup” is selected, Song Surgeon will use the website freedb.org to find the track names or read them from the CD’s metadata, using the radio buttons. If “Use lookup” is deselected, Song Surgeon will use a placeholder label: the default is “Track”, and Song Surgeon will save files as “Track 01”, “Track 02”, and so forth.
Please note that if the list of tracks is blank or empty, it is likely because you have selected "Use Lookup" and there are no matches for this CD in the database. If the Track Name section of the dialog is empty, please deselect "Use Lookup" and you should then see a list of tracks appear.
Save as type: Select the file type in which the ripped tracks will be saved. The default is .wav.
Where to save files: The default save location is C:/Users/User_Name/Documents/Song Surgeon 6/audio. Change the save location either by clicking the location box and typing in a new file path, or clicking the “...” box to the right and navigating to the correct location.
Overwrite existing files is deselected by default. If files already exist in the chosen save location with the same name, this option will overwrite them with the tracks on the current CD. For example, if a previous CD has been ripped with the default of “Track 01, Track 02,” etc., and a new CD is saved in the same location with the same default track title, the new tracks will replace the old ones.
Automatically play the selected file is selected by default. This option allows you to click onto a track and hear it play. This is helpful if you don’t know which track(s) you want to select by name, but can recognize them if you hear them. Finally, select “Rip Tracks” to complete the rip or “Close” to cancel.

9.9 Recording: This button opens the recording module. It is similar to the Recording module found in previous versions. The recording module allows you to record via a microphone whether it is a built-in microphone or an external microphone connected to your computer.
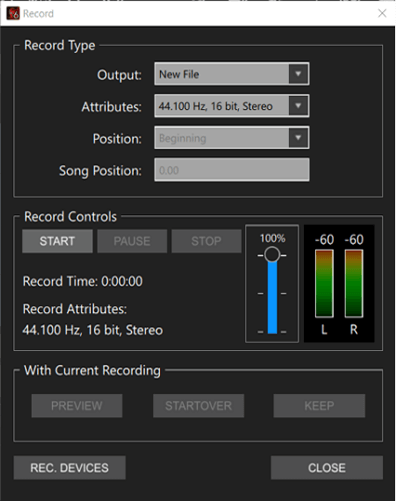
The Record feature can work with input devices other than a default microphone such as a musical instrument or a computer’s sound card if this is supported. For example, if you have a digital turntable, you can plug it into SS and SS can record the audio input from your old LP's.
A. Output - Changes the destination of the recording. New File is selected by default, which will create a new file and load it into a new instance of Song Surgeon. Current File will insert the recorded audio into the currently open Song Surgeon window. When this option is chosen, the Position drop down will be activated: the recorded data can be inserted at the beginning, end, at a specified time, or at the current location of the progress indicator. allows the user to make a recording while listening to (and playing) the currently opened audio file in Song Surgeon. Data from the original played song is placed in one channel and then newly recorded data is placed in the other channel.
B. Attributes - Changes the quality and bitrate of the recording. The recommended setting is set by default to 44,100 and 16 bit stereo. This is standard CD quality audio.
C. Position – Allows you to designate where the segment recorded is to be placed within an existing open audio file. These selections include Beginning, End, Current Position, or a Specified Time. If you select Specified Time then you will need to enter the time in minutes/seconds where the recording is to be placed in the Song Position field.
D. Recording Controls - The recording function can be used at any time; press Start to begin a recording, Pause to pause it, and Stop when the recording is finished. Once a recording is finished, it can be previewed with the Preview button. If the recording is good, use Keep to save it; otherwise, use Start Over to discard the recording and begin a new one.
The Volume Slider to the right of these buttons allows you to adjust and control the volume of the recording input.
The level meters that are found in the recording dialog window will give you an approximate idea; however, we recommend you do a dry run of a few seconds, keep it, and then once it opens in SS you will be able to more easily see the levels and make further adjustments if necessary. Since SS can easily increase the volume of recorded audio, it is best to err on the low side, making sure that whatever you record does not clip. Distortion from clipping cannot be removed in SS; however, low volume recording can be amplified using the change volume settings in the Edit function of Song Surgeon.
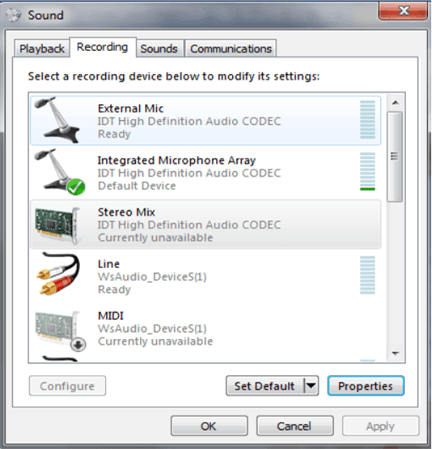
At the bottom of the Record window is the Recording Devices button. Clicking hese will open the system audio settings menu. Select the recording device that is desired, make sure it is set as the default within the system menu.
When you record in Song Surgeon you MUST choose a device that is found in the Recording Tab.
You must select this device and then you must set it as the default. If you have other active devices you may need to disable them to allow you to record a good quality recording.
Most computers have multiple recording devices installed - and every computer is different. We cannot, in this User Guide, illustrate all possible options, so if you want to use this function, please know that you will need to spend a significant amount of time experimenting until you get the correct settings for YOUR computer. Please see the training video on recording for additional details; this can be accessed through the Help Button on Song Surgeon.
A final note: In older version of Song Surgeon, system audio was recorded using this recording features. In Version 6, System audio should be recorded using the Audio Stream Capture module.
 9.10 Spectrum Analysis: This is a new feature found in Song Surgeon. When you click
this button the piano keys open on the main UI toward the bottom, above then module work area.
Spectrum Analysis measures the frequency of audio and, based upon these measurements, displays notes
as a song plays. These notes are displayed on the piano keys. Those notes that are most likely
correct are shown in the larger dots. Smaller dots are less likely to be correct, but possibilities.
These dots are always green in color EXCEPT when playback is paused. When paused the current note
being played is shown with a Red dote.
9.10 Spectrum Analysis: This is a new feature found in Song Surgeon. When you click
this button the piano keys open on the main UI toward the bottom, above then module work area.
Spectrum Analysis measures the frequency of audio and, based upon these measurements, displays notes
as a song plays. These notes are displayed on the piano keys. Those notes that are most likely
correct are shown in the larger dots. Smaller dots are less likely to be correct, but possibilities.
These dots are always green in color EXCEPT when playback is paused. When paused the current note
being played is shown with a Red dote.


In addition to the dots on piano keys, these notes are displayed in note bubbles (section 15), and on piano keys and there is also the option of viewing the graphed spectrum data to assist in note determination.
To turn on the spectrum graphing, toggle the button on the far right side of the piano keys and the graph will appear along with the piano keys as shown. These three buttons do the following.
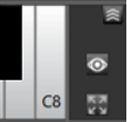
The top button with the arrows on it is a collapse button and will hide this section. The middle “eye” button turns OFF all values (dots) except for the primary one as measured by the spectral analysis. The bottom one (with four arrows) toggles on/off the graphic function that appears immediately above shortened piano keys. When turn off a full length piano key appears.
In concluding this section, also note that you can click on (press) a piano key with your mouse and it will play the note associated with that key.
 9.11 M/S: This button is for open the mid-side processing module. In previous versions
this was referred to as vocal reduction because it is often used in this capacity but technically it can
do more than that.
9.11 M/S: This button is for open the mid-side processing module. In previous versions
this was referred to as vocal reduction because it is often used in this capacity but technically it can
do more than that.
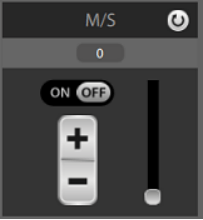
Mid-Side processing can be applied to a loop, multiple loops or an entire song. This menu item has a simple slider that you can adjust from 0 to 256. Typically, a good place to start is by moving the slider to approximately the center range, around 128, and then proceed from there. The slider ranges from 0 (off) to 255 (highest setting). Experimentation with different slider positions will be required to find an optimal setting for any given audio file. Change the setting by clicking and dragging the slider, using the plus or minus buttons, or clicking the numeral display box and typing in a value directly. M/S settings, if used, are saved as part of a Song Surgeon project and are also applied to an audio file if it is exported. Use the circular arrow button to reset this value to 0 (off).
Because most commercial songs today are “mixed down” from many (sometimes dozens) of tracks, it is difficult for the MS on its own to remove vocals effectively, unless vocals are panned to the center. In these cases, MS is quite effective in removing vocals on its own. These songs are the exception though, not the rule.
The MS slider may also be useful when trying to isolate or remove instruments other than voice.
Moreover, when combined with the 31 band EQ, these two in tandem can be a very effective and useful
tool. Please see the following page on our website which provides more details and please watch the
video on this page to see how to use these two tools together to achieve good results.
https://songsurgeon.com/page/vocal_reduction.html
Lastly, Song Surgeon has an AI powered Vocal Removal and Instrument Isolation Tool (VRII) online. It is
normally quite good at removal vocals are instruments. Version 6 customers get two years of free access
to this tool. Here is the link if you are interested in trying it:
https://songsurgeon.com/vocal_removal_tool/

9.12 Capo: The capo feature is primarily of interest to guitarists. A physical capo is usually fastened across all the strings of a guitar or other fretted stringed instrument, although less often they are used on only some strings rather than all of them.
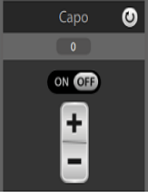
The main advantage of using a capo is that it lets a guitarist play a song in different keys while still using first-position open-string chord forms, which have a more droning and fully resonant tone than, for example, many bar chords. SS6’s capo enables SS to imitate the chords/notes values it displays without actually changing the key of a song. To the right you can see the Capo module which opens with this button is clicked. The + button is used to designate the position of the capo position on a guitar fret. The minus button is used to change this position backward and the rest button will automatically return it to the default position of zero.

9.13 Stream Capture: This feature is new to Version 6. It is not a downloading function; it does not download files. What it does is to digitally record audio streams and save them. With the advent of streaming music, this feature allows users to grab any file that can be played and heard on their computer. This includes music or songs being played from sites like Apple, YouTube, Spotify, Amazon etc.
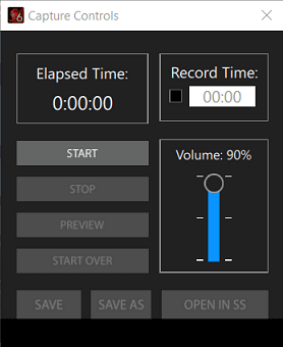
The stream capture module is shown to the right. The steps to using it are as follows:
- Click Start button
- Start streaming audio playing
- When song finished playing, click Stop
- Click Preview to listen if desired
- To discard and start over click “Start Over”
- Click Save or Save As to save the file.
- Click the Open in SS button to have the recorded stream open immediately in SS
Two additional things. Firstly, the volume slider will control the final volume of the recorded stream. Before recording an entire song, you may want to “test” the volume by recording a small segment and previewing it – and then adjust the volume as necessary. Secondly, the “Record Time” checkbox allows you to set a specific record time duration. For example, if you were recording a file that was 10 minutes long, this could be selected and 10 minutes inserted as the Record time. Once started, the recording would automatically end after 10 minutes.
10
Icon Menu Right Hand Side: From this menu when an item is highlighted in blue it means this module has been opened and is being employed on the main interface. Opened modules appear at the bottom to the right of the main playback controls.


10.1 (a) Chord/Notes Module: This first graphic with two notes, when clicked toggles between the default chord detection to note detection to off. The active selection can be distinguished by the C or the N letter on this graphic and the graphic is highlighted to blue. When it is white, as shown here… this means it is turned off.
Chord detection is not new. It was contained in version 5 and this same module has been updated and moved to version 6. When you first load a file, Song Surgeon automatically detects the chords used in the song and displays them as bubbles below the main waveform window. When a file is first opened, in Song Surgeon and it is not zoomed, most likely you will not be able to read the chord bubble values because there are too many to fit on the unzoomed screen. As you zoom in a smaller segment of the song/file is on the screen the bubble will increase in size until they are able to display the chord values inside of them as shown below


Song Surgeon's chord detection capability is good but not perfect. It does make mistakes. We have compared it to similar products and technologies and it performs equally well. In some cases, you will find bubbles containing two values. For example, you might see a bubble with the values A/C#. This means that the regular chord is A, but if you are a bass player this value is C. To learn more about chord detection, go here.
If you'd like to change a chord value you can open a menu that will allow you to delete a chord or rename a chord value, by right clicking over top the chord and opening an edit menu. You can also grab the edge of a chord bubble and shorten it, or if there is space between two chord bubbles you can grab the bubble and slide it to reposition it on the timeline.
In addition to the chord values shown in the bubbles, Song Surgeon also has a chord viewer that displays the chord fingerings or shapes in real time as a song is played. Version 5 only contain chord shapes for guitar, in Version 6 mandolin, ukulele, and piano have also been included. You can access this Chord Viewer Window from the Music Docs menu at the top. When you select Chord Viewer you will be asked to select one of these instruments. After you have done that then either a fretboard or piano diagram will open and it will display the chord shapes as the song plays.
Chord values can be exported from the File > Export Chord Values. SS6 provides several Export (and print) options including Exporting Chord viewer shapes/fingering diagrams, Chord libraries, and chord values with time stamps.
10.1 (b) Chord/Notes Module: (NOTES)
The Note Detection module is new to Version 6. If you toggle the Notes/Chords button to N for Notes, Song Surgeon will show, in the bubbles, the notes it has detected. Like Chord detection, Note detection is not perfect. It works best with songs or files that contain instruments that play single notes, not chords. For example, a banjo or trumpet, or a clarinet. For songs containing multiple instruments, we suggest you use the VRII tool to separate or isolate the instrument of interest and then run note detection on this file.
Clicking the Tools button on the far right side next to the bubbles will open a dialog window with seven different settings. Changing one, several or all of these will change the notes Song Surgeon detects.
At the top of this dialog window, there is a drop down box that lists default settings. From this drop down you can select one of several instruments for which Note Detection has been optimized. The use of this selection should improve the accuracy but, as all songs are difference, you may still want/need to further customize the settings using the explanation provided below for each of the settings.
Additionally, please note the "Add to Presets" button at the bottom. Once you make a change in the on-screen values, this button will become highlighted and you can create and save your own customized presets.
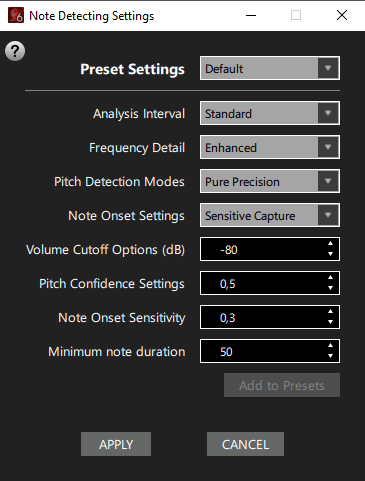
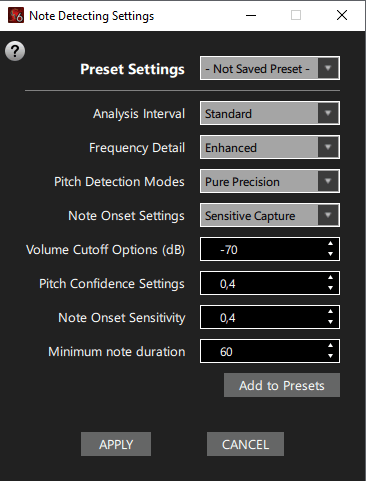
The tables below provide an explanation of each of the seven setting and a description for each of the sub-settings that can be applied. These will help you understand what changes might be beneficial to optimizing Note Detection for a specific song. Clicking the “Apply “ button will make these changes as the new “default” settings that Song Surgeon will use.
Analysis Interval
| Preset Name | Hop Size | Description (When to Use) |
|---|---|---|
| Ultra-Frequent | 256 | Checks for new notes every ~6 ms—ideal for live monitoring or super-fast solos when you need virtually instant feedback (at the cost of higher CPU usage). |
| Frequent | 512 | Updates every ~12 ms—great for near-real-time play-along and detailed performance tracking, while easing CPU load a bit. |
| Standard | 1024 | Analyses every ~23 ms—strikes a comfortable balance between responsiveness and efficiency, perfect for general note detection on most systems. |
| Infrequent | 2048 | Frames every ~46 ms—slower but lighter on your computer, suited for longer passages or lower-powered machines where instant feedback isn’t critical. |
| Rare | 4096 | Polls every ~93 ms—least frequent checks for minimal CPU impact, best used in offline or batch processing where latency doesn’t matter. |
Frequency Detail
| Preset Name | Buffer Size | Description (When to Use) |
|---|---|---|
| Basic | 1024 | Uses a small ~23 ms window for very quick analysis—good when you just need a rough pitch estimate or are limited by CPU power. |
| Standard | 2048 | With a ~46 ms window, you get clear separation of adjacent semitones and stable pitch tracking for most melodies without noticeable lag. |
| Enhanced | 4096 | A ~93 ms window delivers finer frequency resolution, ideal for picking out subtle pitch shifts or instruments with rich overtones, at a modest increase in latency. |
| Detailed | 8192 | Stretching to ~186 ms, this setting excels on complex, harmonic-rich sources (like piano or acoustic guitar), giving very steady pitch readings when you can tolerate more delay. |
| Comprehensive | 16384 | A long ~372 ms window for the utmost frequency fidelity—perfect for offline or batch analysis where accuracy is paramount and latency doesn’t matter. |
Pitch Detection Modes
| Preset Name | Internal Value | Description (When to Use) |
|---|---|---|
| Pure Precision | yin | Maximum accuracy for clean signals. Ideal when you need the most stable and accurate pitch detection (for example, solo instruments or clear vocal melodies). |
| Speed & Accuracy | yinfft | Great for balanced performance. Provides very good accuracy at a faster processing speed—suitable for general use when both speed and quality matter.* |
| Rapid Processing | yinfast | Optimized for real-time performance. This mode is designed for very rapid detection, making it excellent when processing speed is critical, though it may be slightly less accurate.* |
| Simple Mode | schmitt | Very straightforward and resource-light. Good for rough estimates where ultra-high precision isn’t required, for example in less complex or noisy environments.* |
| Robust Low-Noise | mcomb | Enhanced stability in noisy conditions. Best when the audio is less clean and background noise is present. It’s tuned to extract the dominant note even with interference.* |
Note Onset Settings
| Preset Name | Internal Value | Description (When to Use) |
|---|---|---|
| Crisp Start | hfc | Best for percussive, sharply defined note attacks. This mode picks up sudden bursts of energy and is great when the audio has clear, well-defined hits (for example, in rhythmic or drum‐intensive music).* |
| Gentle Entry | energy | Ideal for smooth, legato passages. It detects changes based on overall energy levels, making it well suited for vocals or instruments with softer, gradual note transitions.* |
| Sensitive Capture | specflux | Detects subtle changes. This option focuses on detailed spectral shifts, so it’s useful for audio where note onsets are not abrupt but still need to be captured accurately.* |
| Robust Mode | complex | Works well in busy or noisy mixes. By analyzing both magnitude and phase information, it reliably extracts onsets even when the signal is complex, making it useful for full-band recordings.* |
| Steady Signal | phase | Balanced for mixed content. This mode provides moderate sensitivity and works for a wide range of material, being a good “all-round” choice when the audio has varying dynamics and subtle transitions.* |
Volume Cutoff Options
| Preset Name | Silence Threshold (dB) | Description (When to Use) |
|---|---|---|
| Ultra Sensitive | -90 | Detects almost every sound, even the faintest noise. Use this when you want to capture every whisper or very soft signal—but be aware that it might produce false detections in noisy conditions.* |
| Very Sensitive | -80 | Ideal for delicate, quiet recordings. It picks up soft signals while ignoring the lowest levels of background hiss, perfect for subtle acoustic performances.* |
| Balanced | -50 | A standard, well-rounded setting. This value strikes a good balance by capturing meaningful sounds while filtering out low-level noise that isn’t musically important.* |
| Moderate | -40 | Filters out softer background noise. Use this setting if you want to focus on louder, more prominent signals, ignoring very quiet ambient sounds or minor hums.* |
| Strict | -20 | Only the loudest signals are recognized. Best for situations where the environment is very noisy or you only care about very pronounced sounds (though many softer musical details may be lost).* |
Pitch Confidence Settings
| Preset Name | Pitch Tolerance Value | Description (When to Use) |
|---|---|---|
| Ultra Sensitive | 0.2 | Accepts nearly all pitch estimates, even those that are very uncertain. This setting is best if you want to capture every nuance and are willing to handle some false positives—ideal for exploratory analysis or when coverage is paramount.* |
| Very Open | 0.4 | Allows a wide range of pitch detections while filtering out only the very weakest ones. This mode is good when the audio is moderately noisy but you still want to catch subtle pitch details without being too restrictive.* |
| Liberal Mode | 0.5 | A standard, well-rounded setting. This value strikes a good balance by capturing meaningful sounds while filtering out low-level noise that isn’t musically important.* |
| Moderately Selective | 0.6 | Filters out lower-confidence pitches more than the liberal options. This setting improves detection quality by ignoring some ambiguous values, and is useful for audio with reasonably clear signals that don’t require extreme sensitivity.* |
| Balanced Mode | 0.8 | A standard default for most recordings. It only accepts pitches with relatively high confidence, ensuring stability and accuracy. This mode is recommended for high-quality audio where reliable note detection is most important.* |
| Strict Mode | 0.9 | Only the most confident pitch detections are accepted. Use this when you have very clean audio or when it’s critical to avoid any false positives, even if that means missing some subtle notes or nuances in softer passages.* |
Note Onset Sensitivity
| Preset Name | Onset Threshold Value | Description (When to Use) |
|---|---|---|
| Ultra Sensitive | 0.1 | Captures even the smallest signal changes. Use this when you want to detect every potential note start—even very subtle ones. (May produce too many triggers in noisy recordings.) |
| Sensitive | 0.2 | A fairly responsive setting that will catch most subtle onsets while filtering out minor, insignificant changes. |
| Balanced | 0.3 | Offers a good compromise between sensitivity and selectivity. It detects genuine note onsets reliably while reducing false positives from background noise. |
| Selective | 0.5 | Only registers clear and distinct note beginnings. This is ideal when you prefer only strong, obvious transients to trigger detection, thus reducing false triggers. |
| Strict | 0.7 | Very high threshold; only very strong, unmistakable note attacks will be detected. Use this when you want the system to ignore all minor fluctuations and only catch the most pronounced changes. |
Minimum Note Duration
| Preset Name | Minimum Duration (ms) | Description (When to Use) |
|---|---|---|
| Ultra Short | 30 | Captures very fast, ornamental notes. Use this preset when you need to include grace notes or very brief sound events typical in fast, decorative passages. |
| Short | 40 | Allows for brief notes while filtering out some noise. This setting is useful for music with rapid passages where you still want to capture most short notes without too many false triggers. |
| Standard | 50 | A balanced threshold for most recordings. It ignores transient blips while keeping musically important notes, making it a reliable default for a wide variety of performances. |
| Extended | 100 | Filters out all but sustained notes. Ideal for recordings with a lot of background noise or where only clearly defined, longer notes are desired—ensuring that tiny fluctuations are dismissed.* |
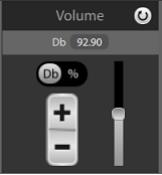
 10.2 Volume: The volume module is new to Version 6. When a file is opened volume in Db
is measured and displayed in the main UI playback area on the far-left side. It is also displayed in the
module window as shown nearby. This volume module allows users to adjust the volume of a song with much
more precision that has previously been possible. You can change the units from Db to percentage by
using the toggle button in this window. The + and – button allows you to increase or decrease the volume
in units of one while the slider button can be used for a quick less precise change.
10.2 Volume: The volume module is new to Version 6. When a file is opened volume in Db
is measured and displayed in the main UI playback area on the far-left side. It is also displayed in the
module window as shown nearby. This volume module allows users to adjust the volume of a song with much
more precision that has previously been possible. You can change the units from Db to percentage by
using the toggle button in this window. The + and – button allows you to increase or decrease the volume
in units of one while the slider button can be used for a quick less precise change.
This new volume module adjustment is applied to the entire song. If you need to change the volume of a segment of the song, the editing module allows you to do this.
As the volume is changes in this module, the graphed wave form data will also change. You can use this viewable change to judge whether or not a change is pushing the peaks beyond the graphic boundaries. Doing so will cause a file to clip and distortion to be introduced. Volume changes can be applied to the entire song or to a segment within a loop. Changes made to volume are saved in project files and on Export, volume changes will be embedded into the newly created audio files.
 10.3 Key: This button opens the key/pitch module and places it in bottom module area.
The Key/Pitch module is shown nearby. Though this module is similar to what is found in older versions,
there are a few changes. When SS opens a file, it automatically run key detection and displays the
detected key in the playback display area and here in the key module. In this example the key is Am. If
you don’t think this key is correct and would like to change it you can do this by clicking the chain or
link at the top left. When you do, you’ll see a thin red line showing that the feature is no longer
locked. Next, you can click the key display area (Am) and it will open a dropdown list of alternative
keys that you can select. Once selected, click the chain or link again and the red line will disappear
and the key will be locked and display the new key.
10.3 Key: This button opens the key/pitch module and places it in bottom module area.
The Key/Pitch module is shown nearby. Though this module is similar to what is found in older versions,
there are a few changes. When SS opens a file, it automatically run key detection and displays the
detected key in the playback display area and here in the key module. In this example the key is Am. If
you don’t think this key is correct and would like to change it you can do this by clicking the chain or
link at the top left. When you do, you’ll see a thin red line showing that the feature is no longer
locked. Next, you can click the key display area (Am) and it will open a dropdown list of alternative
keys that you can select. Once selected, click the chain or link again and the red line will disappear
and the key will be locked and display the new key.
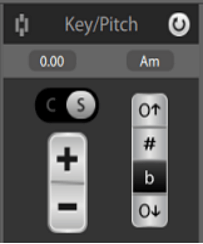
On the left side there is a C/S button. This toggles between cents and semitones (half steps). The +/- buttons when clicked change the key of the song by one of the selected units (either cents or semitones). As the key is changed the amount of change will be shown in the field immediately above the C/S toggle.
On the righthand side there are four buttons. The top button when clicked will change/increase the key of the song by an Octave. The bottom button decreases the by an Octave. The middle two buttons (Sharp # and Flat b) toggle between displaying the chords and notes detected by SS6 in either flats or sharps.
Lastly, the circular arrow at the top right is a reset button and returns any/all changes made to the open song back to default state.

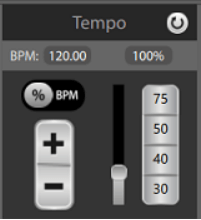 10.4 Tempo: This button opens the tempo module and places it in the bottom module area.
When a file/song is opened Song Surgeon automatically runs tempo detection and place the tempo both in
the playback area and in this tempo module. The tempo as shown here is provided as both BPM and
Percentage. Below the BPM field is a toggle to change between BPM and Percentage. This toggle dictates
what units will be used or employed by the + and – buttons below it. To the right of these +/- buttons
is a slider that allow for gross tempo adjustments. To the right of this slider are preset buttons.
These preset buttons ALWAYS use percentage values as units. These preset button numerical values can be
customized in the Options Button.
10.4 Tempo: This button opens the tempo module and places it in the bottom module area.
When a file/song is opened Song Surgeon automatically runs tempo detection and place the tempo both in
the playback area and in this tempo module. The tempo as shown here is provided as both BPM and
Percentage. Below the BPM field is a toggle to change between BPM and Percentage. This toggle dictates
what units will be used or employed by the + and – buttons below it. To the right of these +/- buttons
is a slider that allow for gross tempo adjustments. To the right of this slider are preset buttons.
These preset buttons ALWAYS use percentage values as units. These preset button numerical values can be
customized in the Options Button.
It should be noted that changes made to tempo can be applied to the entire file, or to only a segment of the file, if a loop is created and used to isolate a segment. Also, saving work in a project file will save any/all tempo changes. Similarly, using the EXPORT command to create a new file will permanently embed tempo changes into this newly created file.

10.5 Looping: This button opens the Looping module and places it in bottom module area. Starting at the top left let’s review this module.

- The three horizontal lines opens a window that displays a list of all created loops for a file. This list can be searched. At the top right the Tools button opens a small menu which will be discussed later in this section.
- The On/Off toggle is ON by default. When turned off, SS will ignore the loops and play back will proceed as if they do not exist.
- The green “S” and the Red “E” are Start and End buttons for creating a loop. As a song is playing, click the S button inserts the Start or beginning loop point and click the E inserts the end and creates a loop. In addition to creating loops this way, a user can click with the mouse in the designated Loop Area. The click creates the beginning and the second creates the ending.
- The L/R arrow buttons are “Jump To” buttons. The first set with the vertical line and arrow will jump forward or backward to the next looping arrow. Those at the bottom jump forward to the end of the same loop or backward to the beginning of the loop.
On the right-hand side, the trash can icon with its associated “S” will delete a single loop. The bottom one with the work “all” will delete all loops the exist within an open file.
The middle pencil icon, opens an edit menu that contains a variety of settings that can be changed. These are discussed below:
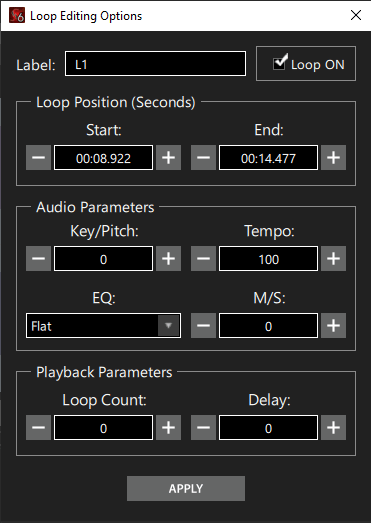
- The Label allows you to create a custom label or name.
- The Loop On checkbox can be deselected and that will disable or turn off the loop.
- The Start / End fields allow a user to change or adjust the position of the loop markers
- The audio parameters allow a user to apply or change Key, Tempo, EQ, M/S parameters
- Loop Count, by default, is set to -1 which means it will loop infinitely. If this value is changed to any other positive numerical value, the loop will play that number of times and then continue play through the end of the loop marker.
- Delay adds a delay to the end of the loop so that, before jumping back to the beginning and playing again, it will delay this X number of seconds before looping or repeating again.
Once loops are created both the beginning and ending loop markers can be grabbed with a mouse and moved. In addition, when you place your mouse over any marker, you can use the L and R arrow buttons and these will nudge the marker 10 ms in either direction.
In SS6 it is also possible to create a contiguous loop where the endpoint of one loop is the beginning of a different loop. This is accomplished by grabbing and dragging a beginning loop point BACKWARDS over top an ending loop point, or vis-a-versa.
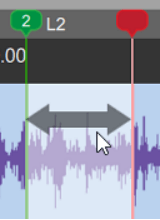
Also, on mouseover an arrow will appear within a loop. When this arrow is displayed this arrow can be clicked and then the entire loop can be moved either left or right.
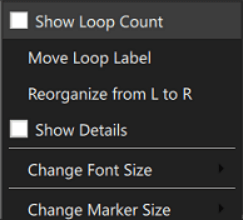
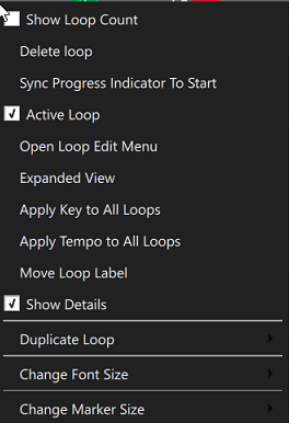
The “Tools” button at the top right of the Loop Module opens this window with these options. These options are applied to ALL loops, whereas a right click over a loop applies changes ONLY to that loop.
Show Loop Count: will display a number with the loop indicating how many times a loop as played (looped)
Move Loop Label: moves the label from the Left (Default) location to the Right.
Reorganize From L to R: When loops are created that are number sequentially. While generally created moving from left to right or from beginning to end, they can be created and inserted so that they numbering is out of sequence. This option will renumber all of the loops and from left to right in ascending order.
Show Details enables a tools tip type window to be displayed from a mouse over of the green starting loop marker
Change Font Size: This changes the size of the text associated with the loop
Change Marker Size: This changes the size of the triangular graphic associated with each loop.
Right clicking with your mouse over the beginning Green or ending Red loop marker opens another Edit or loop customization window. Some of these customization options are found in the Tools button or Pencil button and have already been reviewed but, there are others that have not and these will be discussed below:
Sync Progress Indicator: Selecting this option will immediately move the progress indicator (PI) to the start of this loop.
Expanded View: This option will cause the time line to zoom-in and the loop to be centered within it.
Apply Key Change To All Loops: Selecting this option will send whatever key change has been made to this loop to ALL loops’
Apply Tempo Change To All Loops: Selecting this option will send whatever tempo change has been made to this loop to ALL loops
Duplicate Loop: This clones the existing loops and all of its settings and places it immediately to the right of the existing loop. This loop can then be dragged and reposition on the timeline.
All of the other settings in this menu have been discussed elsewhere in the Looping Section of the UG.

 10.6 Markers: This button opens the Markers module and places it in bottom module area.
You can see the module for markers to the right. This feature has a greatly expanded functionality in
Version 6. To begin with Version 6 has three different types of markers. Informational markers which are
what has existed in previous versions and two new kinds: beat markers and measure markers.
10.6 Markers: This button opens the Markers module and places it in bottom module area.
You can see the module for markers to the right. This feature has a greatly expanded functionality in
Version 6. To begin with Version 6 has three different types of markers. Informational markers which are
what has existed in previous versions and two new kinds: beat markers and measure markers.
In addition to the standard way of grabbing marker with your mouse and moving it, when you place your mouse over any marker, you can use the L and R arrow buttons and these will nudge the marker 10 ms in either direction.
Information markers, when inserted, appear above the wave form graphing area as show in the graphic below. These markers can be created in several ways.
- Clicking in the Informational Marker track area with your mouse
- Clicking the + button as the song plays will insert at the position of the PI
- Clicking the Blue M button in the Marker module WHEN the “i” marker button is selected.

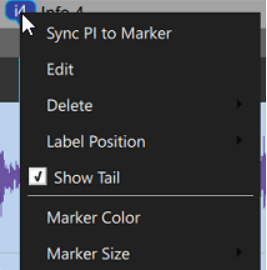
Once an Informational Marker has been created it can be grabbed with the mouse and reposition. Right clicking overtop a blue info marker opens a context menu with several useful options.
- Sync PI to Marker moves the progress indicator (PI) to this marker
- Edit allows opens a further menu that will be discussed next
- Delete removes the marker
- Label position switch the text label from left to right or allow it to be hidden.
- Snow tail drops a tail from the marker bubble down into the audio graphing area
- Marker color contains several alternative choices for maker color
- Marker Size controls the size of the text label.
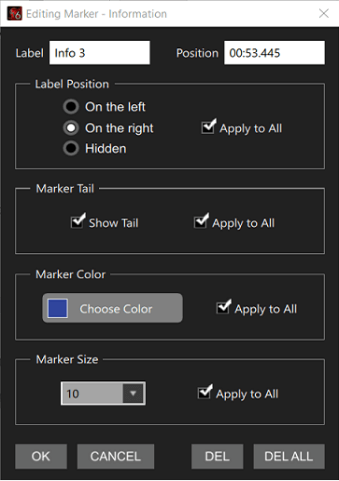
The edit selection referenced above opens this window which allow for additional changes. The main difference with this menu is that you can make changes that apply to ALL markers whereas changes from the previous menu apply ONLY to the marker from which the menu was triggered.
As can be seen in this menu which appears to the right, the very top two form fields are specific to a marker and can be modified. The other selection can be applied to this specific marker or to ALL informational markers.
At the bottom of this menu there are choices to Delete (DEL) or Delete All (DEL ALL). After making any changes in this menu, click the OK button at the bottom left to apply changes.
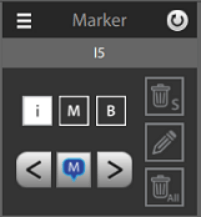
The main Marker Module has three square gray buttons with letters. The “I” button is for informational markers. When selected (as shown below) the marker selected (based upon location of PI) appears in the label field. The vertical buttons are then applied to this label. The top button (trash can) will remove this marker. The Pencil button opens the SAME marker Edit window as shown nearby. The <> left and right arrow buttons are “jump to” buttons that will jump forward or backward to the next informational markers when the “I” button is selected and these are clicked.
Lastly the three horizontal lines open a marker inventory window of all markers in a specific song or file. This inventory can be search to find a specific marker very quickly. In Inventory window which opens, clicking on a marker in the list will cause the Progress Indicator to jump to that marker immediately.

Beat and Measure Markers can be found in a track at the bottom of the graphing area as shown below. On opening a file, both a beat marker (B1) and a measure marker (M1) are automatically created and placed in this marker track.
With the addition of Beat and Measure markers a file or song can be subdivide into measures and beats identified and shown on the timeline. It is beyond the scope of this User Guide to explain how to determine where the first beat occurs; Most musicians know how to do this – and since this is not a course in music theory it will not be done here. However, once the location of the first beat is known (or first and second) the other beats and then measure markers can be inserted automatically.
Beat Marker Insertion:
There are three ways to insert Beat Markers.
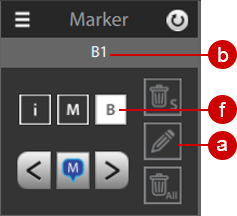
Approach 1: Determine the position of the first beat and grab and slide the red B1 (first beat) marker to that location. We recommend that the timeline be zoomed-in to achieve a precise placement. After the B1 marker is set then, in the Marker Module window (seen to the right) select the B button for Beats and, while the progress indicator (PI) is near the B1 marker click the Pencil icon (a). When you do, you’ll see B1 (b) appear in the module window and the pencil button opens the beat marker editing dialog .

Next, under the section entitled “Automatic Beat Insertion” (c) select the radio button that says Use Detected BPM and then below that choose, “To the Right” (d) and then click OK at the bottom. When you do, SS6 will insert Beat Markers, starting from B1 and through the end of the song, use the time interval determined by the BPM measured by SS6 for the opened file.
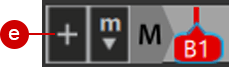
Approach 2: Determine the position of the first beat and grab and slide the red B1 (first beat) marker to that location. We would recommend that the timeline be zoomed-in to achieve a precise placement. Next, determine the location of the next or second beat. While zoomed in and with the PI positioned precisely at the location of Beat 2, click the + button (e) (with b having been selected from the dropdown list next to it). When this is done second thin RED line will appear in this marker track which is the second marker. Another way to insert a Beat marker is to click in the beat/measure marker area with your mouse, when the “B” (f) in the Marker module is clicked. This will insert a beat marker at the location of the click.
Once you have the first two beats set in the beat graphing area, using the beat marker editing menu dialog choose the option that says “Use Timing Between Above Beats” (g)and then in the “Marker Timing Reference Points” (h) and choose B1 to B2 (or for that matter ANY 2 Beat Markers that are accurately placed). Once done then complete your selections near the bottom to insert beats to the right, left or entire song, and then click okay.
To better see and manipulate these Beat Markers we suggest that you zoom in (zooming module). All Beat Markers are labelled starting with the first beat marker, which is always displayed in the large RED bubble and shown as B1 shown below. Subsequent Beat Markers labels are visible ONLY on mouse over. Their number is displayed in a tools tip type labeled that appears on screen.
Here are some additional important details about moving and deleting Beat Markers:
- Holding down the ALT key when you are working in the beat are will enlarge the Beat Markers approximately 4-fold making it easier to see and select them.
- Clicking directly on a beat marker will cause it to be selected and it will turn green. Clicking on a different beat marker will deselect the first and select the newly clicked one.
- The control and/or shift keys can be used to select multiple Beat Markers.
- Click and drawing a rectangle around a group of Beat Markers will select all Beat Markers within the rectangular area.
- Selected Markers can be moved left or right by dragging with your mouse or using the arrow L/R arrow keys
- Tapping the ESC key will deselect all selected Beat Markers.
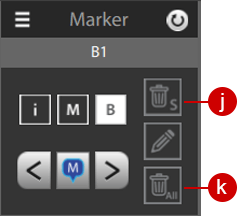
Once Beat Markers are inserted, there are two ways to edit them. The first way is from the Markers Module shown nearby. Select the “B” for Beat Markers and then place the Progress Indicator (PI) near the Beat Marker of interest. The module displays the label that is active just above the controls. In the image nearby you can see B1 being displayed. On this module note the two trash icons. The top one (j) with the S, when clicked, will delete the single selected marker. The bottom (k) one (all) when selected provides several options. These include Delete All, Delete All to the Left, All to the Right, and Delete every second one.
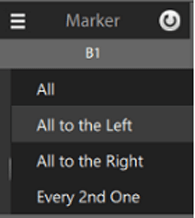
The second way of editing Beat Markers is right clicking over top of a selected beat marker. When you do this a context menu will open with several deletion options. These are:
Delete this marker
Delete all markers
Delete all markers to right
Delete all markers to left
Delete every other (2nd) marker
Measure Marker Insertion:
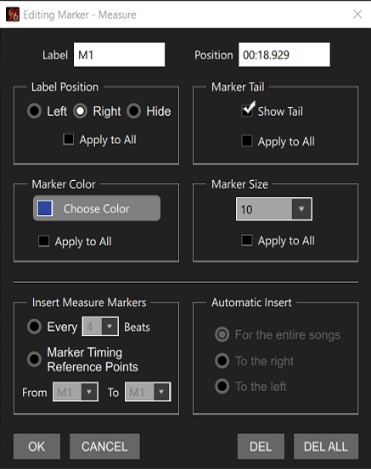 Similar to inserting Beat Markers, Measure Markers can also be inserted automatically. Start by
grabbing the M1 marker that SS6 automatically inserted in the Marker track and dragging it to the
left or right of the B1, to indicate the beginning position of the first measure of the song. Next,
click the M on the Marker Module with the PI near this M1, and then the Pencil Icon to open the
Measure Marker Edit menu. The dialog shown to the right will open. From this dialog, in the lower
left quadrant two options are available
Similar to inserting Beat Markers, Measure Markers can also be inserted automatically. Start by
grabbing the M1 marker that SS6 automatically inserted in the Marker track and dragging it to the
left or right of the B1, to indicate the beginning position of the first measure of the song. Next,
click the M on the Marker Module with the PI near this M1, and then the Pencil Icon to open the
Measure Marker Edit menu. The dialog shown to the right will open. From this dialog, in the lower
left quadrant two options are available
- Every X beats. If you have already inserted beat markers for the entire song, this selection will insert Measure Markers every X beats counting the beats beginning AFTER the placement of the first Measure Marker (M1). After making this selection, moving to the right, select “To the Right” and the click the OK button and the MM for the remainder of the song will be inserted moving to the right. Unlike Beat markers, Measure markers are contained within bubbles in the marker track area.
-
Marker Timing Reference Points. If you are only interested in MM and don’t want
or need to insert beats, then you may want to simply locate the position of MM1 and MM2 on the
timeline. Once this are precisely placed then using the second radio button in the lower left
quadrant, select this option and then choose the measure markers from the drop downs that you
will be using as reference points.
If there are only two then this is not necessary but if you have several, or if the timing of the song changes part way through, you may need to create other MM and use other reference points to accurately place MM in other locations within the song.
To insert a second MM determine its location and position the PI precisely at the location where you’d like the second MM. Next, click the + button (with M having been selected from the dropdown list next to it). When this is done second BLUE line will appear in this marker track which is the second marker.
Another way to insert a Measure Marker is to click in the beat/measure marker area with your mouse, when the “M” in the Marker module is clicked. This will insert a Marker Marker at the location of the click.
Measure and Beat Marker Customization: As can be seen from the MM and BM Edit dialog windows, the top half of these dialogs allow for the customization of both types of markers. These include changing the label position, showing a tail, changing the color and changing the marker size.
 10.7 Speed Trainer: This button opens the Speed Trainer module and places it in bottom
module area. In previous builds the Speed Trainer functionality was found within the loop module. In
Version 6 it has its own module which is shown to the right. The On/Off button allows this function to
be temporarily turned off or bypassed if it has been setup for a given loop. Immediately below this
setting is a drop-down list of loops that have been created. Users select the loop for which they’d like
to apply Speed Trainer from this list. Below this there are three additional settings:
10.7 Speed Trainer: This button opens the Speed Trainer module and places it in bottom
module area. In previous builds the Speed Trainer functionality was found within the loop module. In
Version 6 it has its own module which is shown to the right. The On/Off button allows this function to
be temporarily turned off or bypassed if it has been setup for a given loop. Immediately below this
setting is a drop-down list of loops that have been created. Users select the loop for which they’d like
to apply Speed Trainer from this list. Below this there are three additional settings:
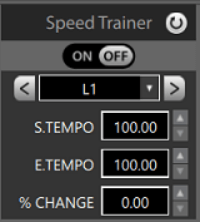
S.Tempo: This is the starting tempo for speed trainer. You can use the arrow buttons to change the default value of 100% or the value can be typed in by clicking in this form field with your mouse.
E.Tempo: This is the ending tempo for speed trainer. You can use the arrow buttons to change the default value of 100% or the value can be typed in by clicking in this form field with your mouse. While most users, start with a lower value and have it gradually increase to this ending value. That does not have to be the case. This ending value can be LOWER that the S.Tempo
%Change: This value is the change that will be incremented by Speed Trainer each time playback loops. For example, if this value is 5% and the start tempo was 80% it would play at 80, then 85, 90, 95 etc.
 10.8 Metronome: This button opens the Metronome module and places it in bottom module
area. It can be seen to the right of this text. At the very top, to the right of the Metronome label is
a circular arrow button which is a reset button. Moving downward, the value below this area on the left
is the detected Metronome value that is currently be used for the open song. To its right is a toggle
switch. The default value is D which means that you will hear the metronome click only when a song or
file is playing. Sliding this toggle button to the right changes it to aO which means always on. In this
state, regardless of whether the file is being played, the metronome sound will be playing.
10.8 Metronome: This button opens the Metronome module and places it in bottom module
area. It can be seen to the right of this text. At the very top, to the right of the Metronome label is
a circular arrow button which is a reset button. Moving downward, the value below this area on the left
is the detected Metronome value that is currently be used for the open song. To its right is a toggle
switch. The default value is D which means that you will hear the metronome click only when a song or
file is playing. Sliding this toggle button to the right changes it to aO which means always on. In this
state, regardless of whether the file is being played, the metronome sound will be playing.
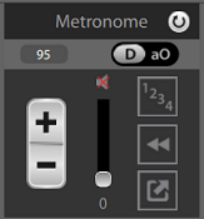
Below this line are the main set of controls for the metronome feature and we’ll review each of these herein.
The +/- button will increase or decrease the metronome value show immediately above this button and this value is the one that will be used by SS6 when the metronome is sounded.
The slider which has a “0” value at the bottom is a volume slider. By default, this volume is set to ZERO or off. Moving the slider makes the metronome beat audible and it allow control over the metronome playback volume.
Lastly, let’s review the three buttons on the right.
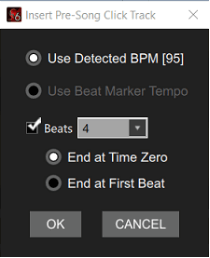
This first one is the 1-2-3-4 button which is a click track button. This button opens this small dialog windows and allows you to customize and insert a click track prior to the start of the song playing. At the very top you have two options for the timing. Once is to use the detected BPM. The second, assuming you have created Beat markers is to us the spacing between these markers as the timing. Below this this is a checkbox and drop down which allows for the selection of the number of beats that will be inserted for the click track. Lastly, below that you have two more options. The first tells SS to end the click track beats at time 0 of the song. If the other option is selected, SS6 will end the playing of the click track at the first beat. This is likely the more accurate option BUT it requires that you find and precisely set the B1 marker to this location. Once you have selected from among these options click the OK button
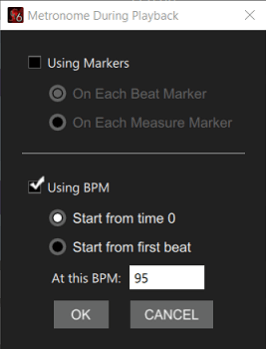 The Second button, moving downward is the Metronome Edit button. When clicked it opens the dialog window
to the right. Starting at the top of this dialog, the first set of options will tell the Metronome to
use, or play, when a marker is encountered. This assumes you have used the Marker function and have set
up markers for a particular song. It allows for the choice of playing each beat marker or on each
measure marker.
The Second button, moving downward is the Metronome Edit button. When clicked it opens the dialog window
to the right. Starting at the top of this dialog, the first set of options will tell the Metronome to
use, or play, when a marker is encountered. This assumes you have used the Marker function and have set
up markers for a particular song. It allows for the choice of playing each beat marker or on each
measure marker.
The second set section is for BPM usage and this is the default setting. Your options are to begin playing the click track at time 0 or on the first beat (again this assumes you identify and position the first beat using the B1 marker). Moving downward the BPM detected will appear and this is the value that will be used to determine the timing of the click track sounds. This value can be easily customized here if a different value for use the Metronome is preferred.
Once these settings have been modified, click the OK button at the bottom to apply them.
 The last button at the bottom left, when toggled on will turn white. It does not open a dialog window it
simply changes from gray to white. When ON, this tells SS to include the Metronome sound when it EXPORTS
and creates a new audio file
The last button at the bottom left, when toggled on will turn white. It does not open a dialog window it
simply changes from gray to white. When ON, this tells SS to include the Metronome sound when it EXPORTS
and creates a new audio file

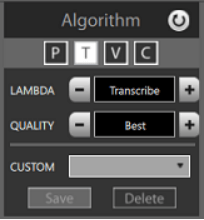 10.9 Algorithm: This button opens the Algorithm module and places it in bottom module
area. It can be
seen to the right. Immediate below the Algorithm label are the default algorithm buttons. These include
P, T, V and C. By default, SS6 uses T or Transcribe. This allows for good quality when substantial
changes to key or tempo or made. If the changes being made or not substantial, for example a couple of
semitones, the P (performance) setting is more appropriate and should provide for better quality. V is
for voice and is recommend for files at contain only the human voice. This might be used for changing
the key or tempo of a voice over, or narration. The last setting is C which stands for custom. If you
have created a custom algorithm and save it, setting this button as default allows you to select a
custom algorithm and use it as the default.
10.9 Algorithm: This button opens the Algorithm module and places it in bottom module
area. It can be
seen to the right. Immediate below the Algorithm label are the default algorithm buttons. These include
P, T, V and C. By default, SS6 uses T or Transcribe. This allows for good quality when substantial
changes to key or tempo or made. If the changes being made or not substantial, for example a couple of
semitones, the P (performance) setting is more appropriate and should provide for better quality. V is
for voice and is recommend for files at contain only the human voice. This might be used for changing
the key or tempo of a voice over, or narration. The last setting is C which stands for custom. If you
have created a custom algorithm and save it, setting this button as default allows you to select a
custom algorithm and use it as the default.
Below these four buttons there are two drops down boxes which allow you to choose other Lambda and Quality Settings. These are the settings which allow you to create a Custom algorithm. Please note, in the Lambda settings box, the choice of Polyphonic 1, 2, and 3 when paired with the Best Quality setting will result in an algorithm that likely cannot be used or played in real time because your CPU power cannot modify the file sufficiently fast to keep up with the play back. When this happens, the playback will stutter or start and stop. To hear one of these custom settings, start the playback and then stop it for 20 seconds or so, and then resume playback. This will allow your computer to continue to process the file while paused and then on playback it will play smoothly until playback again catches up with process. When such a custom algorithm is used, and applied to a new file that is being create in SS using the EXPORT command, processing will be significantly longer than usual but the resulting file, once created will play seamlessly because all of the processing work was done in its creation, and playback proceeds in the normal way.
When employing these different algorithms, the volume of a song may change from the application of a specific algorithm and is known and expected outcome.
10.10 Zooming
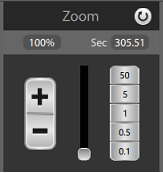
The zooming module works similarly to how it did in Version 5. When a song or file is first opened, the entire song appears in the graphing window regardless of whether it is 30 seconds or 30 minutes. That view is an un-zoomed view. Once it loads the zooming module will show a value of 100% (no zoom) and the seconds will show the duration of the song in seconds. Increasing the percentage value and making it larger will zoom in, and making it smaller will zoom out.
The +/- buttons change the percentage by units of 1. The slider in the center is a rapid adjustment and enables big changes to be made quickly. The preset buttons on the right are in units of seconds and when clicked will zoom to that preset value of seconds. These presets can be modified in the Options >> Program Settings 1 window.
11
Open File Tabs: Previous versions of SS only would open a single file a time. Version 6, depending upon the model you buy can open as many as 10 songs at one time. Each file is opened in a separate tab and changes and affects can be made to each song in each tab. The tabs are place immediately below the graphic icon menu and immediately above the Marker and Looping tracks shown in Section 12. The name for each file is displayed on each tab.

12
 Info Marker/Loop Tracks: The next area, shown below is to house the triangular icons
for Informational
Markers (M) and Loops (L). The + buttons to the far left will insert either a Marker or Loop at the
position of the progress indicator when the + button is clicked. The M or marker track at the top is for
Information Markers only. Measure and Beat Markers are located in a different location. The lower track
for loops illustrates that a completed loop consists of a beginning Green and ending Red Marker. A
detailed explanation of Markers can be found in Section 10.6. A detailed review of loops can be found in
Section 10.5
Info Marker/Loop Tracks: The next area, shown below is to house the triangular icons
for Informational
Markers (M) and Loops (L). The + buttons to the far left will insert either a Marker or Loop at the
position of the progress indicator when the + button is clicked. The M or marker track at the top is for
Information Markers only. Measure and Beat Markers are located in a different location. The lower track
for loops illustrates that a completed loop consists of a beginning Green and ending Red Marker. A
detailed explanation of Markers can be found in Section 10.6. A detailed review of loops can be found in
Section 10.5
13
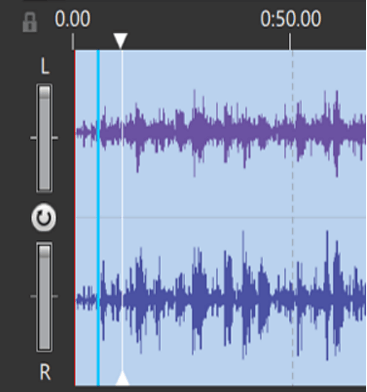 Graphing Area: The next section of the User Interface is the graphing area. This is
where the audio data is plotted. As can be seen there is a Left and Right track of data. Across the top
is a timeline. As the time line is zoomed in the units will decrease from minutes to seconds, to tenths
and even hundredths of seconds. The red and blue lines are beat and measure markers. These will be
discussed in detail in a separate section. The white link with the triangular top and bottom is the
progress indicator (PI) which moves as the song is played. To the very left are sliders for controlling
or adjusting the volume of the Left or Right tracks individually.
Graphing Area: The next section of the User Interface is the graphing area. This is
where the audio data is plotted. As can be seen there is a Left and Right track of data. Across the top
is a timeline. As the time line is zoomed in the units will decrease from minutes to seconds, to tenths
and even hundredths of seconds. The red and blue lines are beat and measure markers. These will be
discussed in detail in a separate section. The white link with the triangular top and bottom is the
progress indicator (PI) which moves as the song is played. To the very left are sliders for controlling
or adjusting the volume of the Left or Right tracks individually.
Lastly the small padlock in the upper left side is a track synchronization tool. Click this will unlock the tracks and open a dialog which will allow you to move forward or backward either of the tracks. In the unlikely event that the two tracks are not synchronized, this dialog allows you to select and shift data in either the left or the right track. Once you have shifted the data, before saving it, you can preview and listen to it.
14
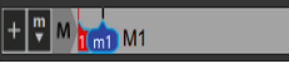 Marker Area: Immediately below the graphic area is a track for markers, specifically
Beat and Measure Markers. As can be seen in the nearby image there is a Red B1 (beat 1) marker and Blue
m1 (measure 1) marker. These two markers are automatically created and inserted when a song is opened.
Also note the m with the downward arrow. This is a selection box from which you can choose either an m
for Measure
Marker Area: Immediately below the graphic area is a track for markers, specifically
Beat and Measure Markers. As can be seen in the nearby image there is a Red B1 (beat 1) marker and Blue
m1 (measure 1) marker. These two markers are automatically created and inserted when a song is opened.
Also note the m with the downward arrow. This is a selection box from which you can choose either an m
for Measure  or B for Beat. There is also a + button on the far-left side. Clicking this +
button will insert either a Measure or Beat marker on the timeline. There is much more to explain about
these markers and how they work in Section 10.6 of this User Guide.
or B for Beat. There is also a + button on the far-left side. Clicking this +
button will insert either a Measure or Beat marker on the timeline. There is much more to explain about
these markers and how they work in Section 10.6 of this User Guide.
15
Chord/Notes: As we proceed downward the next area on the User Interface is the Chord or Note area. When a file is opened in SS6 it will automatically run chord and note detection. Chord detection is the default setting and chords will show in this area inside of bubbles. As a song is played the bubble that is red indicates the position of the value being played by SS at that time.

These bubbles are of a specific length as this length is the measure duration of the chord. Please note that when a file is opened, the values inside these chord bubbles may not be visible (though can be seen with a mouseover). In order to see the chord values you will likely need to zoom in. As the zoom increase the bubbles grow to a sufficient size to display the chord values. A similar situation exists with the Note values. By toggling on the Note Detection (and turning off Chord detection) in (see 10.1) the note values will be shown and again, zooming will likely be necessary to see the note values. Note detection is accomplished using a spectrum analysis that is briefly referenced in Section 9.9 above.
Both Chords and Note values can be edited. To make editing easier we suggest you zoom in significantly so the bubbles and the value inside of them are being displayed. After that you can click on the beginning or ending edge of a bubble and slide it left or right to lengthen it or shorten it to adjust the length of timing of the value being played (displayed). You can also right click in any empty space and SS6 will insert a new chord bubble with a default value that you can edit or customize. You can also right click on any existing bubble and an EDIT menu will appear from which you can do a number of different things that allow you to both customize and edit chord and note values.
Any changes/edits you make to chord or note values can be saved in a SS project file so don’t forget to save your changes. Also, if you’d like to print Note or Chord values, this can be done via the File >> Export Chord // Export Notes. (see #2 above) Keep in mind that both Chord and Note detection are not perfect. There are many factors which influence their accuracy.
16
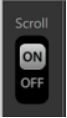 Scroll Button: This On/Off toggle is set to Off by default. When it is toggle on (and
when graphing date is zoomed-in) the PI will move the center of the screen and then become fixed and the
graphing will move rather than the progress indicator. In the On state the PI can also be grabbed with
your mouse and repositioned in a different position, other than the center of the screen where it also
will remain fixed and not move.
Scroll Button: This On/Off toggle is set to Off by default. When it is toggle on (and
when graphing date is zoomed-in) the PI will move the center of the screen and then become fixed and the
graphing will move rather than the progress indicator. In the On state the PI can also be grabbed with
your mouse and repositioned in a different position, other than the center of the screen where it also
will remain fixed and not move.
17
Miniature Graphing Area: This area serves a dual function. When a file is zoomed-in it allows a user to see WHAT part of the entire song is currently showing on the screen. The segment that is on the screen is shaded in gray as shown below. Secondly, it serves as a scroll bar. You can grab the shaded area with you mouse and drag it left or right and, as you do, the main graph will move in the same direction.

18
The bottom section of the UI consists of two things. The first is the Song Surgeon Player controls. Here you can start/stop/pause the playback of a song. As a side note, you can also use the space bar to start and stop the playback. When SS is minimized and in your task bar, on mouseover, you can stop and start it with your mouse without needing to open it on the screen.
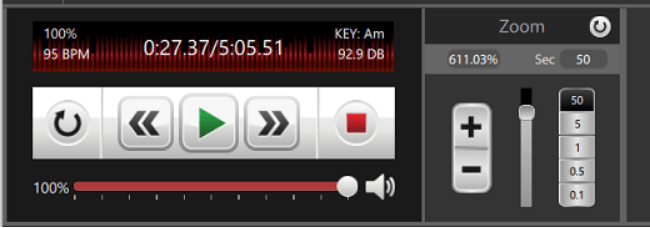
On either side of the green play button are the scrub buttons. This scrub forward or backward as indicated when clicked. The scrub time can be customized and set in the Options >> Settings Button of the program. The circular arrow on the far left is a replay button which, when click, will automatically replay again, the file that is currently playing once it completes.
Below these buttons is the volume slider. This volume slider controls the volume on playback. Unlike older versions, this slider does NOT have any effect on the volume of files that are Exported.
Lastly, above the playback buttons, the display area provides useful details about the song. On the left you can see the BPM value. 100% means that this tempo is 100% of the original – or has not been changed. On the right SS displays the detected key and below it, the measure volume is displayed. In the center are two-time designations. The first is the current playback position. The second value is the length of the open file. In this example the progress indicator is 27.37 seconds into the song and the entire song length is 5:05 (5 minutes, 5 seconds and change).
Modules Track: To the right of these playback controls is the real estate for Song Surgeon’s Function modules. In the above picture you can see the zoom module. Normally this space can accommodate up to five modules open at one time and, if there are more than five a scroll bar will appear so you can scroll and see all open modules. However, depending upon the resolution of the screen it may be able to display more than five modules at a time.
19
Foot Pedal Support (Infinity and Midi)

Song Surgeon provides a foot pedal interface for hands-free operation for several of the key playback functionalities. Currently, Song Surgeon utilizes the Infinity, IN-USB-3 foot pedal, via a USB connection. A picture of the foot pedal is shown below. The Foot pedal interface is only supported in the Professional model of Version 6.
The Infinity Pedal has three switches or pedals. The center pedal can be used to Start and Stop the playback of the currently open audio file. The left pedal has two functions. When depressed once ( a single click ) it rewinds the playback to the BEGINNING point of the current loop. If double clicked, it causes the current position to jump BACKWARD to the BEGINNING point of the next previous loop. Subsequent double clicks will again cause the progress indicator to jump out of the current loop and BACKWARDS to the previous loop until there are no more previous loops.
Similarly, the right button of the pedal when depressed ADVANCES the playback position to the next BEGINNING loop point, and with subsequent clicks of the pedal continues to ADVANCE to the next BEGINNING loop points until there are no more.
Song Surgeon 6 also supports a basic midi footpedal which simple starts and pauses playback. This means you can be hands-free and control playback with your foot.
Keyboard Shortcuts
The table below displays keyboard shortcuts for common operations in Song Surgeon.
| Open | Ctrl-O |
| Find | Ctrl-F |
| Open Playlist | Ctrl-L |
| Undo | Ctrl-Z |
| Redo | Ctrl-Y |
| Insert empty audio tab | Ctrl-N |
| Save | Ctrl-S |
| Save As | Ctrl-Shift-S |
| Cut | Ctrl-X |
| Copy | Ctrl-C |
| Paste | Ctrl-V |
| Delete | Del |
| Insert Silence | Shift-S |
| Silence selected section | Shift-L |
| Change Volume for selected section | Shift-V |
| Fade in | Shift-I |
| Fade out | Shift-O |
| Clear selected area | Esc |
| Play/Pause | Space |
| Stop | H |
| Play Loop from the beginning | Ctrl-Space |
| Delete all loops | Ctrl-Del |
| Delete active loop | Shift-Del |
| Loop Start | B |
| Loop End | N |
| Create info Marker | M |
| Create Measure Marker | J |
| Create Beat Marker | K |
| Jump to loop start | ,(comma, not on keypad) |
| Jump to loop end | .(comma, not on keypad) |
| Jump to previous loop | L |
| Jump to next loop | ;(semicolon) |
| Increment tempo | T + ArrowUp |
| Decrement tempo | T + ArrowDown |
| Increment pitch | P + ArrowUp |
| Decrement pitch | P + ArrowDown |
| Zoom In | ArrowUp |
| Zoom Out | ArrowDown |
| Rewind Forward | ArrowRight |
| Rewind Backward | ArrowLeft |
On keypad
| Jump to loop beginning | Num 0 |
| Loop end -0.1s | Num 1 |
| Create end loop position | Num 2 |
| Loop end +0.1s | Num 3 |
| Loop start -0.1s | Num 4 |
| Create Loop begin | Num 5 |
| Loop start +0.1s | Num 6 |
| Tempo +1% | +(plus) |
| Tempo -1% | -(minus) |
| Pitch +0.1 | *(Asterisk) |
| Pitch -0.1 | /(Slash) |
| Play | .(Period) |
| Pause | Enter |
Also, in refernce to Sections 10.5 and 10.6, you can mouse over on any marker or loop (either beginning or end) and use the arrow left or right keys and each tap will move the marker 10 ms.
User Guide for Add-Ons
AO-1
Song Tuning
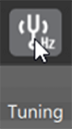
A newly added, optional feature to the original Song Surgeon 6, is its ability to detect the tuning of a song and if it is out of tune, re-tune it. It is an add-on that is only available in the Pro model . There are two ways that tuning detection works. One is manual and the other automatic. Let’s first review the manual approach.
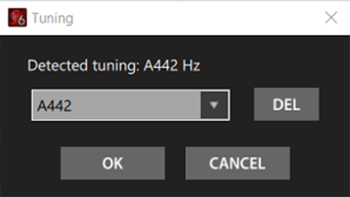
Once a song is open or loaded in Song Surgeon, and the Tuning Module is opened by clicking the Tuning icon,
Song Surgeon will begin running tuning detection on the song. This will take a few seconds. You can see the tuning detection running in the dialog window that opens and when done it will show you the detected tuning.
Song Surgeon will also display it in the top frame of the User Interface, where the other stats of the song are also displayed. Note that the detected value of A442Hz appears as the last value in this frame.
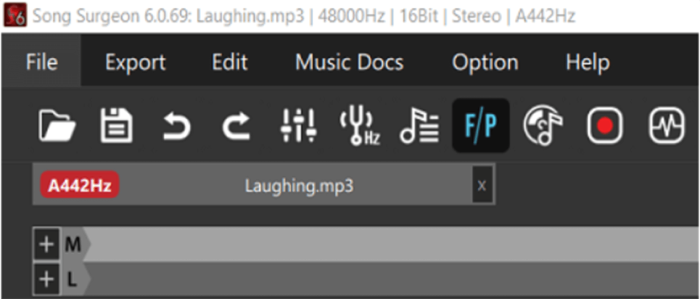
After detection is complete, If the song is out of tune – meaning that it is not tuned at A440 – Song Surgeon will insert a red bubble with the detected tuning in the tab for this song or file.

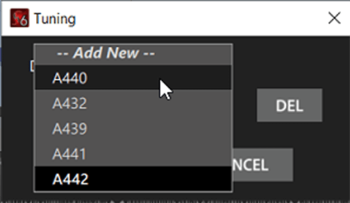
In this example, since we are expecting the song to be tuned at A440 and it is not, we can return the song to the correct value of A440 using the tuning dialog box. Simply click the drop down and select the value of A440 and Song Surgeon will immediately retune the song to this value, click the Okay button at the bottom and you are done. You will note that, after doing this, the red tuning value, previously displayed in the tab for the song, disappears.
A second way to detect tuning is automatically. Automatic Tuning Detection can be turned on in the Program Settings 1, tab, found in the Options button. Simply toggle this setting from Off to On and then click the Okay button at the bottom of this Options button to save this setting. When turned on Song Surgeon will automatically detect the tuning of all songs or files opened.
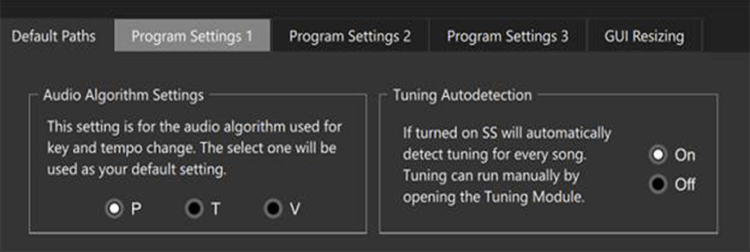
Tuning detection does take some time and will slow down the overall loading of the file, so take this into account before turning on the Automatic Tuning Detection.
When Automatic Tuning is used, the detected values will appear in the same locations as shown above for Manual Tuning. Retuning is also done in the same way as shown above for Manual Tuning.
If you decide to change the tuning of a song, in order for the new tuning to be made permanent, you must use the Export button at the top left of the Song Surgeon interface to create a new file with this change embedded in it.
AO-2
Vocal Removal /Instrument Isolation
The Vocal Removal and Instrument Isolation feature removes and isolates the selected instrument of choice from a song. When done, it returns two files. One with the isolated instrument only and the second of the entire mix but without this one instrument. Currently the list of instruments it can isolate include: guitar, bass, keyboard, vocals and drums. This VRII Tool has been previously offered as a web-based tool on our site, but now, is incorporated directly into Song Surgeon.
To begin using the VRII feature, you must first have the song open for which you’d like to remove or isolate and instrument. Clicking the VRII button with a song open will reveal this dialog window shown nearby.
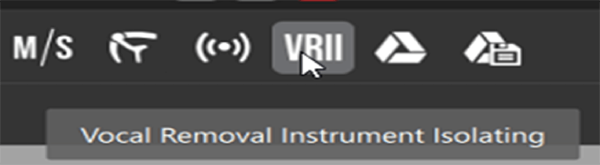
In this dialog window you will see the name of the file or song that will be processed. Below that you’ll next see two drop-down boxes. The first is a list of the instruments. Click this form field and select the instrument that you would like to have removed or isolated. Next, in the output format field, select the file format you’d like to use. After selecting these two options, click the process button and VRII will begin working.
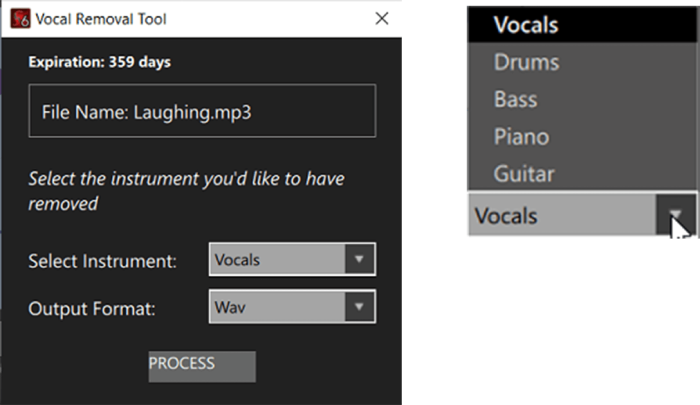
Here is a sequence of what happens next:
Step 1. This file will be uploaded to our VRII process server.
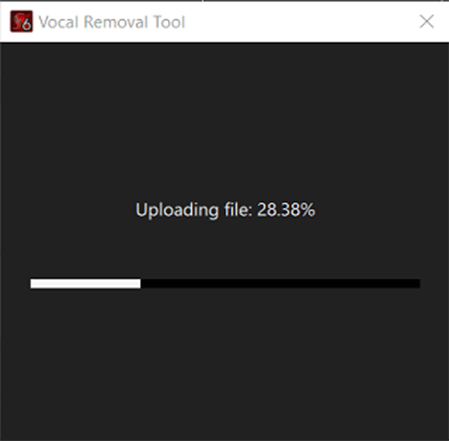
Step 2. The file is being processed to remove the instrument selected and create the two resulting files.
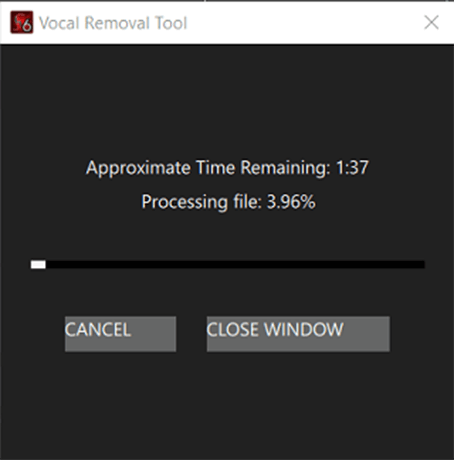
Step 3. The processed files are downloaded to Song Surgeon
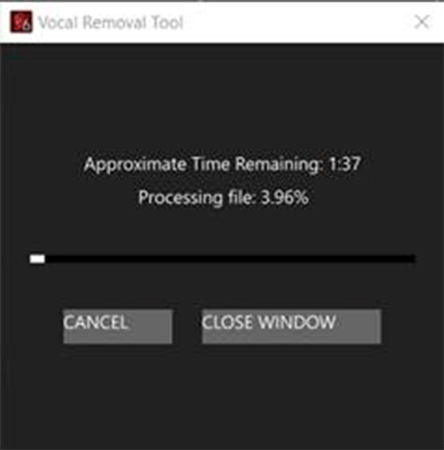
Step 4. The final step is that these processed files are opened in Song Surgeon.
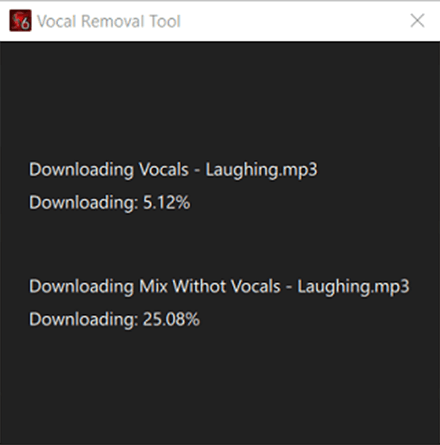
Once VRII finishes, Song Surgeon will have 3 open tabs. One with the original song. The second with the instrument that was removed – in this example “vocals” and the third is the “Mix Without the vocals. This allows you to toggle between tabs and hear any of these three versions of the song.
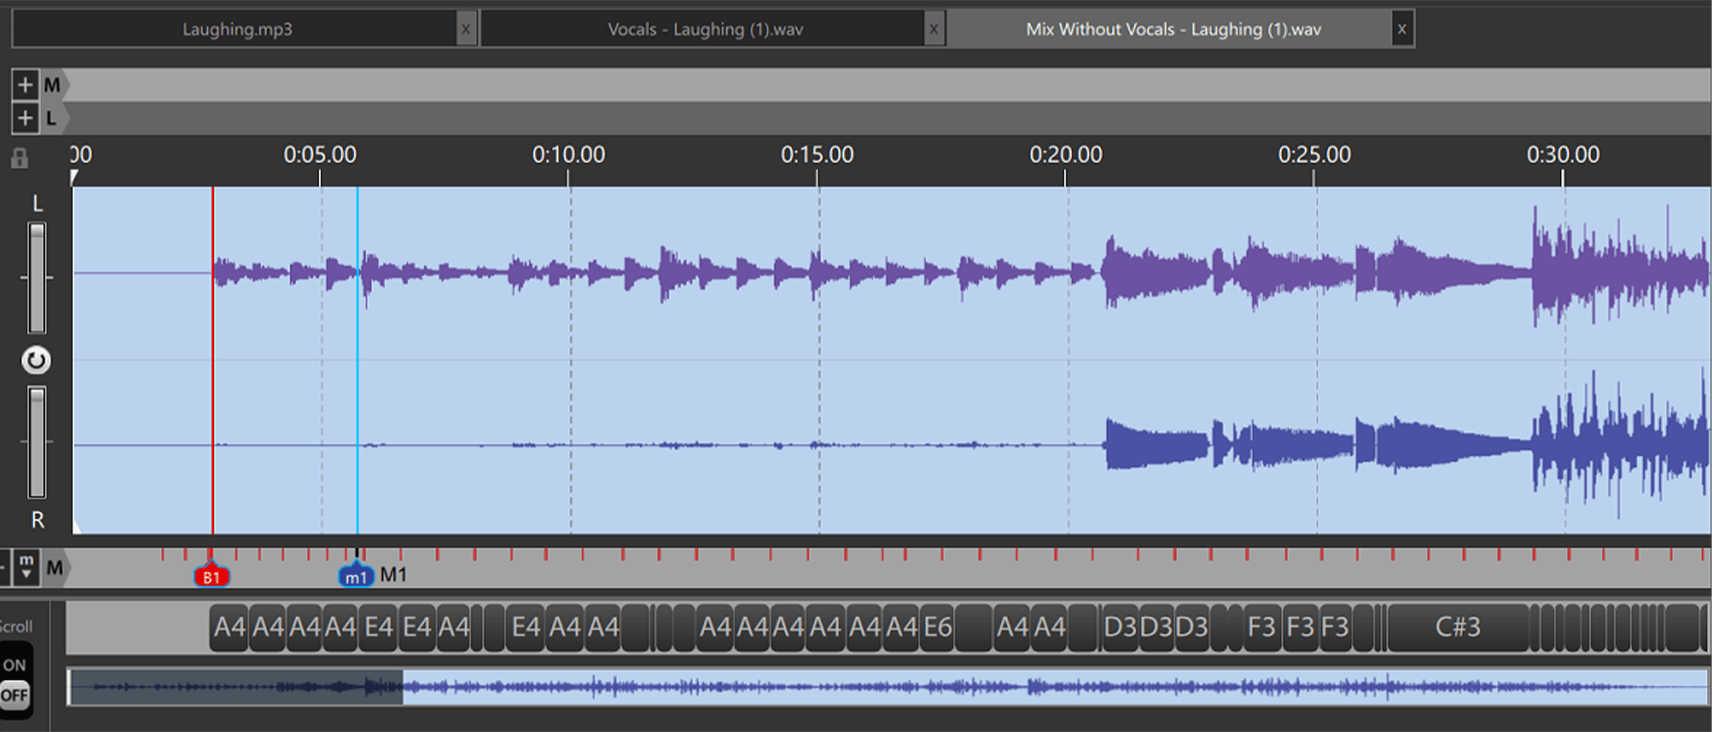
AO-3
G-Drive Integration with Song Surgeon
This section of the User Guide demonstrates how to use Song Surgeon’s Google Drive integration feature. This is an add-on feature only available for the Pro Model. When this module is activated in Song Surgeon you will see the two Google Drive icons near the top of the user interface as shown nearby.

When you click this the first icon of these two icons, it will open a window requesting you to log-in to your Google drive account as shown below. Select one of your Google accounts by clicking on it.

When you do, you will be prompted to login. Provide your password for that account and click the blue “Next” button.
The next screen you will see is this one. Click the Continue button.
Next you will see this “Permissions” screen from Google. Tick the box on the right to give Song Surgon permission and then click the Continue button
Finally, you will see this screen, confirming that you have given Song Surgeon access to the G-Drive associated with your email account.
The above procedure is a one-time process. Once completed, Song Surgeon can begin accessing and uploading files directly to your G-Drive account.
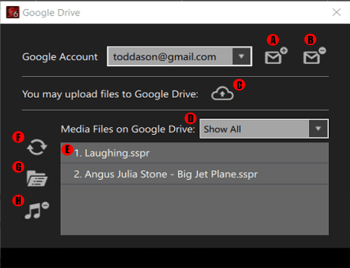
Now, let’s review the features in this main window which is displayed, when your click the first G-Drive Button.
Now, let’s review the features in this main window which is displayed, when your click the first G-Drive Button.
To the right of the Google Account field, where your email is displayed, there are two buttons:
AThe envelope with the plus sign on it, when clicked, allows you to add an additional email account and its associated G-Drive to Song Surgeon.
BThe minus button allows you to remove an email account and its associated G-Drive from Song Surgeon.
CMoving downward in this window, you will see an upload button. Clicking this allows you to upload a Song Surgeon project file, or any other A/V file that you want, into your connected G-drive.
DAs you move downward in this window, the next item you will see is a filter that allows to filter and show only the types of files you have selected in this window.
EA/V files uploaded to your G-Drive are shown in the larger center window. Depending upon your filter choice, these will be Song Surgeon Project files, Audio files, Video files or All files.
Lastly, let’s discuss the three icons to the left of this File List.
FThe top one refreshes the list. If you have just uploaded a file or files, and they are not showing in the list box, this button should refresh and update the list.
GWhen a file is selected in the list box and the middle “folder button” is selected, this selected file will be downloaded from G-Drive and opened in Song Surgeon.
HThe bottom button with the negative sign next to the music note, allows you to remove or delete a file stored on G-Drive.

The second G-Drive button with the floppy Disc image on it is a Save button. If you have a file opened in Song Surgeon from your hard drive or another physical drive, and you click this button, it will open a dialog window that looks like this, allowing you to assign a name. After that, click the SAVE button at the bottom right of the dialog window and Song Surgeon will create a project file, temporarily save it to local G-Drive folder, and then upload it to G-Drive. It will also leave an “empty” file with the same name here in this local G-Drive folder.
The second time you click the GDrive Save icon, it will use the existing project name and save it directly, so you will not see this dialog window. The /Song Surgeon 6/ Temp/GDrive/folder is used by Song Surgeon to manage the uploading and downloading of files to GDrive. You should not delete or rename any of the files found in this folder.
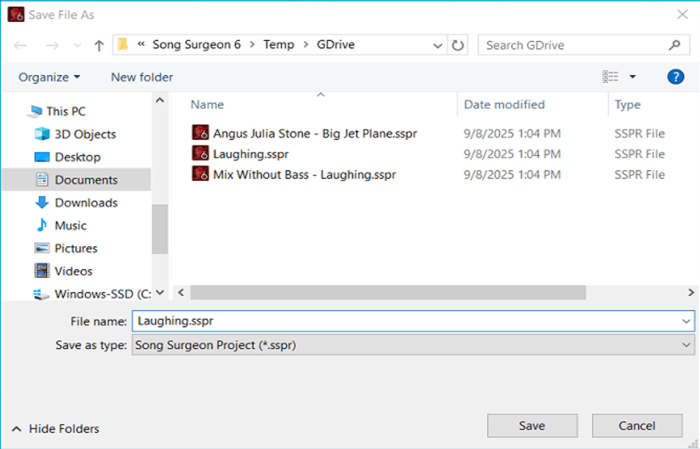
Please note that Song Surgeon’s Export command can also create and send files to GDrive. When you click the Export button and select one of the Export options, you will see this standard dialog window, allowing you to set the file type and the name. Note however, on the left side of this dialog window at the top, is a G-Drive folder.
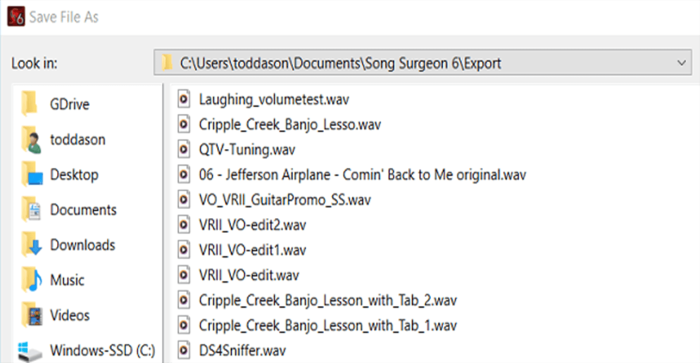
To Export and save to your G-Drive account, select this option. When you do you will see the path change to the \Temp\GDrive\ folder. Assign a name, select a file type, and then click Save at the bottom right. Song Surgeon will export to this local temp folder and then, once done, will upload this file to your GDrive account.
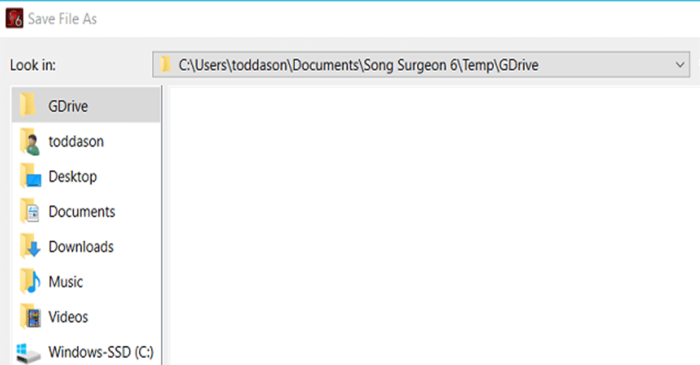
AO-4
Automatic Beat Detection and Graphing
Automatic Beat Detection and Graphing is an add-on feature that was added after Song Surgeon 6 was launched. It is available only for users of the Pro model. This new feature automatically detects the locations of the beats when a song is opened, and it inserts those beats into the beat marker area.
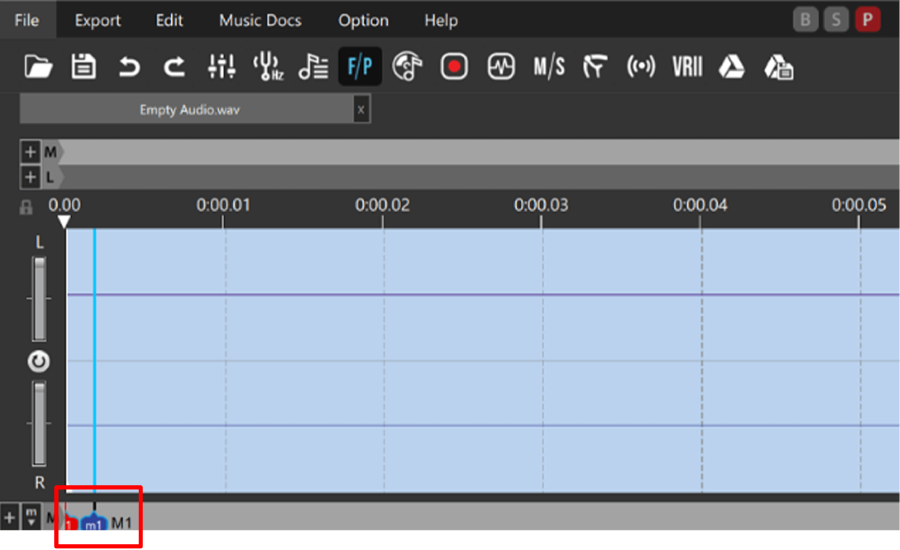
Automatic beat detection is not 100% accurate but it provides a good starting place if you need or want to see the beats of a song, and it can be a big time saver. If you have purchased this add-on, you will be able to turn it on by going to:
Options >> Program Settings 2 This setting can be found in the center of this tab and can be turned On or Off from the drop download list.
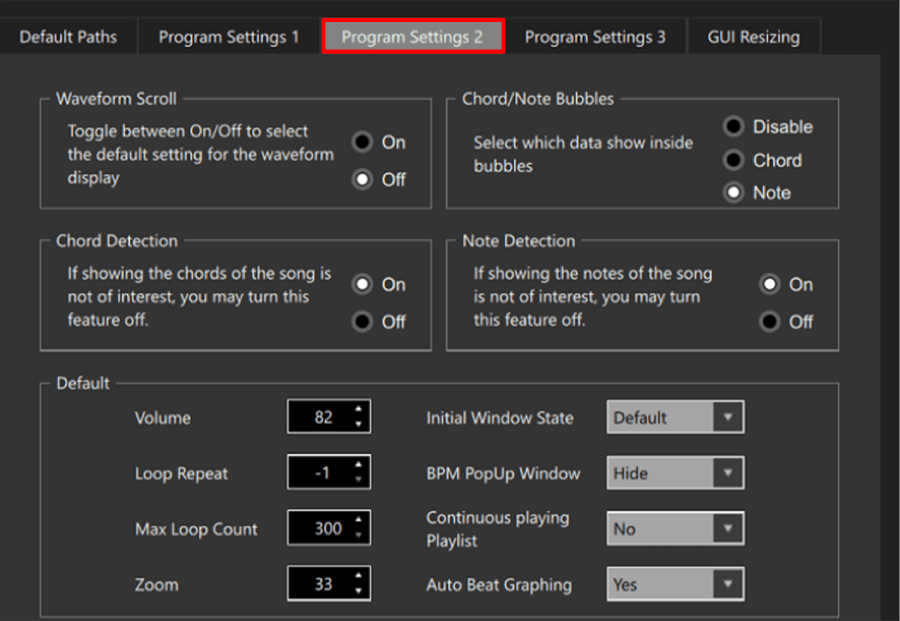
Once turned on, Song Surgeon will detect and graph the beats for each song or file it opens. You can see an example of this below.

You may want to move, add, or delete these to achieve the accurate placement of them. For that we refer you to Section 10.6 of the User Guide.
AO-5
Audio Restoration Add-On
The Audio Restoration Module is an Add-On to Version 6 Pro. Once purchased this Add-On will be automatically enabled within Song Surgeon and will be found at the bottom of the Edit drop-down menu.
There are six different audio restoration tools contained within this module. They are shown nearby.
Each parameter has a series of presets that can be selected from the drop down box for a specific situation. The customize button, when selected, allows you to see the underlying settings being used for a specific parameter and to modify or customize them.
To apply one of these parameters select a preset and click the OK button. As soon as you do, these changes will be applied in real time. Anything you apply can be removed using the UNDO button functionality in Song Surgeon.
Lastly, these parameters will be applied to the entire song/file unless you have selected a segment of the song by using your mouse and clicking and dragging to select an area. Also note that any changes made using this module can be saved permanently by Exporting and creating a new file.
This guide compiles practical, non-technical explanations and presets for common cleanup/mastering tasks. Use it front-to-back or jump to the tool you need.
1) Clip/Pop Removal
What it does (plain English)
Finds very short, impulsive spikes (clicks/pops) and repairs the bad samples by rebuilding from the
surrounding audio. It fixes glitches without dulling the track.
How it works (at a glance)
• Scans audio in small windows.
• Flags spike-like samples using a detection threshold.
• Reconstructs damaged samples so the repair blends in.
Core controls
w = window size | o = overlap | t = threshold (lower = more aggressive)
When to use
• Vinyl or cassette clicks and pops.
• Digital dropouts or tiny edit ticks.
• Mouth clicks in dialogue or podcasts.
Not for steady noises (hiss, hum, HVAC). Use a de-noiser for those.
Ready-made presets
• Gentle restore (keep brightness) — w=55, o=75, t=6: Occasional clicks;
preserves sparkle. Higher t = less aggressive.
• Everyday cleanup (balanced) — w=55, o=80, t=2: Daily driver for
crackle/ticks. Higher overlap gives smoother seams.
• Stubborn crackle (strong) — w=50, o=88, t=1: Dense vinyl crackle or
frequent spikes. Lower t catches more; high o hides seams.
Quick tweak
If the result sounds soft, keep the preset but raise t one step or lower o by
about five points.
2) De-Clipping (Repairing Clipped
Audio)
What it does
Detects flat-topped, over-level samples (true digital clipping) and rebuilds them to reduce harsh,
crunchy distortion while retaining the original character.
Use when you see/hear
• Squared or flattened peaks near 0 dBFS (or the track ceiling).
• Over-recorded sources, shouty moments, or raspy transients.
Don’t use for
• Random clicks or pops → run Clip/Pop Removal first.
• Steady hiss or hum → use Noise Reduction.
General presets
• Peak softener (gentle) — w=55, o=75, t=12
• Harshness tamer (balanced) — w=55, o=80, t=10
• Heavy rescue (strong) — w=60, o=85, t=6
Quick tweaks
• Too aggressive or dull? Raise t one step or lower o by ~3–5.
• Not enough repair? Lower t one step or raise o by ~3–5.
Window guidance
Tiny ticks: w ≈ 50–55; broad pops or flat tops: w ≈ 58–60; most cases:
w=55.
Workflow tip
If both clicks and clipping exist, run Clip/Pop Removal → De-Clipping.
3) Noise Reduction (De-Noising)
What it is
A smart “noise eraser” for steady background noise (hiss, hum, fan, HVAC). It lowers the constant
bed while keeping voice or music intact. Use Clip/Pop Removal for random spikes.
Use when
• Noise is present before, during, and after words or music.
• Quiet pauses reveal obvious hiss, buzz, or rumble.
Modes
• Adaptive – set-and-forget for changing noise (cycling A/C, street ambience).
• Manual – capture a 2–5 second room-tone sample for stable noise; often the most
transparent.
How much reduction? (rule-of-thumb)
• Light: ~3–6 dB
• Moderate: ~7–10 dB
• Strong: ~11–14 dB
• Extreme: ~15–20 dB (expect artifacts)
Presets
• Podcasts / VO (home/office) — Manual: 7–10 dB (if you can sample room tone);
Adaptive: 7–10 dB (if noise varies).
• Zoom / Phone / Screen-recorded — Adaptive: 10–14 dB (back off to 8–10 dB if it
sounds “swirly”).
• Vinyl transfers — Manual: 6–9 dB (after click/pop repair).
• Live music — Adaptive: 6–9 dB (protect transients; up to 10–12 dB if needed).
• Classical / acoustic — Manual: 3–6 dB (very gentle).
• Electronic / EDM — Adaptive: 6–9 dB.
• Field / ambience — Adaptive: 6–12 dB (reduce machines, keep atmosphere).
• Digitized cassette / VHS — Manual: 9–12 dB.
30-second check
Loop a quiet spot; toggle on/off; keep the setting that reduces hiss while leaving voices and
cymbals natural. If it sounds “underwater” or dull, reduce a notch or switch to Manual.
Simple workflow
1) Fix clicks/pops → 2) Choose Adaptive vs Manual → 3) Start ~7–8 dB → 4) Nudge in 2 dB steps → 5)
Re-check quiet + loud passages.
4) Limiter
What it does (plain English)
Acts like an audio airbag: it prevents sudden peaks from clipping—setting a hard ceiling that
engages only on the loudest hits.
Use when
• Final safety to stop clipping on tracks/mixes.
• Taming rare shouty moments.
• Preparing files so they won’t distort on phones/streams.
Settings
Threshold (dBFS) = ceiling; lower = more limiting.
Attack (ms) = how fast it catches peaks; shorter = catches spikes, longer = preserves
transient.
Release (ms) = how fast it recovers; too short → “pump,” too long → dull.
Presets
• Podcasts / VO — Thresh −3 dBFS, Attack 1 ms, Release 100 ms (If breathy S’s lose
bite → Attack 2–3 ms).
• Zoom / phone — Thresh −3 dBFS, Attack 1 ms, Release 80–120 ms (If “pumps” →
Release 140–160 ms).
• Live music — Thresh −2 dBFS, Attack 2 ms, Release 150 ms (If drums flattened →
Attack 4–6 ms or raise threshold slightly).
• Classical / acoustic — Thresh −1 dBFS, Attack 2 ms, Release 150–200 ms.
• Electronic / EDM — Thresh −1.5 dBFS, Attack 1 ms, Release 100–150 ms.
• Field / ambience — Thresh −2 dBFS, Attack 2 ms, Release 180–250 ms.
• Digitized cassette / VHS — Thresh −2 dBFS, Attack 2 ms, Release 150–200 ms.
• Vinyl transfers — Thresh −1.5 dBFS, Attack 1–2 ms, Release 150 ms.
Quick fixes
• Peaks still clip? Lower threshold 0.5–1 dB.
• Too aggressive/dull? Raise threshold 0.5–1 dB or lengthen release 20–50 ms.
• Transient punch lost? Lengthen attack 1–3 ms.
Chain note: If you also use a compressor, run compressor → limiter
(limiter last).
5) Compressor
What it does (plain English)
Acts like a gentle hand on the volume knob. When sound gets too loud, it nudges it down so quiet
parts feel closer to loud parts—steadier, easier-to-listen audio.
Use when
• Voices/instruments jump in level.
• Live recordings with big dynamics.
• Podcasts with animated speakers.
Settings
Threshold (dBFS) = where compression starts; lower (more negative) = more action.
Attack (ms) = how fast it reacts after crossing threshold; shorter = grabs fast spikes,
longer = lets initial “punch” through.
Release (ms) = how quickly it lets go; too short → “pump,” too long → dull.
Presets (start here; fine-tune)
• Podcasts / VO — Thresh −18 dBFS, Attack 10 ms, Release 120 ms.
• Zoom / phone — Thresh −20 dBFS, Attack 5–8 ms, Release 100 ms.
• Live music — Thresh −12 dBFS, Attack 25–30 ms, Release 180–220 ms.
• Classical / acoustic (very gentle) — Thresh −10 dBFS, Attack 30 ms, Release
200–300 ms.
• Electronic / EDM — Thresh −14 dBFS, Attack 15–20 ms, Release 120–180 ms.
• Field / ambience — Thresh −24 dBFS, Attack 30–40 ms, Release 250–350 ms.
• Digitized cassette / VHS — Thresh −18 dBFS, Attack 15–20 ms, Release 180–240
ms.
• Vinyl transfers (post-declick) — Thresh −16 dBFS, Attack 20–25 ms, Release 180
ms.
Quick fixes
Too squashed? Raise threshold 2–3 dB or lengthen attack 5–15 ms.
Still jumpy? Lower threshold 2–3 dB or shorten attack a bit.
Audible pumping? Lengthen release 20–50 ms.
Chain note: Compressor before limiter.
6) De-Esser
What it is
Targets harsh “S/Sh/Ch/T” (sibilance) by turning down a bright treble band when it gets too loud—a
smart, targeted dip that removes sting while keeping clarity.
Use when
• “S” sounds feel sharp/fatiguing (earbuds/phones).
• Bright EQ or compression makes sibilance jump forward.
• You want clarity without the “ice-pick” effect.
If the problem is low thumps (~80–150 Hz), that’s plosives → use a high-pass filter
instead.
Chain placement
HPF (plosives/rumble) → EQ → Compressor → De-Esser → Limiter. If compression or a
high-shelf boost increases sibilance, keep the de-esser after those.
Fast workflow
1) Find the hot spot (often 5–8 kHz; sometimes 4–6 or 8–10). 2) Set sensitivity so it triggers only
on esses, not on vowels. 3) Set amount so worst esses drop ~2–6 dB (avoid “lisp”). 4) Smooth timing
so action is invisible.
FFmpeg de-esser presets
(i=intensity 0–1; m=amount 0–1; f=freq-keep 0–1; s=mode)
• Podcasts / VO (natural) — i=0.30, m=0.35, f=0.60
• Bright female / airy mic — i=0.35, m=0.45, f=0.55
• Zoom / phone — i=0.40, m=0.50, f=0.55
• Live vocals (keep bite) — i=0.30, m=0.30, f=0.65
• Classical / narration (max transparency) — i=0.25, m=0.25, f=0.70
• Radio-style “finished” — i=0.35, m=0.40, f=0.60
• Dialogue (varied speakers) — i=0.33, m=0.38, f=0.60
Quick tweaks
• Still sibilant? Increase i by 0.05 (more often) or m by 0.05 (deeper).
• Getting lispy/dull? Decrease m by 0.05 or raise f by 0.05 (keep more
treble).
• Not sure what it’s catching? Temporarily set s=e (ess-only monitor), then back to normal.
7) Plosives (High-Pass Filter)
What plosives are & why HPF helps
Plosives are big, slow thumps on P/B sounds when air hits the mic. Prevention (pop filter, slight
off-axis) is best. If they sneak in, a high-pass filter trims very low bass where
the thump lives while keeping the voice natural.
The one control that matters most
f (frequency in Hz) — set this first. If pops remain, bump 10–20 Hz. If voice thins, back
off. (Advanced options you can usually leave: p poles = 2; t/w curve
shape defaults.)
Presets (start here; adjust only f at first)
• Close-mic podcasts / VO (with pop filter) — f=90, p=2
• Energetic podcast / emphatic speech — f=110, p=2
• Zoom / phone / screen-recorded — f=120, p=2
• Sung vocals (good technique) — f=80, p=2
• Stage mics / live speech — f=100, p=2
• Field interviews / ENG — f=120, p=2
• Archival cassettes / VHS voice — f=100, p=2
When to go steeper
If mega-plosives persist: keep p=2 and raise f 10–20 Hz, or stack a second HPF at
a similar f (two gentle stages > one extreme cut).
30-second sanity check
Loop a strong P/B; toggle on/off; keep the setting where thump drops and tone stays natural. If
thin, lower f by 10–15 Hz.
Recommended Order & Quick Chain Recap
Clip/Pop Removal → 2) De-Clipping → 3) De-Noising
→ 4) Compressor → 5) De-Esser → 6) Limiter → 7)
HPF for Plosives (often first in the corrective chain for speech; place before
comp/DE if needed). Always trust your ears: make small moves, A/B often, and re-check both quiet and
loud passages before printing your result.
AO-6
MusicXML Module
The MusicXML Module is an add-on for Song Surgeon 6 Pro. It helps you work with MIDI and MusicXML data, isolate individual MIDI channels, convert between formats, and create printable music notation from supported source material. When used with Song Surgeon’s note-detection tools, the module can also support a single-instrument audio-to-MIDI or audio-to-MusicXML workflow.
6.1 What this module can do
| Capability | Description |
|---|---|
| Printable notation | Create printable music notation from supported files and compatible workflows. |
| MIDI track access | Open a MIDI file, detect the available instrument channels, and load either the full mix or a single channel. |
| MusicXML playback | Open MusicXML files and work with their note and timing data inside Song Surgeon. |
| Format conversion | Convert between MusicXML (MXML) and MIDI formats. |
| Export options | Save generated files as MusicXML or MIDI and/or create ABC music notation (sheet music). |
| Single-instrument audio workflow | Use an isolated audio track with Note Detection to generate MIDI or MusicXML output. |
6.2 Opening the module
The MusicXML module button appears in the top icon menu. Clicking it opens the module controls in the Song Surgeon workspace. The screenshots below show the module icon, the main workspace area, and the control panel.
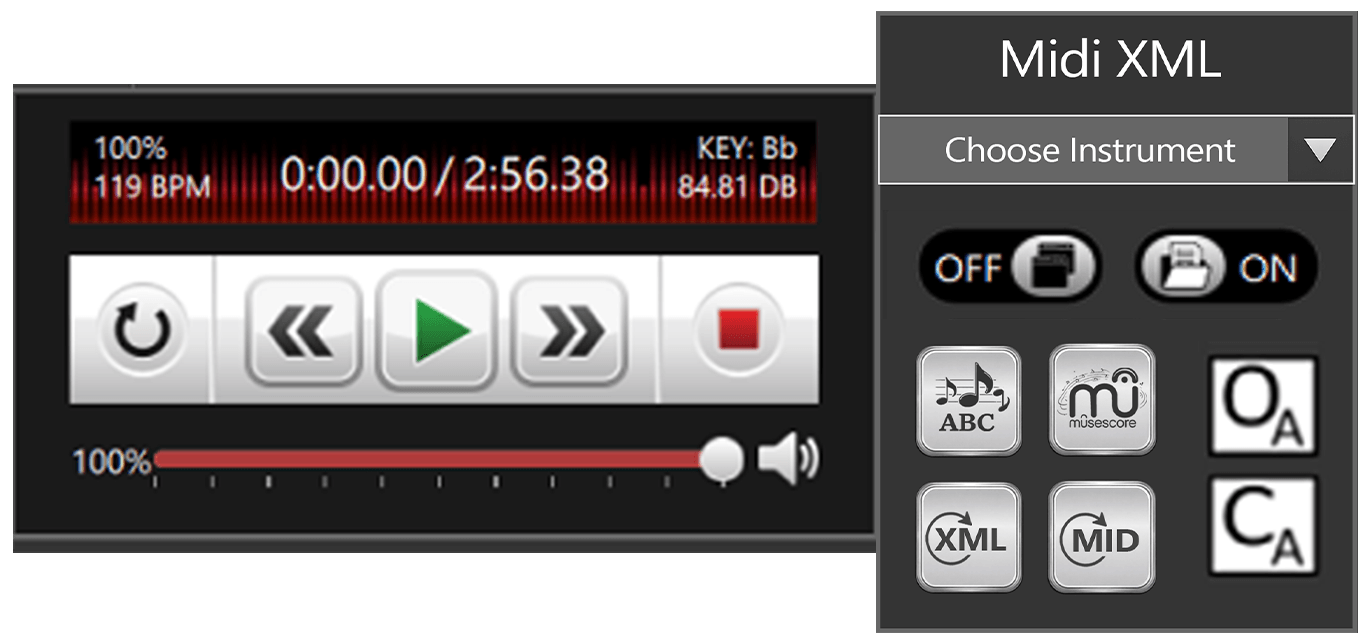
6.3 Working with MIDI files
When you open a MIDI file, Song Surgeon analyzes the file and identifies the available instrument channels or tracks. The All Tracks menu shows every channel found in that file.
- By default, the file opens as a combined or mixed instrument view.
- You can open the track list and choose a single instrument channel.
- When a single channel is selected, Song Surgeon places that channel on top of the full mix so you can compare the isolated part against the original combined track.
- This makes it easier to inspect one instrument without losing the broader musical context.
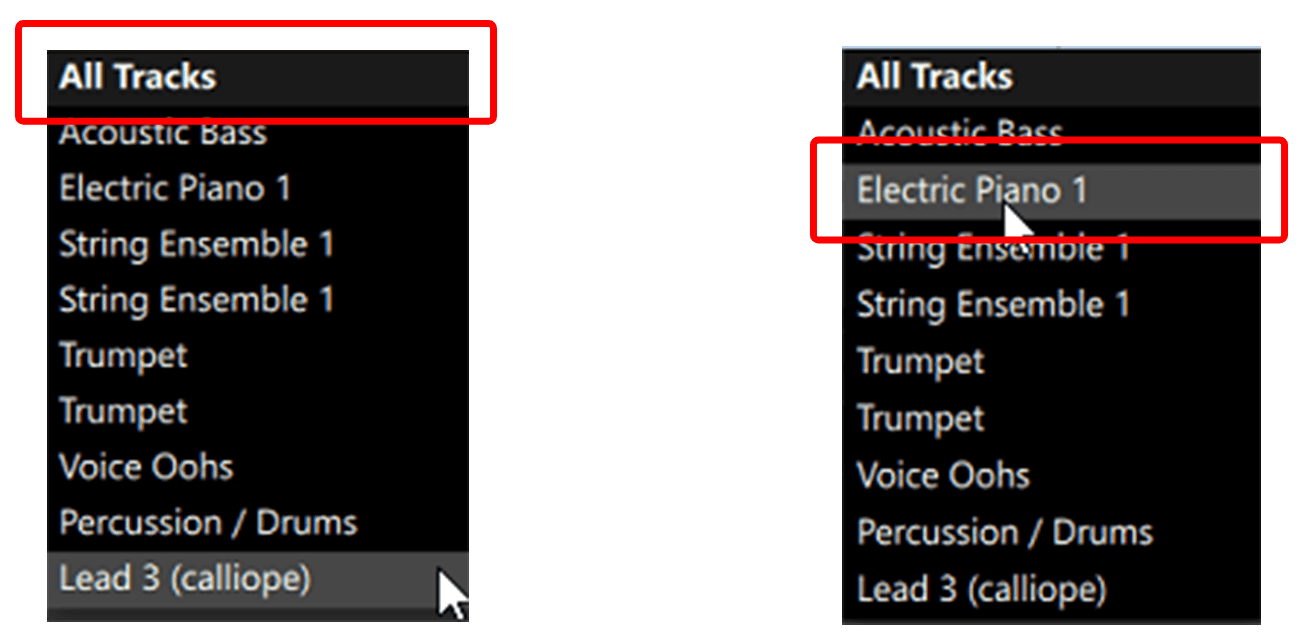
Full Mix
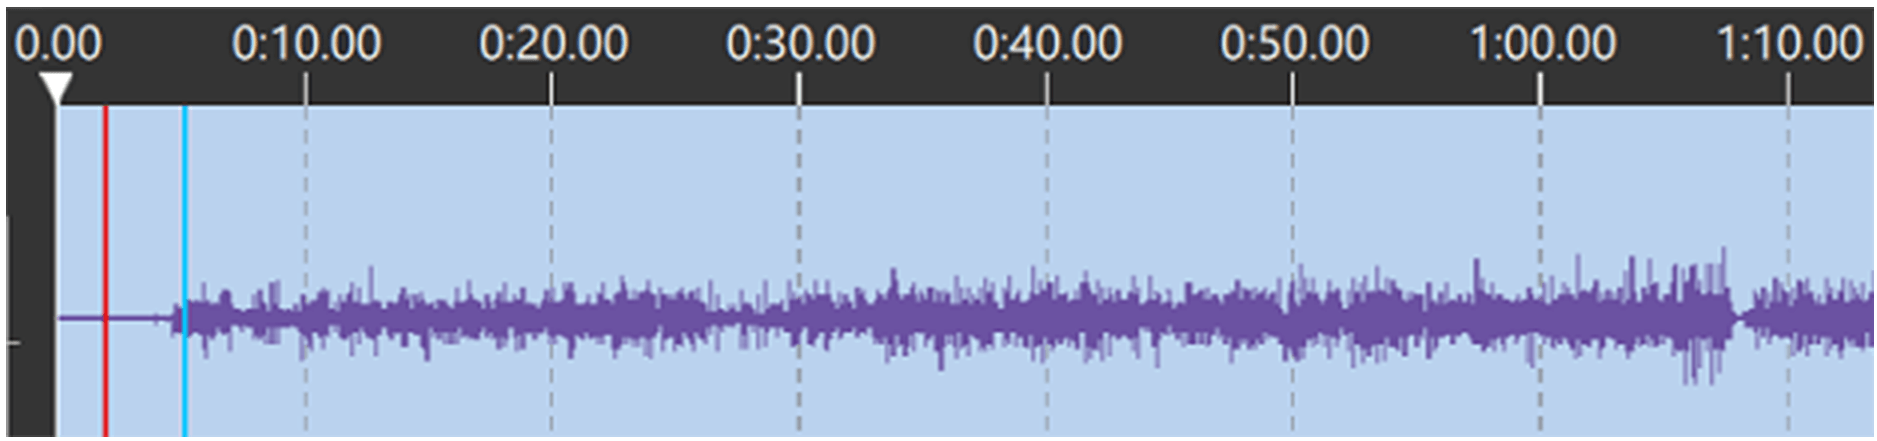
Electric Piano 1 – On top of Full Mix
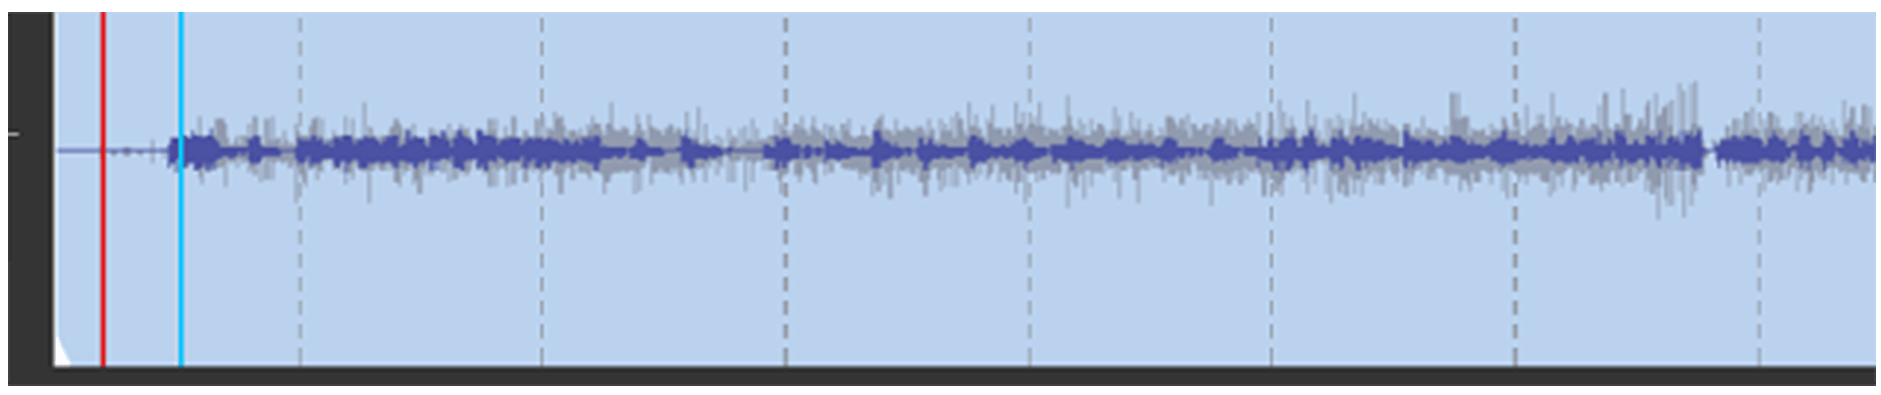
6.4 Module controls and buttons
The MusicXML module includes toggles, tab controls, and output buttons that affect how files are opened, exported, and displayed.
6.4.a Toggles and tab controls
- File toggle: Opens the selected instrument channel in a new tab and can also open generated ABC, XML, or MID files automatically after they are created.
- Folder toggle: Opens the folder where a generated ABC, XML, or MID file was saved.

- OA - Open All: Opens every instrument channel found in the file, each in its own tab.
- CA - Close All: Closes the instrument tabs and leaves only the original mixed MIDI file open.
6.4.b Output buttons
- ABC: Converts the currently selected MIDI or XML tab into notation output.
- MU: Opens the file from the currently selected tab in MuseScore.
- XML: Converts the data in the selected tab into MusicXML format.
- MID: Converts the data in the selected tab into MIDI format.
When an instrument tab is open, Song Surgeon displays note and timing information inside note bubbles for that track.
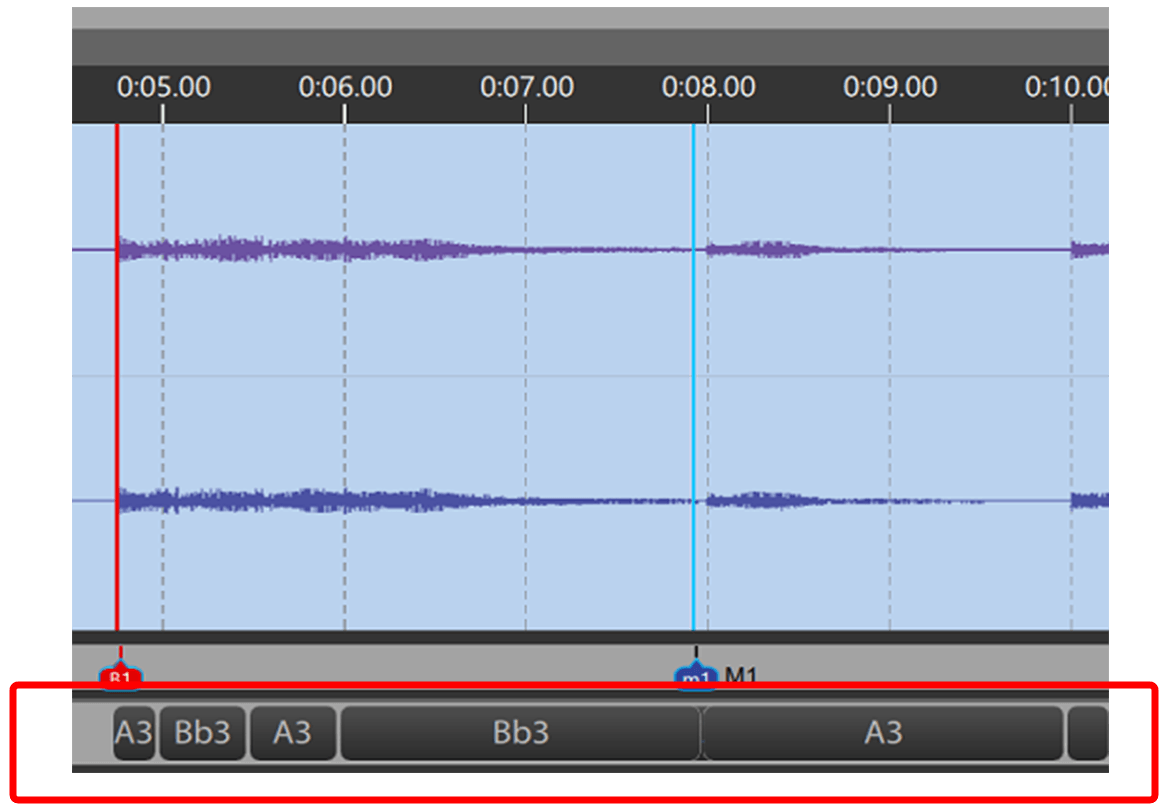
6.5 Opening a MusicXML file
If you open an .xml or .mxml file, Song Surgeon reads the note and timing data in that file and loads it into a playable form inside the program. This lets you review, convert, and export the file using the same MusicXML module tools used for MIDI-based workflows.
6.6 Using standard audio files
Although the module is primarily intended for MIDI and MusicXML data, standard audio files such as WAV, MP3, or M4A can also be used when the audio contains only a single instrument. For the best results, do not try to transcribe a full mix directly.
6.6.a Recommended workflow for audio files
- If you are starting with a full mix, first use Song Surgeon’s VRII stem-separation tools to isolate the instrument you want to convert.
- Run Song Surgeon’s Note Detection on the isolated track. Adjust presets or set tings as needed so the note data is as accurate as possible.
- Use the MID or XML button in the MusicXML module to create MIDI or MusicX ML output from that detected note data.
- After the new file opens in its own tab, select that tab and use the ABC button to create printable notation output.
Important accuracy note: Note detection is much more reliable when the source contains only one instrument. If you begin with a full multi-instrument mix, isolate the target instrument first. In practice, Song Surgeon’s Note Detection, VRII, and MusicXML tools work best as a combined workflow when your goal is to create notation from audio.