


There are two versions of the written User Guide. The first is the version that follows on this page. Though it covers all of the topics it is an abbreviated version, and it contains a search feature to help you find a specific topic.
Click here to download the (Song Surgeon V.5 User Guide PDF)The pdf file is a more detailed version and it can be downloaded and then printed. It runs about 120 pages in length and it is organized with a table of contents.

 Win 10 – Win 11
File Drop Down Menu
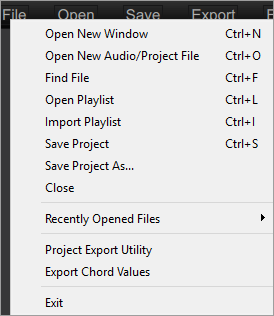
Opens an additional, blank instance of Song Surgeon 5.
Opens a window's dialog that allows you to browse to a folder and select an audio file or Song Surgeon project file to open.
Opens a Windows Explorer dialog box to search for audio files. Type in the name of a file and Song Surgeon will search the disk for files with matching names. This feature is new to Version 5.
This search feature works exactly like the Windows Explorer search feature. Once open, you
select the top level folder you want to use for your search on far left side of the dialog.
Next,
in the upper right side type in the word(s) you’d like to search for, and tap your
Opens a windows dialog from which you can browse and select a Song Surgeon playlist file to open. Refer to item #25 for more details.
Opens a Window's dialog from where you can browse your computer and select a Windows Media Player playist or an iTunes playlist and then open and import it into Song Surgeon. Once a playlist has been imported into the Song Surgeon playlist window you MUST use the Save button, if you'd like to SAVE it as a Song Surgeon Playlist file that you can access again.
Saves the current project. On the first save, will open a dialog box to choose the location and title of the project file. The default name is the name of the audio file, and the default location is C:\Users\User Account\Documents\Song Surgeon 5\project\ . Projects are saved in the .ssp format. To save as an audio file, use the Export menu.
Opens a dialog box to choose the location and title with which to save the currently opened file.
Closes the currently active file. A dialog will prompt for saving the file before closing.
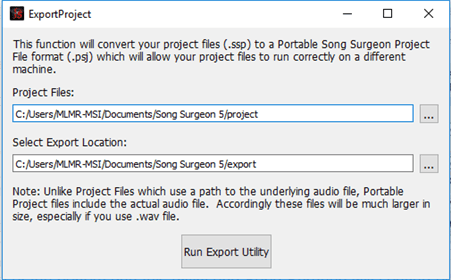 This is a batch
file converter for Song Surgeon project files. When saving as a Song Surgeon
project, the Save Project option saves your work as an .ssp file, without the original audio
file included, in order to save disk space. To create Project that includes the original
audio
(so
that a project can be opened on another computer on which Song Surgeon 5 is installed) use
the
Portable
Project file option from the Export menu.
Most people choose to use the standard project file format .ssp (without audio) because,
over
time, you create dozens or hundreds
of this project files they will save you GB's of hard drive space.
However, at some point, if you get a new machine, and want to use these project files on
this
new machine, that is where the Project Export Utility can be of great value. It will convert
your project files into portable project files that which can be opened on a different
machine.
This utility allows you to select a folder that contains all of your project files. Use the
[...] button to the right of the first form to select all the folder which contains your
project
files. Next use the [...] button to the right of the second form to choose
where the Portable Project Files will be saved, once they are created. After making these
two
selections click the button at
the bottom and this utility and Song Surgeon will convert all of your Project Files into
Portable Project Files.
Exports the chord values in the chord window as a comma-separated values (.csv or .txt) file with the corresponding time stamps, as an easy-to-use study tool. This file can be opened with Notepad, Excel, and other programs.
Opens a list of your 10 most recently open files. At the bottom of this list is alos the option to clear this list.
Closes the program.
Open
Opens a Windows dialog so you can select an audio or project file to open. Please note that Version 5 now supports .midi files. Right-click the Open button to bring up a list of the last ten files opened in Song Surgeon.
Save
Saves changes to the current file, without a prompt. When changes have been made to a file, the title of the open file will have an asterisk after it. When the file has been saved, the asterisk will disappear.
Export
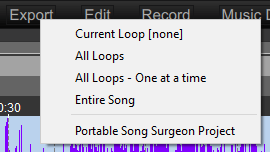
The export menu offers several ways to save Song Surgeon projects as audio files. For the first
four options, a file dialog will pop up in which it is possible to save the exported file in
seven formats: .wav, .mp3, .aac, .mp4, .m4a, .aif and .wma. Choose the desired format from the
drop-down menu.
Near the bottom of this Export dialog you will see an “Export Duplicate Count” field. This
option
will create X copies (whatever number you
select) of whatever it is you are exporting and place them back to back inside the audio file.
If for example you select three for this value and are exporting an entire song, it will place
three copies of this song in the file that will be created. If you Exporting only a loop it will
place three copies of the data from this loop into the resulting file. Use the up/down arrows at
the right of the box, or click inside the box and type in the desired number of copies.
After selecting “Save” for these options, a second dialog box will open, to select the bitrate at which the audio file(s) should be saved.
Exports the currently active loop. The number in brackets indicates which loop is selected. A loop is selected by having the white vertical progress indicator line within a looping area.
Places the data from all loops that you have created in Song Surgeon in one audio file.
Exports all loops created in the current project, and saves each loop as a separate audio file. It will use whatever name you provide in the Export dialog window as the base name, and append sequential numbers to this name when in creates these files. For example, if you have 3 loops and select this option, and assign the name "midnight rider" for the file, Song Surgeon will create the files Midnight Rider 1, Midnight Rider 2, and Midnight Rider 3.
Exports the entire song, including all changes made, as an audio file.
Exports the current project as a Portable Song Surgeon Project (.psj) file, which can be transferred to another computer and opened with Song Surgeon.
Edit (Pro Version only)
Before executing the Edit functions, an area of the audio file must first be selected. Left-click and drag in the main waveform window to select an area. By moving the position of your mouse to the bottom or top of this graphing area you can select either the L channel, or R channel or both channels of data. Click at either edge of the selected area and drag it to adjust the placement of the selection. For finer tuning place your mouse over one of the edges of the selection area and use the arrow keys to change the position by 0.1 seconds. To clear a selection, use the Escape key.
Song Surgeon supports cut, paste and copy operations not only within a single opened file, but also between files open in multiple instances of Song Surgeon. One of the features of Song Surgeon is automatic frequency and bit depth conversion when moving audio data between two files. Song Surgeon will automatically detect these values and convert the selection to match the frequency and bit depth of the destination file.
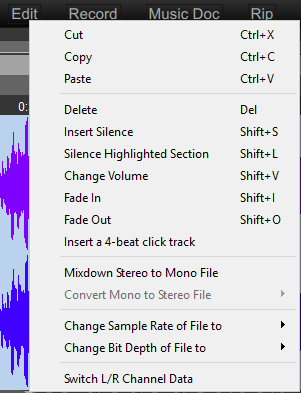
The operations in the Edit menu are:
This deletes the highlighted section, and places a copy of it on the clipboard.
This copies the highlighted section to the clipboard.
This pastes the audio data on the clipboard into the currently opened file by inserting it at the current position. The current position is always the location of the white vertical progress indicator.
This deletes the highlighted section.
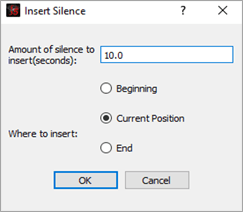
This option opens a menu for inserting a period of silence into an audio file. Choose the length of silence in seconds, and whether to insert it at the beginning of the file, at the end, or beginning from the current position in the file (default).
With a portion of the audio file selected, select this option to silence the selection.
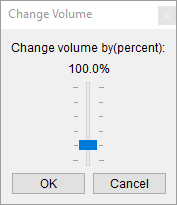
Opens a menu to increase or decrease the volume of the selection. Use the slider to make a selection between 0% and 500%, and select OK. A notification will be added when a much higher volume may distort audio quality.
With an area of the audio file selected, use these two options to gradually increase volume at the beginning or decrease volume at the end of the selection, for smoother transitions.
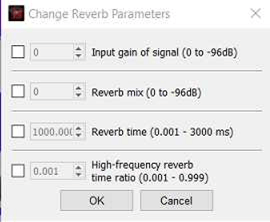 This is a new
feature in Version 5. As can be seen to the left, this option opens a dialog with four
parameters which can be selected and set. Please note that to enable or apply a parameter
the
checkbox next to it, must be selected or checked. Also, note that two of these parameters
have
default settings. When these parameters are selected you can use these defaults or override
and
change them.
If an Edit selection is made, this option will apply the reverb only to the selected area.
If no
selection is active,
this option will apply reverb to the entire file.
We'd suggest as a starting point that you use the default values supplied. Applying reverb adds substantial volume. To offset this volume you will need to reduce the sound in these first two parameters:input gain and reverb mix. We suggest you start with values of -2 db and then adjust from there as necessary.
Song Surgeon determines the tempo or BPM of every file that is opened by the program. Using the determined default PBM value, Song Surgeon will automatically create and insert a four beat click track at the beginning of the opened file. This feature is new to version 5.
If a file is open in Song Surgeon with a left and a right (stereo) channel, this option will mix the two down to a mono (one-channel) file. If an Edit selection is made, this option will only mix down the selected area, and will discard the remaining portion of the file. If no selection is active, this option will mix down the whole file to mono.
This option creates a stereo track from a mono audio file. Hovering over the option opens a submenu: choose to place the mono audio data in the left audio channel only, in the right channel only, or to place a copy of the mono data in both the left and right channels. If you choose either L or R channel only the mono data will be placed in that channel and the other remaining channel will be blank or empty.
The sample rate of a file is the same as its frequency. Hovering over this option opens a submenu with a list of sample rates which Song Surgeon can convert the open file to.
The bit depth of a file is a measure of quality. Most standard digital audio files are 16 bit files, but some types of uses may require alternative bit depths. Song Surgeon can convert to 8, 16, 24, and 32 bit depths.
Exchanges the audio data for the left and the right channels of a stereo file, so that left channel audio data is played in the right channel and vice versa.
Record (Pro Version only)
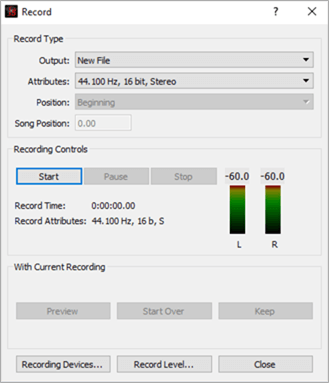
Allows you to record audio from a built-in microphone or any other external microphone plugged into your computer. Additionally, the Record feature can work with input devices other than a default microphone such as a musical instrument or a computer’s sound card if this is supported. For example, if you have a digital turntable, you can plug it into SS and SS can record the audio input from your old LP's. One other type of recording that SS can do is record the audio from your computer's sound card. This is straight forward in Windows as Win OS's allow you to see the system audio and select it. On Mac (OSx) no such device is available, so do to that you'll need to install an external utility called SoundFlower.
Changes the destination of the recording. New File is selected by default, which will create a new file and load it into a new instance of Song Surgeon. Current File will insert the recorded audio into the currently open Song Surgeon window. When this option is chosen, the Position drop down will be activated: the recorded data can be inserted at the beginning, end, at a specified time, or at the current location of the progress indicator. Overdub is new to version 5: it allows the user to make a recording while listening to (and playing) the currently opened audio file in Song Surgeon. Data from the original played song is placed in one channel and then newly recorded data is placed in the other channel.
Changes the quality and bitrate of the recording. The recommended setting is set by default to 44,100 and 16 bit stereo. This is standard CD quality audio.
The recording function can be used at any time; press Start to begin a recording, Pause to pause it, and Stop when the recording is finished. Once a recording is finished, it can be previewed with the Preview button. If the recording is good, use Keep to save it; otherwise, use Start Over to discard the recording and begin a new one.
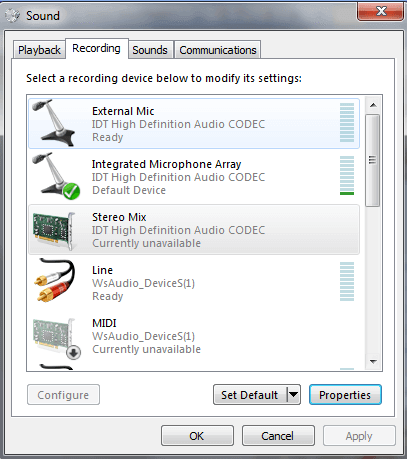 At the bottom
of the Record window are the Recording Devices and Record Level buttons; both of
these will open the system audio settings menu. Select the recording device that is desired,
make sure it is set as the default within the system menu, and adjust the volume as
required.
1. When you record in Song Surgeon you MUST choose a device that is found in the Recording
Tab.
2. You must select this device and then you must set it as the default.
3. If you have other active devices you may need to disable them to allow you to record a
good
quality recording.
In the picture to the right you can see the stereo mix is highlighted and selected as the
default. This means we will be recording the system audio... in other words whatever is
heard
over you computers speakers will be recorded.
Record Level will open your system audio settings. Once you have selected a recording
device,
you can then from there select the Device you want to use for recording. You can select its
properties and then adjust the recording level. A picture of what qsg_clip this looks like
on a
Win 7 machine is shown to the right. 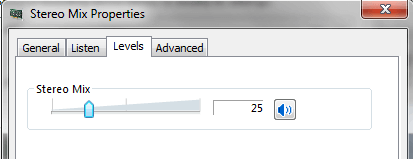 Please note it
is very important that you reduce the volume enough, so you don't cause clipping
(distortion) in the audio you are recording. The level meters that are found in
the
recording dialog window will give you an approximate idea; however, we recommend you do a
dry
run of a few seconds, keep it, and then once it opens in SS you will be able to more easily
see
the levels and make further adjustments if necessary. Since SS can easily increase the
volume of
recorded audio, it is best to err on the low side, making sure that whatever you record does
not
clip. Distortion from clipping cannot be removed in SS; however, low volume recording can be
amplified using the change volume settings in the Edit function of Song Surgeon.
Most computers have multiple recording devices installed - and every computer is different.
We
cannot, in this User Guide, illustrate all possible options, so if you want to use this
function, please know that you will need to spend a significant amount of time experimenting
until you get the correct settings for YOUR computer. Please see the training video on
recording
for additional details; this can be accessed through the Help Button on Song Surgeon.
Music Docs (Pro Version only)
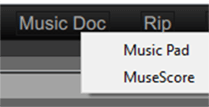
The Music Docs menu is new in Version 5. This menu contains Music Pad, something found in previous versions, and a new feature called Muse Score.
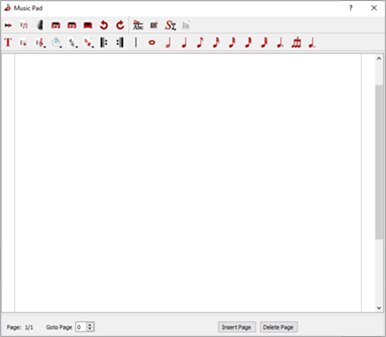
Music Pad is largely unchanged from Version 4 and the documentation for it can be found below. There is one new feature in Music Pad: Song Surgeon automatically inserts the chord values it detects when opening a song - and inserts and stores these in Music Pad.
Music Pad is used to create and store text notes, music tablature and conventional music notation. Anything created with Music Pad in a Song Surgeon project is saved with that project, and can be opened again later when the project is reopened.

A. This button toggles your screen back to the main Song Surgeon
interface.
B. This button opens the music notation toolbar.
C. This button displays or opens the tablature toolbar.
D. This is a print preview button.
E. This is a print settings button.
F. This is the print button.
G. This is an undo button.
H. This is a redo button.

Standard music notation is quite varied and quite complex. Music Pad allows you to create basic music tablature and gives you some flexibility when doing so. Keep in mind that Music Pad is not intended to be a complex Music Score program; rather, it is an auxiliary feature found within Song Surgeon that allows you to create and store basic music notation.
The Music Notation toolbar is shown below.
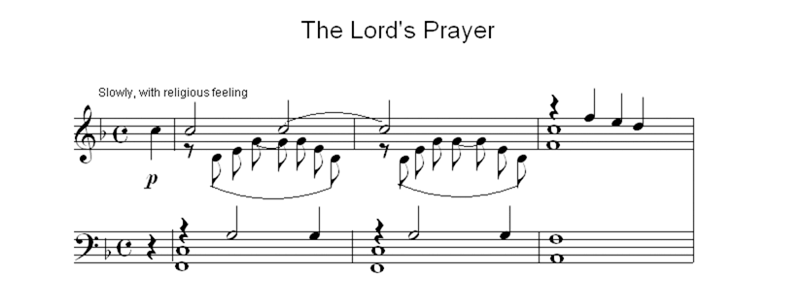
The standard music notation toolbar allows you to create basic standard music notation like that shown below. Note the basic layout. It is like an online sheet of paper. The inner gray line represents the margins or useable area for printing purposes. It is within the gray boundary line that you will create your music.
I. This is a text notes button that allows you to enter text onto your music notation via a text box. Within the text box you can control the font size, the orientation, the font color, and the font.
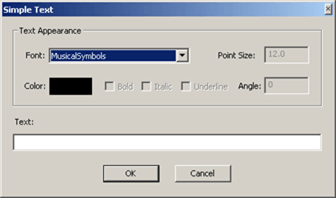
This music symbols font enables you to enter additional, less common symbols that are not available from the notation toolbar. For example, the following symbols can be created by typing the following characters into the text form.

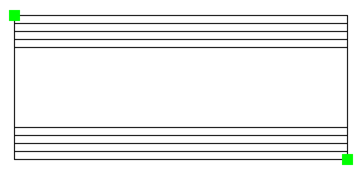
J. This is the staff button. When clicked -- if you move your mouse onto the music pad paper and left click and drag to the right -- you will create a grand staff. If you also pull or slide your mouse downward as you do this, you will create 2 staff lines simultaneously.
K. This Clef button allows you to select a clef sign from the dropdown box and place it on the staff.
L. The clock is the icon for the tempo. You can select from any of the tempo presented in the drop down list. If you also want to include a numerical designation of tempo, like for example, 120, you can do this by using the text tool mentioned in (LETTER I).
M. This time signature button allows you to select from any of the normal time signatures and place it on the staff.
O. and P. These are beginning and ending repeat signs that can be selected and placed on the staff.
Q. This button is a vertical measure line for delineating measures.
R. These are buttons for individual notes beginning with a whole
note
and
decreasing to a 128th note. All of these notes have the tails pointing upwards.
However,
there are many circumstances in which the tails of notes point downward. To flip
these
notes
by 180 degrees so that the orientation of the tails is downward, select the note
from
the
toolbar with your left mouse button. As you begin to move your mouse with the note
attached,
right click and hold down and you will see that the note has been inverted. Continue
dragging the note to the position on the staff where you would like to insert it.
While
your
right mouse button is being held down and the note is inverted, click the left mouse
button
and this will place the note, in an inverted position, onto the staff.
IN ADDITION -- these same buttons (S-Y) also double as REST buttons. You can toggle
to
see
the rests by holding the Control key down. When you do this, you will see the
corresponding
rest notes displayed. While holding the control key down and with the rest being
shown,
you
can select a rest and place it onto the staff.
Z. This is the half dot, which when placed after a note increases the length of the designated note by ½ or 50%.
AA. This is a triplet button, which allows you to create a triplet line that can be placed above a group of three notes to designate them as a triplet.
AB. This button allows you to create a tie of an indeterminate length. It can be stretched to accommodate any number of notes AND it can be rotated so the arc opens upward or downward.

The toolbar below is the Tablature Toolbar. It contains four buttons as described below. Anyone that is familiar with tablature knows that there are many different forms not only between instrument types but even within the same instrument. Accordingly, we have created the tablature part of this program to be flexible to accommodate the specific preferences of users.
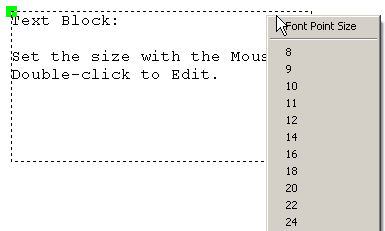
AC. This button is a Text Block Insertion tool that has a variety of uses. It is especially useful when creating tablature. When you click this button and move your mouse to the Work Area of Music Pad, it will display and insert a text box that looks like what is shown below.
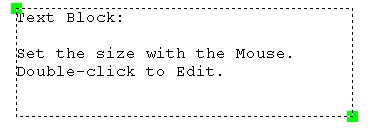
As the text says, you can drag and resize with your mouse and double click within the box to edit the text. You can also right click and you will see a menu that will allow you to resize the text by choosing alternative font sizes. This is especially useful when cutting and pasting text from documents or web pages whether tablature, lyrics or something else. The ability to resize allows you to have it fit into the work area so it
AD. This button allows you to create strings similar to the staff button in the Music Notation toolbar. It is different, though, because it enables you to create any number of strings with a minimum of two. After you click the button, you move your mouse to the main work area and left click. As you drag your mouse to the right, you can size the string area horizontally and, if you drag down, you will see the number of strings increase.
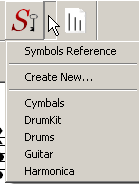
AE. This is the button for the symbols key. When you click the drop
down
box, you can select from a few preset symbol keys for commonly used instruments like
guitar, drums, harmonica and a few others. When you select one of the items in the
list,
it opens a text editor window with the selected information. You can modify or edit
this
information at any time. To save these changes, you must click the save button on
the
text window.
When you click this button you will also see the option to create a new symbols key.
This will open a dialog where you can enter the name of the instrument or some other
name you will recognize; then you can enter the set or series of symbols for this
new
key, clicking Save on the dialog box. You have now created a new symbols key.
Symbols keys are for reference and should be altered or modified to customize them
for
your needs. Also, if desired, you can copy these symbol keys and paste them into the
work area of Music Pad using the Text Block button #28. This
might
be helpful if you are
going to print the information in Music Pad to share with someone else.
AF. This button creates a line of indeterminate length. Once placed in the work area, you can grab it and change the length. This line is similar to the measure line found in the Notation toolbar, except this line can be resized. This line should be useful when creating measure markers for tablature, as it will allow you to size it to the tablature you are creating.
Important Keyboard Functions:
Space Bar
- Depressing the space bar will insert again onto the Work Area the last selected
object.
Caps Lock
- When the caps lock is on, the Quick Text Insert Mode is invoked. This allows you
to
push any alphanumeric key
on your keyboard and that letter or number will be inserted at the location of your
mouse.
Control Key
- Holding the control key down reveals the "rests" toolbar and enables you to select
these objects.
Control + Space Bar
- Holding the Control key down allows you to select a "rest" and then ones placed on
the
work area, while
continuing to hold the control key down and tapping the Space Bar inserts the same
rest
note again.
Left, Right, Up, Down Arrows
- When one or more objects are selected, these arrow keys allow you to nudge the
object(s) in the direction
of the key.
Escape
- If you have selected an item from one of the toolbars by mistake and would like to
deselect the item
without having to place it in your work area, simply hit the Escape key.

At the bottom of the music page frame, there is a small menu (shown below) that allows you to insert additional pages.
An object that is selected will show two small green squares or handles. If an object is selected, this means that it is active and can be manipulated. Multiple objects can be selected by clicking on these objects one at a time within the boundaries of the object. Lastly, if you want to select multiple objects in one operation, simply use your mouse and trace a rectangle around the OUTSIDE of all the objects you want to select, while holding the left mouse button down. Once you release, you will see that all of the objects within this rectangular area are now selected as indicated by their green handles.
An object or group of objects that is selected can be nudged by using the four arrow keys on your keyboard.
Muse Score is a highly sophisticated scoring program which rivals many of the high quality, paid, scoring programs such as Maestro, Finale, and Sibelius. You can download it and run it as a separate program, or you can install it and run it from within Song Surgeon. We recommend the latter because we have modified the two programs so they can talk to each other. This allows Song Surgeon to grab the location of the Muse Score project file and save it in the Song Surgeon project file. That is beneficial because if you create tabs or sheet music in Muse Score for a song that you have open in SS and save it, when you re-open the SS project file and then open Muse Score from the Song Surgeon interface, Muse Score will open and automatically load the MuseScore data associated with the Song Surgeon project.
The complete documentation for Muse Score, including training videos, is located on its website: https://musescore.org/handbook.
Rip
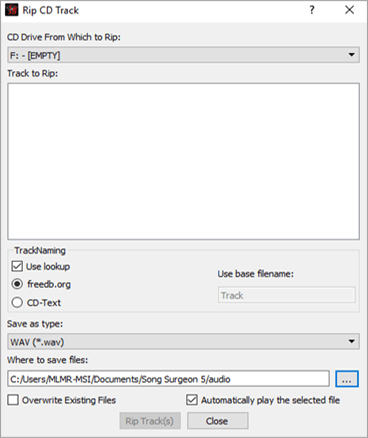
Opens a file dialog for ripping tracks from CDs. Select the drive where the disc is located using the top drop-down menu. Once the CD loads all the tracks will be displayed in the box; select one or more to rip.
Track Naming: Song Surgeon will either look up the track names or use a default name. If “Use
lookup” is selected, Song Surgeon will use the website freedb.org to find the
track names or read them from the CD’s metadata, using the radio buttons. If “Use lookup” is
deselected, Song Surgeon will use a placeholder label: the default is “Track”, and Song Surgeon
will
save files as “Track 01”, “Track 02”, and so forth.
Please note that if the list of
tracks
is blank or empty, it is likely because you have selected "Use Lookup" and there are no matches
for
this CD in the database. If the Track Name section of the dialog is empty, please deselect "Use
Lookup" and you should then see a list of tracks appear.
Select the file type in which the ripped tracks will be saved. The default is .wav.
The default save location is C:/Users/User_Name/Documents/Song Surgeon 5/audio. Change the save location either by clicking the location box and typing in a new file path, or clicking the “...” box to the right and navigating to the correct location.
Is deselected by default. If files already exist in the chosen save location with the same name, this option will overwrite them with the tracks on the current CD. For example, if a previous CD has been ripped with the default of “Track 01, Track 02,” etc., and a new CD is saved in the same location with the same default track title, the new tracks will replace the old ones.
Is selected by default. This option allows you to click onto a track and hear it play. This is helpful if you don’t know which track(s) you want to select by name, but can recognize them if you hear them.
Finally, select “Rip Tracks” to complete the rip or “Close” to cancel.
Options
The options menu has two tabs.
The first tab, “Default Paths”, shows all the default file paths for Song Surgeon 5. Click on
any
text box and type a new path, or click the “...” button to open a dialog and navigate to the new
folder. The second tab, “Program Settings”, allows adjustment of a number of settings.
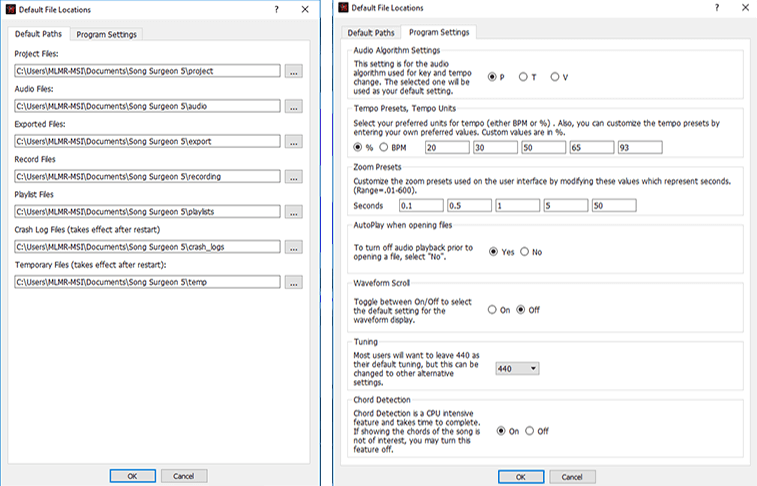
Select one of three audio algorithms as the default for rendering and processing audio files. On-the-fly switching between algorithms can also be accomplished from the Algorithms menu at the bottom of the screen. See Algorithms.

In Version 5 tempo can be displayed by default, and modified by default, in units of either percentage or BPM. Note that, even if tempo is displayed in BPM, the preset values are in percentage (%). These values are % of the original tempo, and can be changed by clicking and typing into the box.

Select the default units for zooming-in, in seconds or parts of a second. The values can be from one-tenth (0.1) of a second to 600 seconds. When a zoom value is chosen, the Song Surgeon main window will display data for that amount of time of the currently loaded audio file (for example, one second’s worth of audio from edge to edge of the window). The defaults are 0.1, 0.5, 1, 5, 10, and 50 seconds, from left to right.

Off by default. If this option is turned on, files will begin to play as soon as you select them with your mouse - even before they are loaded or opened in Song Surgeon.

Off by default. Normally, the waveform remains still and the white Progress Indicator moves from left to right across the chart as the audio file plays. If this option is turned on, the Progress Indicator will be centered and fixed in position, and the waveform will move. There may be a slight performance cost if this options is selected.

Select the default precise tuning for A: 440, 442, 444 or 432 Hz. The default is 440 Hz and this will not need to be changed in most cases. However, there are a few types of music where alternative tunings may be useful.

On by default. Chord Detection automatically detects the chords of a song and loads them into the chord bar below the main waveform window. Turn this feature off if it is not needed.

Marker Bar

Shows all the markers placed in the current audio file. Click inside the bar to place a marker; click and drag a marker to reposition it. See Marker - Item #21
Loop Bar

Shows all the loops placed in the current audio file. The loop creation tools are powerful and allow precise control. Left-click in the loop bar, or in the main waveform window, to set a yellow marker which is the beginning of a loop. Right-click in the loop bar at some point to the right to open the loop. Right-click in the loop bar to set a yellow marker which is the end of a loop; left-click at a point to the left to open the loop. Right-click a numbered loop marker to see the options menu; click and drag the green and red lines to adjust the edges of a loop. See Loop, Item #20.
Waveform Window
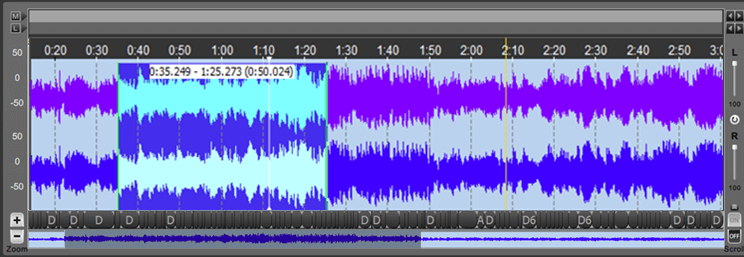
The main waveform window displays the waveform of the currently loaded audio track. This chart
is
automatically generated when a file is opened in Song Surgeon. The main waveform window will
also
display loops, markers, and the current time position marker. In stereo files, the top waveform
is
the left audio channel and the bottom waveform is the right channel.
To select a section
of
the
data for various EDIT operations, click with the left mouse button, hold, and drag to the left
or
right. Also, by dragging an moving your mouse up or down you can select data from both channels
or
only L or R channel data. Adjust the boundaries of the selection by clicking and dragging on the
left and right edges
of the selection; the cursor will change when it is over the edge. For finer tuning of the
positioning of the selection area, you can hover your mouse over an edge and then use your
left/right arrow keys to move the edge .1 seconds per key tap. To clear a selection, use the
Escape key.
You can also left click in the wave form area to set a beginning loop point
and
then slide your mouse to the right and right click to set the ending loop point. Also note that
by
clicking in the area of timeline numbers just above the plotted data, you can move the progress
indicator to the position where you click.
To the right of the waveform window, along the bottom edge, is a small tray icon. Clicking this icon will collapse the waveform window. Click the icon again to reopen it.
Right-clicking on a EDIT selection within the waveform window will open a menu with the “Detail Editing” option. Clicking on this will open the Detail Editing menu.
Detailed Editing Module (Pro Version only)
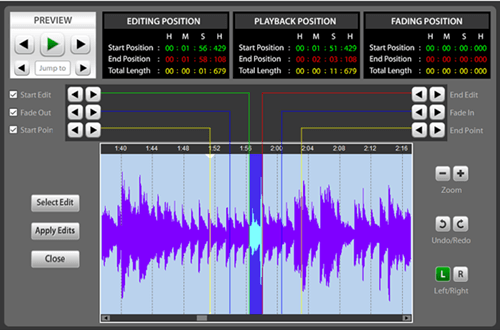
The Detailed Edit Module (DEM) is new to version 5. It provides for much greater control over the editing process by allowing more precise edit area selection and the option to preview edits before the changes are committed.
To open this module an area of the waveform data must be selected in the main User interface. Once selected, with your mouse over top this area, right click and the option for the Detailed Editing Module will appear.
The playback controls are in the silver box at the upper left. The green arrow initiates playback. The smaller black arrows move the position marker incrementally forward or backward through the current selection. The bottom set of arrows inside the box are the Jump-To buttons. Clicking one of these will jump the Progress Indicator line to the beginning or end of the defined playback area, which is indicated in the main window by the yellow lines.
The three black boxes display time stamp information for precise control over editing and inserting effects. Above the main window are the position controls for editing. There are three functions: Edit Position, Fade In/Out Position, and Start/End Point Position. Each of these three options is enabled or disabled using the respective check box at the left side of the window. For each option, use the forward/back arrows at each side of the window to reposition the markers, or click and drag them directly.

The green and red lines indicate where the beginning and end of the edit area, respectively, are located.
The blue lines indicate where the fade begins and ends. This is optional; when checked it will apply a fade out of the edit area and a fade in of the edit area, if a smoother transition is necessary.
The yellow lines indicate the boundaries of the playback area. When previewed, playback will loop repeatedly within the boundaries of these yellow markers, allowing users to hear what the edits will sound like before they are made.
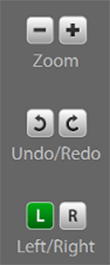
On the right side of the main window, where the audio waveform is displayed, there are three sets of controls: a zoom function, an undo/redo function, and a channel selector. Use the +/- buttons to zoom in and out on the waveform; use undo/redo to remove a change or add it back; and use the channel selector to toggle, when editing stereo audio files, between the left and right channels of audio data. If only one channel was selected before the Detail Editing window was opened, only that channel will be displayed.
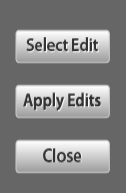
On the left side of the main window, there are three buttons. Select Edit: Shows a dropdown list of all the edits that can be applied to the current selection. The selected edit will be applied to the preview playback loop. Once you have chosen an option, click the green playback button to hear what it will sound like before applying this edit. If it doesn't sound like you need it to, adjust the positioning of the edit area and then play it again. Apply Edits: After you have confirmed that the Edit, as applied, sounds like you intend it to, click the Apply Button and the selected Edit will be applied to the current audio selection. Close: Save and close the Detail Editing window.

Channel Volume
On the right side of the main waveform chart there are two volume sliders, marked L and R. Click and drag within these sliders to raise or lower the volume of the left or right audio channel, respectively, in a stereo audio track. Use the circular reset button between the sliders to reset the channel volume.

Zoom Buttons
The plus and minus buttons to the lower left of the waveform window allow for coarse-grained control of the zoom level, with each step representing roughly half (or twice) of the previous step. For more precise zoom control, use the Zoom Submenu at the bottom of the screen. See Zoom - Item #27.

Waveform Scroll Toggle
The toggle to the lower right of the screen toggles waveform scroll on and off. By default, waveform scroll is off: the waveform remains static and the current position marker moves from left to right. Turning waveform scroll on will center the current position marker, and the waveform will move from right to left underneath it. The default for this option can be changed in the Options menu.
Chord Bubbles

The ability to automatically detect chords in a song is new to Version 5. When you first load a file, Song Surgeon automatically detects the chords used in the file and displays them as bubbles below the main waveform window.
Song Surgeon's chord detection capability is good but not perfect. It does make mistakes. We
have
compared it to similar products and technologies and it performs equally well. If you'd like to
change a chord value you can open a menu that will allow you to delete a chord or
rename a chord value, by right clicking over top the chord. To learn more about chord detection, go
here.
In some cases you will find bubbles containing two values. For example in the nearby image you
see a
bubble with the values A/C#. This means that the regular chord is A, but if you are a bass
player
this value is C. Chord values can be exported in a comma-separated (.csv, .txt) file using
File >
Export Chord Values. They are also automatically
stored in Music Pad and can also be printed from Music Pad.

Undo
Undo the latest action. Clicking this button repeatedly will continue to undo actions.

Redo
Redo the previous action that was undone. If no actions have been undone, Redo will display a message saying there is nothing to redo.
Creating Loops (see also #31)
Loops allow users to isolate specific segments of an open file and customize each differently. The following effects can be applied to a loop: EQ, VR, Key change, and Tempo change.
When any of these effects are applied to an open file with no loops created, these settings will be applied to the ENTIRE file. When applied to the entire file these are termed to be Global Settings. Similarly, if loop(s) have already been created and these settings are applied when the progress indicator is outside of these loops, they will again be applied only to non-loop areas. Alternatively if you have a loop selected by placing the progress indicator inside of a loop, then any changes made to these parameters will be applied ONLY to that loop. These are termed, loop specific settings. If you have created loops and then apply global changes, they will not affect the loop settings. If you change loop settings they will not affect global settings. And if you apply a global setting first and then create a loop the global settings that were previously applied will be contained within the loop.

With that as an introduction, let’s move to the topic of creating loops. The loop button in the lower left side of the UI, to the left of the playback controls, allows users to set up loops as the listen to a song play. During playback, when you hear a point that you’d like a loop to begin, click the button. A orange vertical line will appear. As the song continues to play click this same button again and the ending loop will appear - and simultaneously the beginning loop marker will turn green and the ending one will turn red. There is also a similar Start/End set of loop creation buttons on the Loop Submenu shown below.
Loops can also be created with the mouse. Left-click in the loop bar, or in the main waveform window, to set a yellow marker which is the beginning of a loop. Right-click in the loop bar at some point to the right to open the loop. Right-click in the loop bar to set a yellow marker which is the end of a loop; left-click at a point to the left to open the loop.
The marker for the beginning of a loop is green, and the end of the loop is red. Switch between loops by using the left and right arrows to the right of the loop bar, at the top of the screen. Once a loop is created the beginning and ending locations can be changed or repositioned by grabbing the inverted triangle at the top of the loop in the loop area with a left mouse click and dragging it left or right.
When you click the Edit button from the Loop Submenu, shown above you will see a dialog window with the following options.
Marker

The marker button places a marker at the current location in the audio file, denoted by a tag in the marker bar at the top of the Song Surgeon window. Jump to a marker and move between markers using the left and right arrows to the right of the marker bar. Markers can also be placed by clicking directly in the marker bar at the top of the window. Right-clicking on a marker tag, in the top bar, offers a drop-down menu with a number of options.
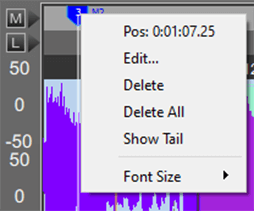
Shows the time stamp location of the selected marker.
Click “Edit” to open a new dialog window with Label and Position boxes. You can click and type in the boxes to change the values.
Delete the currently selected marker.
Delete all markers in the currently opened file.
Clicking this option will display a white line below the marker, extending downward through the main waveform window.
Font: Hovering over this option will open a context menu that allows changing the font size of the marker labels. The options are 8, 10, 12, 14, and 16-point font. This is useful if the labels for markers are too long to read.
Volume Slider

Click and drag the volume button to increase or decrease the volume. Click the speaker icon to the left of the slider to mute the audio.
Controls and Information Panel
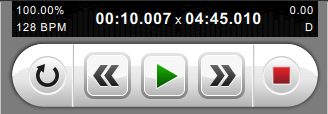
The black box displays information about the currently loaded audio file. At the far left, the tempo information is displayed. The top number, in percent (%), is the percentage of the audio file’s original original speed or tempo that the file is currently set to play. For example, if a song is originally 200 BPM, and the currently selected tempo is 180 BPM, this will display 90%. The bottom number is the current BPM of the audio file. See Tempo - #28.
In the center, the number on the left is the current position timestamp, and the number on the right is the total length of the audio file.
The numbers on the right are key information. The current key of the audio file, as automatically determined by Song Surgeon, is displayed on the lower right. The number at the top is the number of ½ step changes away from the original that have been made. For example, if a song is originally in G minor, and the Key panel is used to transpose the song up to A minor, this will display “2.00 - Am”. See Key/Pitch - #29.
In the Playback panel below the information panel, the circular arrow is a replay button. When selected or turned on it has a blue shading. When turned ON a song will replay. That is, it will jump back to the beginning and play again. The back and forward arrows move the white position marker forward and backward in the audio file. Click either button to move the current position by 0.1 second in either direction. Hold down either button to scroll smoothly through the audio file. Click the play/pause button to start or pause audio playback, and click the red square button to stop playback and reset to the beginning.
Submenus

The Submenu area is new to Version 5. Clicking on any of the text buttons on the bottom row will open the relevant widget in the dropdown area. If more than four are open at once, a slider will appear along the bottom edge of the program. Clicking the text button again will close the relevant submenu; they can also be closed by clicking the tiny “X” in the upper right corner of the box. The submenus can be left open, but minimized, by clicking the small tray icon at the far lower right of the Song Surgeon interface. The Zoom, Tempo, Key/Pitch, Format Preservation, Loop, and Algorithm have these additional submenus with additional detailed controls. VR and Metronome at the far right do not have such controls. Also please note that you can rearrange the location of these submenus by dragging and dropping to reorder or reposition them.
Playlists
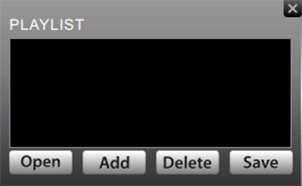
The playlist feature is new to Version 5. The “Playlist” text below the Play/Pause button opens the menu in the drop-down widget area.
Add files to a playlist by browsing to them with the “add” button or by dragging and dropping files into the black box. You can select one or mulitiple files at once.
Delete a file by selecting it in the list and clicking “Delete”. You select more than one file by using your shift or control keys (in Mac command Key) to select multiple files or all files, and then delete all selected files.
Allows you to assign a name to a group of songs in this window and create a playlist.
Please note, if you add files to the playlist window, whether by dragging or dropping, using the add button, or whether you Import them from an iTunes of Windows Media Player playlist, in order to be able to access these files as a playlist in the future you must create a Song Surgeon Playlist by using this SAVE button.
Opens a dialog that allows you to select and open a playlist that you previously created or saved.
Playlists can also be opened from the File menu, and imported from iTunes or Windows Media Player. See File - #1.4
Equalizers

The equalizer differs between the Standard and Pro versions of Song Surgeon 5. The Standard equalizer has 9 bands, whereas the Pro equalizer has 31 bands and over 50 presets.
Click the Equalizer button below the main controls to open the EQ window.
The preamp band is at the far left by itself. Use this to adjust the preamp volume. Below the preamp band, at the bottom left of the Equalizer window, there is a lock icon; click the lock to separate the equalizers for the left and right channels. By default the two channels are locked together. Any adjustments made while locked will be made to both channels of data simultaneously. Please note that this lock/unlock feature applies only to the EQ bands, it does not apply to the pre-amp sliders.
The EQ bands can be adjusted in any of four ways:
For ease of use, the EQ bands are color-coded; the default position is gray. When a band is set above zero (0) the adjustment slider turns green, and when any band is set below default the slider turns red. At the right of the EQ window is a preset menu, which can be used to select from a range of preset EQ options. Click on any of the options to use it.
The three buttons at the bottom, right edge of the EQ window are used to modify EQ settings. When a desired setting is reached, use the top, green checkmark button to save a preset. Use the middle button, with a red X, to delete a preset; use the bottom button to modify an existing preset. Default presets cannot be deleted or modified.
It is important to note that EQ can be applied either to the entire audio file or to a particular loop. The EQ for a loop can be accessed in the Loop Edit menu; only presets are available. If you have a custom EQ configuration that you want to apply to a loop, you will need to create and save as a EQ Preset to be able to do that. EQ settings are saved with Song Surgeon project files, and applied to any audio files that are exported from Song Surgeon.
With a thirty-one band graphic equalizer, each band covers one third of an octave (you can work
this
out from the fact that one octave represents a doubling - or, going the other way, halving - of
frequency, and there are ten octaves between 20Hz and 20kHz: on a 31-band graphic there are
three
steps between each doubling of frequency). This EQ configuration provides a great deal of
control
over frequencies and therefore over the sound you hear. This sophisticated EQ configuration is
very
useful to musicians or people that transcribe music, as it allows them to diminish unwanted
sounds
and to enhance others.
In Song Surgeon Pro, this 31 band EQ comes loaded with more than 60 presets that have been
custom-built on an instrument basis. The list of instruments is not comprehensive, but we have
included the most commonly played instruments in this list of presets. For each instrument, we
have
a preset designed to enhance that instrument as well as diminish that instrument. These are not
perfect, as every song has a different mix of instruments and frequencies and, not only will one
size not fit all, EVERY song is likely to require customization of the EQ preset to best work
for
that song. Nonetheless, these EQ presets are helpful starting points. The Pro EQ allows you to
create new custom presets and delete them. Unlike the Standard EQ, the 31 band found in Pro
allows
you to apply the EQ to either of the two stereo channels or to both.
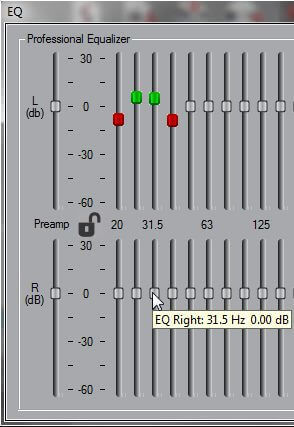 To make this
EQ compact, we did not label all of the bands, but by hovering your mouse over any slider you
can
see what band it is for. Also notice here on the left side that we have a pre-amp that can be
used
to increase the volume. This is especially useful when you are cutting bands and you need to
pump up
the volume to hear the remaining frequencies.
Notice that the gain is +30Db and the cut is -60Db. Please note that if you increase the gain
substantially it is likely that you will introduce clipping and distortion. Also note that if
you
cut a band significantly, you will reduce the volume substantially.
Notice the color coding -- when flat, the sliders are gray; when boosting, they are green; when
cutting, they are red, and if they are turned OFF, they are BLUE.
There is a lock icon here in the middle. When turned off, you see sliders for both left and
right
channels, and these sliders can be moved independently. When locked, the bands for the channels
move
together and whatever you do to one, you do to the other. In the locked state, the EQ goes into
a
mini mode, and only one set of bands is visible and necessary for the locked channel
adjustments.
Bands can be adjusted in several ways. The first way is by grabbing a slider
with
your mouse (left click) and moving it up or down. A second way is to click or click and hold
down
the mouse in the groove for that EQ band -- it will move incrementally up or down. If you want
to
move multiple sliders at once, you can right-click and drag your mouse across a series of bands,
and
the sliders will move to the location of your mouse drag.
Lastly, for fine tuning, you can select bands by On Windows: Hold the control key down,
and left click on a band or a several bands; then use the up/down arrow
keys to nudge the group. On a Mac: Hold the Shift key down + left click on a band or
several EQ bands,
and then to move them as a group by using your up/down arrow keys.
The last area to review regards the presets. System presets cannot be modified or
erased.
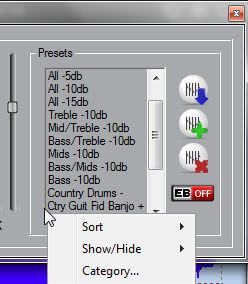 However, you can create new presets
based upon the existing ones by selecting a preset, modifying it to meet your needs, and then
saving
it with a new name. To create a new preset, you click the button with the green + sign, give it
a
name, and the click okay -- this will create a new preset. If you want to save this new preset
permanently so that it stays in the list of presets, you must click the button with the BLUE
arrow
to save it. The delete button will allow you to delete ANY custom preset, but it will NOT allow
you
to delete System presets.
If you right click in this preset area you will see some additional selection
appear. These selections will enable you to sort the list, or filter the list, so that you can
get
the group of presets on your screen that you would like to use. To refine your list further, you
can
also use the hide/view button to hide or remove presets from the visible list. Once you have
refined
your list of presets, you will need to click the SAVE button (blue arrow) to save this list of
presets so it loads the next time you open SS.
In addition to using your mouse to
select a specific preset and using the scroll bar on the right to navigate the list, you can
also use your arrow keys. Here are commands. On Mac: Click in the preset area, then holding your
Shift key down, use your up/down arrows keys to scroll. On a Windows machine you can do the same
by clicking in the preset area and then while holding your Control key down using your up/down
arrows.
Lastly we will discuss the EQ-B button (which is the EQ bypass button). If you have a song open
and
playing in SS and you have EQ applied to it, selecting the EQ Bypass and toggling it on will
ignore
the currently applied EQ and the song will continue playback with no EQ applied. Note that when
you
do this, the buttons become blue and inactive/you can't move them. When you toggle the bypass
off,
the EQ is again applied to the file and the buttons are re-activated.
EQ is a topic that can be very complicated. There are entire courses in college dedicated to it,
so
don't expect to master the use of this 31 Band EQ overnight. If you'd like to learn more about
EQ,
we refer you to this external site which provides an excellent overview: http://www.zytrax.com/tech/audio/equalization.html
Zoom
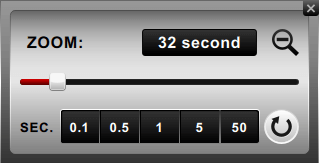
The zoom widget is used to provide more precise control over zooming in and out on the open file. The black box displays the amount of time, in seconds, which is currently represented in the main waveform window.
The magnifying glass zooms out, when clicked, and show the entire audio file, with empty space before and after to allow for operations like appending files. Click and drag the red slider to change the amount of time in seconds which is displayed by the main waveform window. The smallest possible amount of time that can be displayed (largest zoom) is 0.1 seconds. Click on the six presets at the bottom of the zoom widget to display that amount of time on the screen; these presets can be changed in the Program Settings tab of the Options Button, found at the top right of the Song Surgeon User Interface.
Tempo
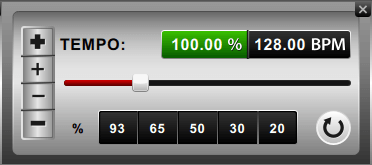
The tempo function is used to change the playback speed of the current audio file. The tempo function can be configured to display tempo either in BPM or in a percentage of the file’s original BPM. To change between these modes, click the word “Tempo” to open the drop-down submenu and use the Tempo/BPM buttons. Tempo is displayed in percentage by default; change the default display, and the default percentage changes, in the Program Settings tab of the Button, found at the top right of the Song Surgeon User Interface.
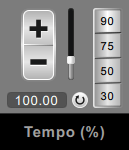 Version 5 of Song Surgeon
now has automatic beat detection; when an audio file is opened, the
program loads and displays the BPM value, and allows tempo changes to be made in units of
BPM.
Because Song Surgeon does not know the time signature of a song, there will be times when the
numerical BPM value being displayed for a particular song is not correct; however, the program
is
detecting a musically correct pulse, i.e. in time with the music. For example Song Surgeon
calculates the BPM of the song “Hotel California” to be 148. The true value from the sheet music
is
74, or ½ that value. In the bigger picture it is irrelevant which value is used as the default
value
from which to increase or decrease the tempo, because either one can be used as a starting
reference
point from which change can be measured.
Also note that the accuracy of beat detection
is
dependent upon the time of music or song opened. You will find it works very well with a
definitive
beat. However, for music genres where a definitive beat is often missing, it's accuracy will
diminish significantly. Choral music, classical music, and to a lesser extent Jazz music are
examples of such genres.
In the Tempo area at the bottom of the Song Surgeon window, use the +/- buttons to adjust tempo by one unit. The Tempo button will have either a (%) or a (BPM) displayed to show which unit is currently in use. The tempo can also be changed by clicking and dragging the slider, or by clicking the tempo box and typing in a value. Song Surgeon supports any value between 10 and 400%. Use the circular reset button to reset the tempo to the original value.

Clicking on the Tempo button opens the submenu. Use the large +/- buttons to adjust by a value of 1, and use the small (inner) +/- buttons to adjust by a value of .01.
At the top of the Tempo submenu is a toggle to switch between BPM and %. The active value is green; the inactive value is black. The red slider can also be used to adjust the tempo; the five values on the bottom are tempo presets, which are always in % of the original, even if BPM is selected as the tempo unit. These presets can be changed in the Options menu. Use the circular arrow button to reset the tempo.
Key / Pitch
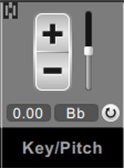
New to Version 5, is Song Surgeon's ability to automatically calculates the key of a file when it is first opened; this value is displayed at the bottom of the K / P area and in the black Playback Information Window. The accuracy of this technology is good. In a database of 1000 songs it was correct 70-80% of the time. that obviously means that it will be incorrect 20-30% of the time. If you’d like to change this value (for example if you believe it is incorrect), toggle the “lock” icon at the top left corner of the K / P menu. Click on the key (next to the small reset button) to open a dropdown menu and select the correct key. Next click the lock to relock and reset the key to this new default key.
Song Surgeon can transpose the key of an audio file by 2 octaves up or down. The chord values are automatically changed as the key is changed. Use the +/- buttons to adjust by a half step up or down. Click and drag the vertical slider to make gross or quick changes in key.
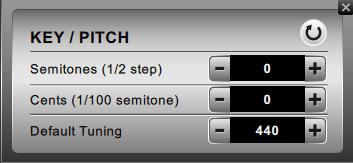
Clicking the “Key / Pitch” text label at the bottom of this area to open the submenu. Use the +/- buttons to change the key values. The bolder set of +/- buttons changes in half step increments. The finder +/- buttons change by cents or 1/100th of a half step (semitone). The bottom set of +/- buttons to change the default tuning. The default tuning is set at A 440 and you should not change this, unless you know something about alternative tuning frequencies.

F/P
Formant preservation is a feature which preserves the tonal qualities of the human voice through changes in key avoiding the so-called “chipmunk effect.” F/P is automatically adjusted when changes in key are made. Version 5 allows the user to Turn F/P On or Off for for optimal results. If a file does not have vocals in it we recommend that F/P be turned Off.
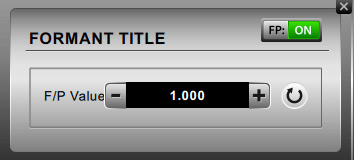
Click the F/P label to open the submenu and enter a precise value. By default F/P is set at 1.000 when there is no key change. As key is changed you will see the calculated correction value for F/P in this submenu. Users may use the +/- buttons or click and type directly into the box to change the value to achieve different results.

Loop Submenu
The Loop Menu is a simple On/Off toggle, and is on by default. When loops are on, the area between green and red loop lines will be shaded green and all of the loop settings will be applied as the loop plays. When loops are turned off, the loop area is the same color as the rest of the waveform, and all loops are bypassed.
The Loop submenu is opened by clicking on the “Loop” Text at the bottom of the Loop menu area.
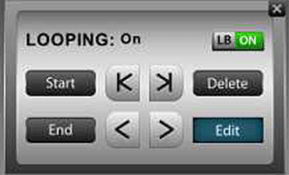
The Loop Submenu has the following controls:
In order for this submenu to work a loop must be selected. A loop is selected when the white progress indicator is within a specific looping area.
Use the upper set of arrows to jump between loops, and use the lower set of arrows to jump to the beginning and end of the current loop.
There are also loop “Jump To” arrows in the upper right hand side of the UI that can be used For jumping forward or backward to the loops that have been created. (see also Loops)
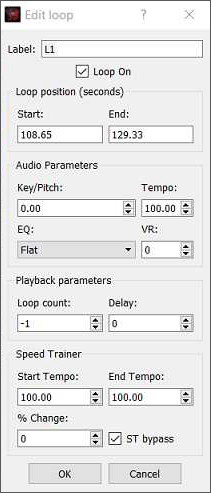
When a loop is selected by placing the progress indicator within the loops boundaries, and you click the Edit button from this Loop Submenu, you will open the dialog window shown to the immediate right. From this window you can change the details of this specific loop. These details are reviewed below.
Change the label or name assigned for this loop.
Unchecked by default. Checking this box will bypass the current loop; when this is selected the shading or highlighting of the loop area will disappear signalling that this loop is off. Playback will apply global settings (if any) to this area that was previously a loop. De-selecting the checkbox will again activate the loop and its settings.
Change the key of the loop, the tempo of the loop, the equalizer settings for the loop, and the vocal reduction (VR) of the loop. Vocal reduction is an algorithm which attempts to isolate the vocals of a track and reduce their volume. The recommended setting for this, if desired, is 128; experimentation will be necessary to find the optimal setting for any particular audio track. See VR for more information.
Loop count is the number of times that the loop will play. The default is -1, which loops infinitely. By changing this to a postive number you can control the number of times the loop plays. If you assign a positive number, after playing the specified number of times the audio will continue playing past the loop. Delay sets the time, in seconds, between loops. Setting delay to 5 will leave a five-second gap between the end of a loop and the beginning of its next playthrough.
The Speed Trainer is a useful feature designed to allow a musician to practice a passage at gradually increasing speeds. Select the start tempo, the end tempo, and the “step” (all in percentage), and the Speed Trainer will play the loop until it reaches the end tempo, increasing by the step with each loop-through. For example, selecting 50, 100, and 5 will begin the loop at half the original speed, and increase the tempo by 5% on each playback until it reaches the original speed. This feature can also be used in reverse, to slow down a loop gradually. The “ST Bypass” checkbox, which is checked by default, turns this feature off. That means if you'd like to use the Speed Trainer you must uncheck this box to allow Speed Trainer to run.
There is one additional place to find loop details. This is a menu that is opened when your right click while hovering your mouse over a beginning or ending loop point. When you do this the following options, briefly discussed below an be seen.
Delete all loops applied to the current audio file.
If this option is checked, hovering the cursor over a loop marker will display a window with all the loop information. These details can all be changed by using the “Edit” menu.
Change the font size for loop labels. Useful if a label is too long to read at the default font size, or too small to see clearly.
Algorithms
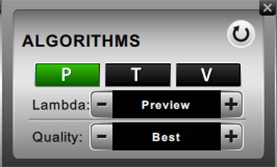
Though not new, we have reorganized this control. As you will see the Main Algorithm menu shows 3 different default algorithms that can be used. As a user toggles between these settings the changes are made in real time. The P setting or Performance is normally the better choice when you are changing key or tempo by small or modest amounts, viz. +/ - 15%. If you are making more substantial changes especially with regard to tempo, the T algorithm is normally the preferred one. Lastly V or voice is more suited to voice only recordings or monophonic (single instrument) recordings.
Clicking on the Algorithms text label at the bottom of the Main menu, will open the Algorithms submenu.
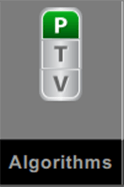
Use the P / T / V buttons to toggle between the three algorithms available. Use the reset button to switch back to the default. The algorithm submenu shows the underlying setting used for each of these three algorithms, identified as Quality and Lambda.
Users are free to choose other selections if they feel the default settings do not provide adequate quality. Using P as an example, please note that for this setting we use the highest Quality setting (Best) but a Lambda value of Preview. Within Lambda there are several other settings, especially L3, L4, and L5 which may be of interest. These are optional polyphonic settings which may provided slightly better quality.
Please note that these additional Lambda settings take much more CPU power and, when selected, may cause a stuttering in playback as Song Surgeon changes these settings and applies them in real time. Whether you encounter this issue will depend upon the CPU power of your machine. If you experience this stuttering we would suggest you pause playback for 20=40 seconds to allow Song Surgeon to continue processing this new setting. After this brief pause, start SS playing again and now playback should play normally (unless playback catches up with the SS’s ongoing processing).
Vocal Reduction (VR)
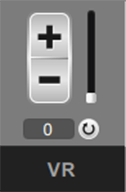
Vocal Reduction can be applied to a loop, multiple loops or an entire song. This menu item has a simple slider that you can adjust from 0 to 256. Typically a good place to start is by moving the slider to approximately the center range, around 128, and then proceed from there. The slider ranges from 0 (off) to 255 (highest setting). Experimentation with different slider positions will be required to find an optimal setting for any given audio file. Change the setting by clicking and dragging the slider, using the plus or minus buttons, or clicking the numeral display box and typing in a value directly. VR settings, if used, are saved as part of a Song Surgeon project and are also applied to an audio file if it is exported. Use the circular arrow button to reset this value to 0 (off).
Because most commercial songs today are “mixed down” from many (sometimes dozens) of tracks, it is difficult for the VR on its own to remove vocals effectively, unless vocals are panned to the center. In these cases VR is quite effective in removing vocals on its own. These songs are the exception though, not the rule.
The VR slider may also be useful when trying to isolate or remove instruments other than voice.
Moreover, when combined with the 31 band EQ, these two in tandem can be a very effective and
useful
tool. Please see the following page on our website which provides more details and please watch
the
video on this page to see how to use these two tools together to achieve good results.
https://songsurgeon.com/page/vocal_reduction.html
Metronome
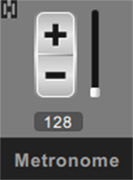
The metronome function is new to Version 5. The metronome, by default, is synced to the detected BPM of a song. The vertical slider next to the +/- buttons is a volume slider. You can adjust the volume of the metronome so it can be heard during playback. When in the down position the volume is turned OFF or muted and silent.
The metronome is not only synched to the BPM it is also locked to the BPM. That means that if you change the tempo of the song in the tempo area, the metronome value will change to this new tempo to always stay in sync. The metronome only plays when the song is playing. If you stop or pause the song, the metronome also stops.
Users have the option, to unlock the metronome by clicking the small lock icon in the upper left hand side of this control. When this is done, a small, fine red line appears signifying that it is unlocked.
Once unlocked you will notice that the +/_ buttons now work to adjust the tempo of the metronome. In addition you can also click in the area where the metronome value appears and edit this value directly.
While unlocked the metronome value can be changed to any desired value, and can be heard by increasing the volume slider. This allows the use of the metronome at any desired tempo.
In this unlocked mode the metronome will play constantly, regardless of whether a file is playing or paused or stopped. The only way to stop the metronome in this case is to silence it with the volume slider.
Once you relock the Metronome function, the metronome will again sync to the BPM of the open song.
Foot Pedal Support

Song Surgeon provides a foot pedal interface for hands-free operation for several of the key
playback functionalities. Currently Song Surgeon utilizes the Infinity, IN-USB-2 foot pedal, via
a
USB connection. A picture of the foot pedal is shown below. The Foot pedal interface is only
supported in the Professional model of Version 5.
The Infinity Pedal has three switches or pedals. The center pedal can be used to Start and
Stop the playback of the currently open audio file. The left pedal has two functions. When
depressed
once ( a single click ) it rewinds the playback to the BEGINNING point of the current loop. If
double clicked, it causes the current position to jump BACKWARD to the BEGINNING point of the
next
previous loop. Subsequent double clicks will again cause the progress indicator to jump out of
the
current loop and BACKWARDS to the previous loop until there are no more previous loops.
Similarly, the right button of the pedal when depressed ADVANCES the playback position to the
next
BEGINNING loop point, and with subsequent clicks of the pedal continues to ADVANCE to the next
BEGINNING loop points until there are no more.
The table below displays keyboard shortcuts for common operations in Song Surgeon.
| Open | Ctrl-O |
| Save | Ctrl-S |
| Save As | Ctrl-Shift-S |
| Cut | Ctrl-X |
| Copy | Ctrl-C |
| Paste | Ctrl-V |
| Undo | Ctrl-Z |
| Redo | Ctrl-Y |
| Delete | Del |
| Insert Silence | Shift-S |
| Change Volume | Shift-V |
| Silence Highlighted Section | Shift-L |
| Delete All Loops | Ctrl-Delete |
| Play/Pause | Space Bar |
| Move Position Needle to Start | H |
| Add Start Loop at Position Needle | B |
| Add End Loop At Position Needle | N |
| Add Marker At Position Needle | M |
| Jump To Start of Loop | , (comma) |
| Jump To End of Loop | . (period) |
| Jump To Previous Loop | L |
| Jump To Next Loop | ; (semi-colon) |
| Zoom in 2X | Arrow Up |
| Zoom Out 2X | Arrow Down |
| Scrub Back 0.1 secs | Arrow Left |
| Scrub Forward 0.1 secs | Arrow Right |
| Nudge Marker or Loop Left 0.1 Secs | C |
| Delete Current Loop | Shift-Delete |
| Nudge Marker or Loop Right 0.1 Secs | V |
| Scroll | Control-Left-Mouse |
